Cue the Etta James: at last, my typewriter has come along. Thanks to help from friendly typospherians, this old green gal is typing. Check out my mad hunt-n-peck skillz:
I am very glad that I am not a touch typist because this three bank keyboard would really throw me for a loop.
Over the last couple weeks, I’ve posted details: initially her carriage wasn’t advancing on typing. Thanks to a suggestion from Tyler of Words Are Winged, I tightened a hooked nut under the machine and suddenly her space bar became responsive and the carriage advanced as I hit the space bar.
The carriage still wasn’t advancing when regular keys were struck, so I posted a request for functional Oliver No. 9 photos on the Typewriter Talk forum.
I was beginning to appreciate the subtleties of the machine’s construction – the tightness of a single screw or nut can mean the difference between a functional machine and a dead one. Perhaps that sensitivity was amplified by residual rustiness or gumminess in my outwardly cleanish machine. For the last couple weeks I have been playing whack-a-mole: making adjustments underneath and improving responsiveness of the keys but losing the space bar and vice versa – or losing responsiveness all together. It was all blind fumblings. I needed pictures.
A helpful member of the Typewriter Talk forum posted photos of his functional Oliver No. 9 and I used them as a guide for making adjustments under my machine. My typewriter began to wake up.
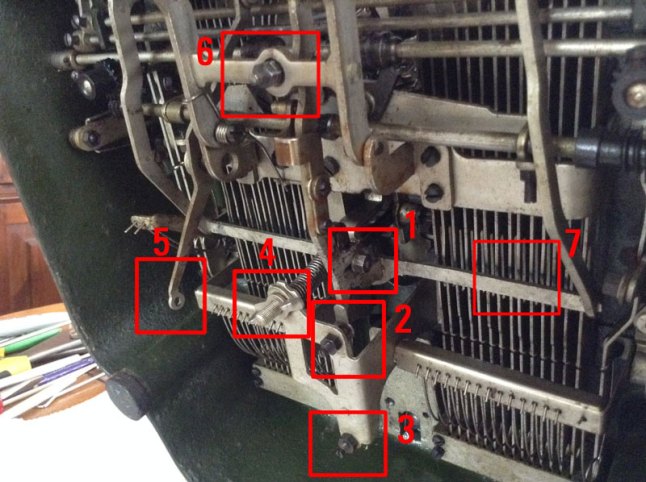
I found that my universal bar (area #7) wasn’t close enough to the type bar levers. My space lever nut (area #6) was too tight. I loosened my space lever nut a tiny bit, adjusted the position of the nut in loop of area #1 and adjusted the height of the spring board in area #2 (“Supplemental Spring”). At last. The key strikes began to trigger the escapement and the carriage advanced.
UPDATE: On the advice of Martin Rice (THE Martin Rice), I increased tension on the spring under the universal bar (area #4) by first loosening the wingnut and then by turning the flower nut to compress the spring. This improved reliability.
I doused everything in PB Blaster (underside guts, key levers, ribbon vibrator, escapement) and set it outside for the night. The next morning it was even better – a cleaner crisper response and more reliable escapement trip. My conclusion: my machine was out of adjustment and gummy /rusty and once those two things were corrected, it began to respond.
Gary Bothe’s restoration of an Oliver 2 is an amazing read. Of special interest, is the section on calibration. In it, Gary Bothe describes a “delicate dance”:
“The activation of the ribbon transport and triggering of the escapement is a delicate dance involving two things, the adjustment of the “hook” connecting the universal bar to the space bar levers, and (on my machine) the setting of the two “mystery springs” arching up under the universal bar from below. These springs are evidently there to cushion the blow of the type bars as they reach the platen, and their adjustment serves as a form of “touch control.” The only time they are activated is when the universal bar contacts them at the end of a type stroke. I found that the machine feels rough and clattery when these springs are adjusted down until they are out of reach of the universal bar, but the touch gets excessively heavy and escapement becomes unreliable when they are too high and are adjusted too tightly. I ended up setting their height so that the universal bar encounters their resistance when the type slugs are about one centimeter above the platen, and then setting the tension (via the bridge screw on the bottom of the frame) to give the best feel. Of course, not having access to the wisdom of the original designers, my approach is strictly trial and error. I encourage you to play with these settings yourself and come to your own conclusions.”
I still need to make some adjustments to my Oliver. The escapement is still not 100% reliable: it will fail to trip here and there.
I have been watching Words Are Winged’s re-assembly of an Oliver with great interest. I would like to see how he calibrates his machine for best touch and reliability.
I am thinking about getting another Oliver to take apart and reassemble ala Words Are Winged. I love how open, visible and accessible the parts of the Oliver are – perfect for a novice tinkerer like myself.
Here’s a little Etta James for your Monday:

Congratulations on a successful revival of a deserving machine! You will find that Oliver’s are, type-bars down, one of the more entertaining machines to type on.
LikeLike
Thank you again for your very helpful suggestions – they helped nudge me down the adjustments track.
LikeLike
Great! I look forward to seeing what it can do with a ribbon.
LikeLike
I threw a ribbon in it yesterday – I had some some problem with the ribbon not advancing, but fixed it (a little springed tooth on a ribbon transport gear was badly positioned). Some of the typebars are very bent but it’s readable.
LikeLike