Last week, I got a text from a local typospherian about a couple typewriters that needed a clean-up and fix. Was I interested? Of course!
Jean is a teacher with a deep love of typewriters. I rehabbed a distressed Lettera 22 for her that has become one of her very most favorite typewriters.

Jean and her Lettera 22
Jean arrived with a lovely SM8 – it ‘s just a little gummy and will clean up nicely.

She also had a Remington Portable with issues. Most obvious were a broken drawstring and a typebar that was sticking up. I pulled the carriage gently to the left and tested typing. It seemed to work.
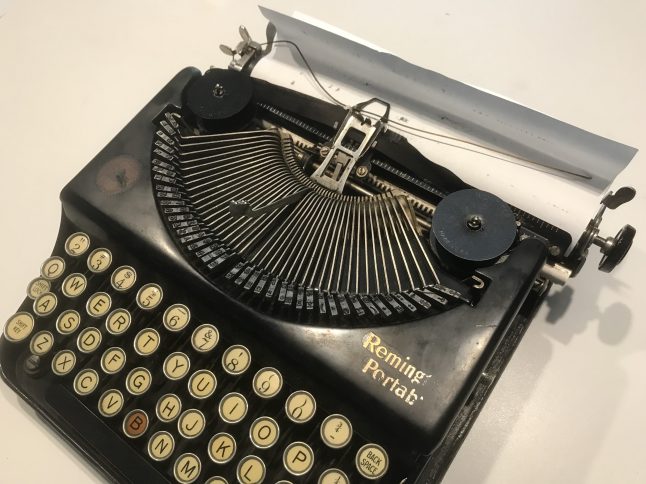
This little thing is a Remington Portable #1 from 1922, the dawn of portable typewriters with standard four-bank keyboards.
I have a confession to make: Remington portables of this ilk kind of FREAK ME OUT. I see them a lot in antique stores, but they make me uneasy. I vaguely remember an orchid-colored Porto-Rite I came across a few years ago that I was almost too afraid to even touch; it was so beautiful and so strange. Try as I might, I couldn’t get the typebars up, so I backed away from it cautiously, careful not to make any quick movements.

These old Remington portables are not typewriters that I understand right out of the box. I have to familiarize myself with all their weird little controls by paging through the manuals and watching instructional videos.
First up: The carriage lock. To disengage it, you pull out the right platen knob. Weird, but OK. To get it back into its case, you have to pull forward an obscure little locking lever behind the left carriage release lever, push the right platen knob in and move the carriage until it clicks and locks in the center. Got it? If you don’t lock it, it may not fit in its case and you might damage the right platen knob and scrape up the inside of the case.
Next, to get it to type anything, the typebars need to be in the freaky upright typing position achieved by raising them with a lever. Ready: 1, 2, 3…

FREAK OUT!

Note that the “@/¢” slug is broken. The #1 doesn’t have the curved typebar guards on each side that the #2 has for protection.

This just seems dangerous. How did so many of these survive 90-100 years with this sort of fragile set-up? Also, someone might poke their eye out here. Won’t someone please think of the children?
On top of that, I kind of freak out because at first glance I think I’m missing parts on this #1:
- There’s no left platen knob! What the heck!
- There’s no carriage release lever on the right! That’s a paper release lever!
- There’s no carriage return lever! On these early ones, you use a little pinch mechanism to return the carriage and advance to the next line.
- There are a couple small and easily overlooked metal tabs for the margin release and the line spacing.

It’s so primitive and so weirdly complicated at the same time. Type-writer.org has an excellent post on features of early Remington Portable #1s. There seems to have been a lot of experimentation, evaluation, addition, and revision in those early days.
Richard Polt’s Classic Typewriter Page has a very good run-down of early Remington portables. He estimates that 400,000 Remington Portable #1s were made between 1920 to 1925. They were very popular and Remington followed up the #1 with several successful portable models.
Per Richard P.’s Remington Portable page, some of the early Remington portables had 2-letter, 5-numeral codes: the first letter represents the typewriter model, the second letter the month of manufacture, and the first numeral represents the year of manufacture (e.g “3” means 1923).
Jean’s Remington has a serial number of NZ27886 meaning that it is a 1922 Remington Portable that was made in the month of November.

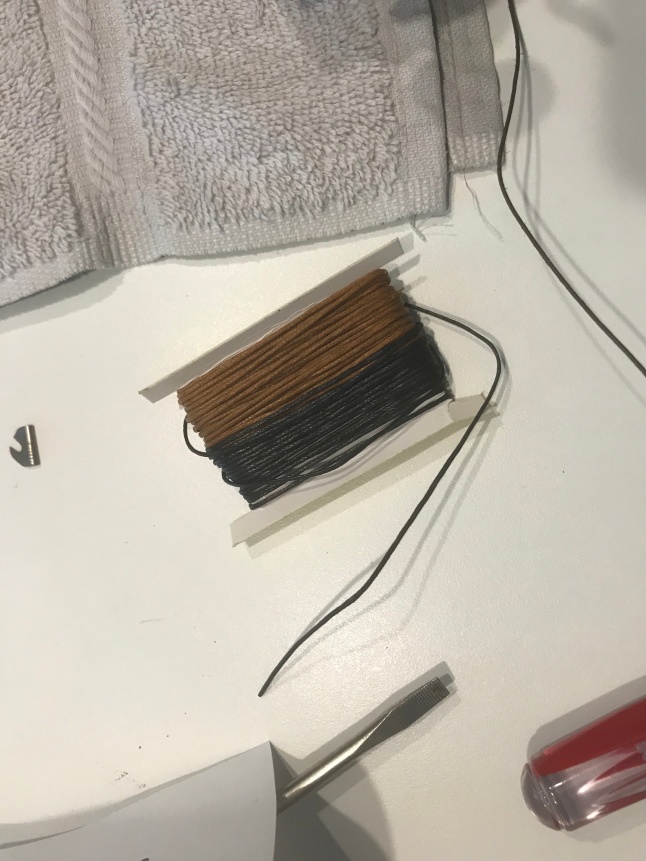
The first thing I wanted to address was the busted drawstring. I had to take the base plate off to access the machine from beneath. On this typewriter, there are four screws on each corner that hold the typewriter to the base that need to come off.

The drawstring has a slightly unusual set up, so I was very glad that I watched the Duane Jensen’s Phoenix Typewriter video for the drawband repair. I used heavy duty craft thread for my repair. I think I found the thread in the jewelry department at Michael’s craft store.
There’s a little clip on the end of the carriage where I secured the end.

I used a bamboo skewer and threaded the draw string through to the mainspring area.


Here comes the drawstring on the bamboo skewer
There’s a little clip and a pulley that the string needs to go though:

I took Duane’s suggestion of indicating with an arrow the winding direction of the mainspring. It’s easy to get confused and wind the wrong way. I wound the mainspring five complete turns and wedged a pointy tool into the mainspring to hold it in place while I made a big knot in my new string.

The moment of truth: it types!
We need a new ribbon here. Take a moment and watch Typewriter Justice’s video on Remington Portable ribbon changing. It’s a little complicated, and you want to make sure it’s wound on the spools properly or it won’t feed.

Let’s put some paper in and get to typing!
*silence*
Oh crud. I couldn’t feed a sheet of paper in. The four rear feed rollers were hard as rocks and square in shape. Ugh! The four front feed rollers were OK – a little hard, but mostly round and moving. I finally managed to scoot some paper in by engaging the paper release lever and slipping it around the platen. This typewriter typed very nicely but it was unusable with those square feed rollers. I will deal with this later, I told myself.
I decided to address the typebar that was sticking straight up.

What is your major malfunction?!
Sometimes there’s something jammed under a typebar that will prevent it from laying flat. Sometimes there’s something bent.
There was something bent. A key lever was bent and hanging up on the lever next to it.

I straightened out the lever carefully and the typebar then rested comfortably with his peers.

It was time to take care of those rear feed rollers. Once again, Duane Jensen from Phoenix Typewriter had two very helpful videos. One video demonstrates rear feed roller replacement. The other video shows how to remove the platen from a Remington portable. I wanted good access to the rear feed rollers and I wanted to clean the platen and under the platen. A lot of dusty gunk was kicking up from underneath it and dirtying the paper.
I took off the top cover by removing two screws on each side. I did this for cleaning purposes.

I then removed the set screw that held the right platen knob on.

I pushed the platen rod through the platen from right to left (if facing the front of the typewriter) and had to use a pair of pliers to pull it out.

I loosened the two screws that held the line gauge just a tiny bit and pulled out the line gauge.


I loosened the screw that holds the scale just a tiny bit so I could pull out the platen without bending it. Don’t take the screw all the way out because there is a wacky triangular nut behind that will slip out and get lost. I don’t know if I needed to do this on the #1 – the platen came out very easily.

Wiggle, wiggle, wiggle and out came the platen.

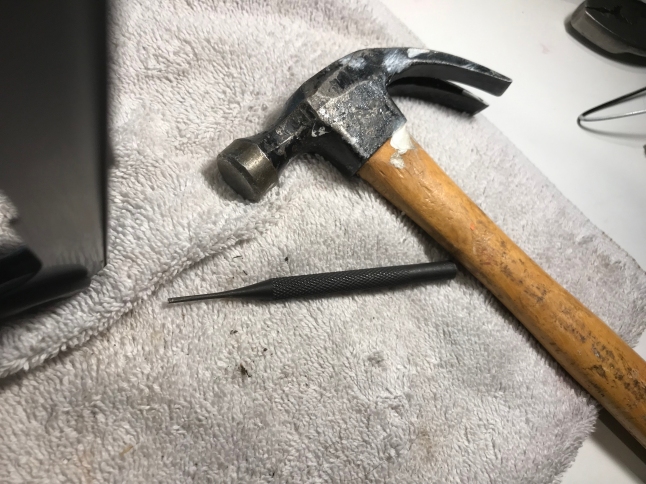
Removing the little rods that hold the feed rollers in is tricky. Backspace Does Not Erase does beautiful work on Remington Portables, and I have found his blog an invaluable resource during this project. He has a good picture of how the feed roller rods should be removed in his post on dismantling a Remington Portable. There are a total of eight feed rollers: four in front and four in the rear. I’m going to fix the rear four. On this 1922 Remington, there are two rods in back, each holding a pair of rear feed rollers. One end of the rod is knurled to hold it in place and you have to tap the rod out in the direction of the knurled end or it won’t budge.

Rear feed roller rod. Backspace Does Not Erase’s photo shows direction of front and rear feed roller removal.
I used a hammer and a thin punch to tap the rod out part way. I then wiggled the rod out all the way with a pair of needle nose pliers.
I learned after the fact that removing the feed rollers is a lot easier if you remove the paper tray which is held in place with a couple small rods. Here is an excellent description of how to remove the paper tray.
I carved the old hardened rubber off the center brass core of the feed roller and then polished up the core with #0000 steel wool.

I bought a foot of rubber tubing at the auto parts store for about $1.50. It had an inner diameter of 7/32″ and an outer diameter of about 3/8″.

Though it fit snugly over the brass core of the feed roller, the resulting outer diameter was a tad larger than the original feed roller.

I made four new rear feed rollers, popped them in and hoped for the best. I cleaned the platen and reinserted it. The platen rod required a lot of wiggling to get it to slide through (left to right if facing the front of the machine). Once everything was re-assembled, I tested.
The new rear feed rollers work great. They grip the paper solidly. The platen turning is a just a hair tight, but this is more than good enough. That paper feeds so nicely.

I finished cleaning up the typewriter and scrubbed the type with mineral spirits and a brass brush.

Minty clean

I am now thoroughly charmed by this strange little thing. I’m not freaked out anymore. It’s missing the “@/¢” slug but is otherwise a nice lil typer.

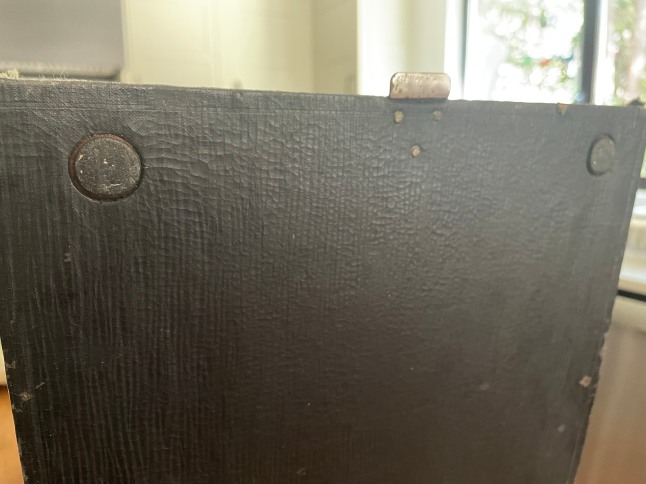
I have another Remington Portable, a #2, in the queue. The decals are still very nice on this one.

It has a tragic platen.

I’m going to clean this up and recover the platen on this #2. I feel so much more confident now that I have worked on the #1.
One last thing. I have a theory about Remington Portables with random orange keys you see here and on Typewriterdatabase.com. Oil got in under the key tops and darkened the yellow here and there. I actually like the warm, orangey punches of color. Anyway, that is my theory. Thank you.

One more last thing: does anyone know the meaning of the T/S symbol on this key? It’s on the Remington Portable #2 I am starting to clean up. Could it be a currency symbol (since it’s next to the “$” and “£”)?

Here’s the last, last thing: Antikey Chop sells a Remington Portable #1 manual digital download in his Etsy shop and there’s a Remington Portable #2 instruction manual in Richard Polt’s manual archive.

Wow! I’m impressed & grateful. Thanks for sharing every puzzle & eventual solution with us – and thank you for bringing the lovely Remington back to life!
I will continue to scour thrift stores & estate sales, searching for more typewriters in distress!
Cheers,
Jean
LikeLike
Thank you for entrusting it to me. I learned lot on this project – and developed a taste for Remington Portables.
LikeLike
Wonderful work! I suspect the worst that will happen with an extra 4mm on the feed rolls is they’ll flatten easier as they age (more pressure on them). (:
LikeLike
Oof! I hadn’t thought of that. Hopefully they have a few years before they flatten and become unusable. I was really looking for 3/16″ inner diameter and 5/16″ outer diameter for the back feed rollers, but 7/32″ ID and 3/8″ OD was all they had at the place down the street. I am trying heat shrink tubing on the Remington Portable #2 I’m now working on.
LikeLike
Again, thanks for sharing a wonderful piece of writing with the rest of us. Although I don’t have a Remington portable yet, I found particularly interesting the way you built the new feed rollers. That must apply to other machines as well.
LikeLike
I have another Remington Portable #2 that I am working on right now. It needs the front feed rollers recovered. I am going to try heat shrink tubing, building up layers to the right diameter. Stay tuned, as I will write up a report on that.
LikeLike
Congratulations on the fine repairs. Nice detailing of the parts and repairs. I do not know when Remington went away from the funky carriage lock system, but even my 1947 Noiseless 7 has it.
By then Remington did get away from the need to squeeze the left hand carriage lock levers to set it.
You are having the same repairs about a month after my first delving into a Portable 1 and a Portable 2. My Portable 1 only needed a cleaning, but the Portable 2 needed a mainspring and draw cord. They are fun little machines to work on. Doing some repairs though require a split screwdriver (like removing the drum) or snap ring pliers with the proper tips.
There must have been a lot of machines damaged because Remington added the hooks (Mean looking little things, but functional) to the ends. Proper name is type bar protectors according to the operating manual.
These are actually fun little typewriters to use.
LikeLike
During this project, I have developed a deep affection for these Remington Portables. They are lightweight, easy to handle, with very accessible guts. Love, love, love working on these. Fortunately there are lots of online resources for them too. I have learned so much about specialty fasteners and specialty tools since working on typewriters – just googled snap ring pliers.
LikeLike
That T/S symbol isn’t any currency symbol that I can find, past or present! Are there any other special characters on the keyboard that might provide a clue?
LikeLike
It’s otherwise a garden variety keyboard – it does have a “£” character which made me wonder if the T/S was a currency symbol from a former British colony.
LikeLike
It’s a good working theory, but I can’t find any evidence to support it, unfortunately.
Another oddity of this keyboard is that it appears to have an equals sign without a plus sign.
LikeLike
Weird! I hadn’t noticed that.
LikeLike
A standard UK typewriter keyboard doesn’t have a $ on it. This makes me think that this is a keyboard for a British colony of which there were a great many e.g. Tanzania. Could it be a Tanzanian Shilling symbol? Are there any other labels on the machine that give clues? I have a Torpedo 18b that has an international keyboard as it was originally sold in Hong Kong. It has both a $ and a £.
LikeLike
It might be a Tanzanian Shilling symbol. Your reasoning that the typewriter came from a British colony is good.
Here is the complete keyboard:
One commenter pointed out that there is an equals sign without a plus sign.
LikeLike
The Tanzanian shilling wasn’t introduced until 1966.
LikeLike
Too bad! Back to square one.
I am going to look into currencies of former British colonies in Asia. I am not even sure that the “TS” is a currency symbol, but its proximity to the dollar sign and pound sign on the keyboard are sending me in that direction.
LikeLike
Could it be that the missing + sign was replaced by the TS symbol as a retrofit? It does look more like T$ with one character on top of the other. Taiwan dollar?
LikeLike
The TS symbol doesn’t appear to be a retrofit – the key top and the soldering on the slug match the other keys.
In the 1920s, Taiwan was under Japanese rule and using the Taiwanese yen (at least according to Wikipedia):
https://en.wikipedia.org/wiki/Taiwanese_yen
I am plunging down a rabbit hole of international currency history.
LikeLike
I think that’s a really fun rabbit hole, but then I’m a big ol’ nerd!
LikeLike
Nerd! 😀
I enjoy this kind of thing too.
LikeLike
The reason why I thought of a retrofit is that I have a 1943 Royal Aristrocrat with a US keyboard but with the # replaced by a £ on the 3 key. The font of the 3 on the keytip is slightly different & you can see that the typeslug has been cut in half with a £ soldered onto the top half. I assume this was done either during WW2 or not long after.
Are there any dealer labels or similar on the machine? The Torpedo 18b I have which also has a £ & a $ has a dealer label in Hong Kong. The Torpedo was marketed as the Bluebird in the UK for obvious reasons. Your keyboard does look a lot like the Hong Kong one. The fraction keys are also a feature of Britishesque keyboards. I have no idea why fractions appear so often when there are other more useful symbols!.
LikeLike
No dealer labels.
I’ve heard some theories that there are lots of fractions on British keyboards because of pre-decimal British money:
http://www.historyhouse.co.uk/articles/old_money.html
LikeLike
Excellent! Turns out that farthings (1/4 penny coins) were minted until 1960. I hadn’t known! I can’t think of any other likely reason for the presence of 1/4 and 3/4 fractions on British typewriter keyboards.
LikeLike
I’m not convinced about the pre decimal money being the reason for all the fractions as there were 12 pennies in a shillings & 20 shillings in a pound and it was always expressed in the form lsd e,g, £1/2/3 which is 1 pound 3 shillings & thrupence. There was a thrupenny bit 3d coin. More likely in my view was the general non decimal nature of weights & measures. In the 1960s we spent many many hours in school learning how to do fractions which was pretty much totally superceded by decimals when we went metric in the early 1970s. We still use a mixture of imperial & metric. It’s quite normal to ask for half a pound of mushrooms on a street market veg stall even though the scales are in metric & imperial. It’s always a pint of beer but petrol is sold by the litre. The British just cannot let go of the past.
Given that you can show fractions as 1/2 or 3/8 etc using key combinations it seems to me that it would have been more useful to have more punctuation marks. Surely a 1 or ! has to be more useful than 5/8!
Getting back to the odd character, could it be a ligature or other form of digraph?
LikeLike
The fractions wouldn’t be used for fractions of a shilling or a pound, but they would be needed for fractions of a penny, i.e. 1¾d. for 1 penny, 1 ha’penny, and 1 farthing. There are examples of this notation at the historyhouse.co.uk link that Mary provided.
LikeLike
True but what about 1/3, 5/8 and the rest? The farthing went out of circulation well before the typewriter although the 1/2p lasted until a few years ago. I can see that the fractions might have had a use in finance i.e. stocks & shares & for interest rates but they weren’t relevant for most people.
It often seems that fractions are added to just to use up keys!
LikeLike
I am going to peruse the British-made Imperials at TWDB and see what kind of fraction collections they have. Rob B.’s Imperial 55 has a large assortment:
https://typewriterdatabase.com/1948-imperial-55.2486.typewriter
LikeLike
According to this article, there are only three countries in the world that don’t use the metric system: the US, Myanmar and Liberia:
https://www.smithsonianmag.com/smart-news/america-has-been-struggling-metric-system-almost-230-years-180964147/
We Americans are really stuck in the past: I measure using inches, feet, yards, miles – and cups, pints, quarts and gallons as well as ounces, pounds and tons. I know: it’s very old-timey.
I will be at Herman’s Typewriter Jamboree in October, and I will ask the great thinkers and researchers of the typewriter world their theories on the fractions on British typewriters. We’ll see what they have to say.
Regarding the strange character, a ligature is an interesting possibility – though I am not finding one that looks like the T/S symbol.
LikeLike
Looking at a 1970s Smith Corona GT and it has 1/4, 3/4, 1/8, 3/8, 5/8, 7/8, 1/2 but no !, 1+, =.
The TS does look a bit like the medical symbol.
LikeLike
Medical – hmm, that’s an interesting option. It does sort of look like a caduceus.
LikeLike
TS…..the symbol means Tout Suite….in other words ASAP. If you look up Tout Suite symbol, you’ll find it.
LikeLike
Interesting! I will add “Tout Suite” to the theory hopper.
A likely explanation for the TS symbol is “Shanghai tael”. A native of Shanghai, China reports that he has three typewriters with this same symbol and it is understood to be a currency symbol from the pre-1945 era.
LikeLike
Yes, I think Shanghai Tael is it! Great work.
LikeLike
As a (pedantic) French speaker, by the way, the correct spelling is “tout de suite” (meaning “right away”). But apparently it’s been used in English as “tout suite”, which I didn’t know.
LikeLike
Oh, funny! The English language has a reputation for borrowing rather haphazardly from other languages, but that’s pretty bad – it would grate on me if I were a French speaker.
LikeLike
What date is teh Remington No.2? The tael was replaced in 1933.
LikeLike
By serial number, it’s a 1925 Remington #2.
LikeLike
Well, case solved.
Shanghai had an international settlement where the British were prominent so a £ sign makes sense.
Shanghai in the 1920 & 1930s was a lively place. I’ve just read a book about a Soviet spy called Sonya https://en.wikipedia.org/wiki/Ursula_Kuczynski who lived in Shanghai in that era and worked as a Soviet spy. She later lived in England which she left for East Germany in the 1950s as MI5 were closing in.
It’s an extraordinary story: https://www.amazon.co.uk/Agent-Sonya-Lover-Mother-Soldier/dp/0241408504/ref=sr_1_1?crid=31Z8KYPAFLJCS&dchild=1&keywords=agent+sonya&qid=1602518834&s=books&sprefix=sonya%2Caps%2C137&sr=1-1
LikeLike
Agent Sonya’s story sounds fascinating – I may have to add it to the book pile.
LikeLike
https://en.m.wikipedia.org/wiki/Ground_glass_joint#Conically_tapered_joints Perhaps?
LikeLike
Another symbol suggestion to put in the hopper!
I agree with Richard Polt that “Shanghai tael” seems the likeliest meaning of this symbol given the £ and $ nearby on the typewriter. I had many comments on a follow-up post:
https://myoldtypewriter.com/2019/10/06/platen-regeneration-remington-portable-2/
One commenter noted:
LikeLike
Thanks for a great reaad
LikeLiked by 1 person
Vielen Dank! 😋
Sitting in Germany, I just found an old ‘Portable’.
‘Made in U.S.A.’
But, with a German keyboard. ☺️
I’m going to restore,…CLEAN IT(!). 🤓
….this article REALLY inspired me.
Danke.
Gallagher Hayes
LikeLike
So happy to hear from you from over the seas and congratulations on your little Remington! Do check out Richard Polt’s very interesting article on Remington Portables:
https://site.xavier.edu/polt/typewriters/rem-portables.htm
LikeLike
Hi! I found this (wonderful) blog while researching a 1928 Remington Portable #1 I had the good fortune of finding. Thank you for your level of detail.
My typewriter is in surprisingly good condition, but the case is disintegrating. When I unscrewed those four screws holding the machine to the bottom plate, an enormous amount of hard rubber chips fell out. I’m guessing they once were rubber washers, which are easy enough to replace. My question: Did the typewriter itself have feet? Was it intended to be removed from the plate for use on a table, or would one leave it screwed in (like a SC Skyriter) and the case base was its base too?
LikeLike
Hi Zachary – congrats on your Remington Portable! Those chips are probably the old feet/grommets/washers. Some years back I had a Remington Portable #2 with bad feet and I ordered replacements from a gentleman, Steve Dade, who, sadly, has died.

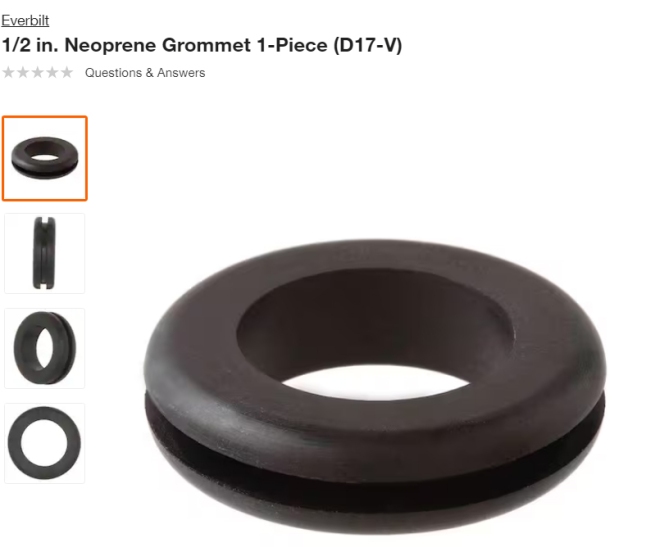
You can use rubber grommets that you find at the hardware store instead – perhaps 1/2″ inner diameter (though you may need to experiment with sizing):
Here’s a video from Phoenix Typewriter that you may find helpful:
Here’s another video from HotRod Typewriter with a feet fix:
Also, leave the typewriter screwed to the base when typing. There should be rubber feet on the exterior of base like this to keep it from moving around:
LikeLike
Zachary, Anthony Valoppi at The Type Space in Portland, Oregon fabricates replacement feet for all sorts of typewriters at a reasonable price. You might want to contact him about that. Mary’s suggestion about finding replacement grommets at the hardware store is excellent. I’ve had great results using them to replace worn-out grommets in a Lettera 22.
LikeLike
Thank you, John! I’m glad that there’s someone out there making feet.
LikeLiked by 1 person
Thought you might both want to know. 🙂 Sometimes I think Tony’s whole reason for being, after running his store, is making typewriter feet. He sure loves it!
LikeLiked by 1 person
Thank you both for the info. I’ll try the grommet route first, and if that gets me nowhere I’ll try Tony (I may contact him anyway about feet for an Underwood #3).
Upon further testing of the Remington Portable, the only other snag is that it indeed has platen or feed roller issues, likely both. The platen is a smooth rock, and I’m guessing the feed rollers are similar because the paper slides around while I’m typing. It sounds like the auto parts store is a good place to look for feed rollers, but is there a substitute platen roller source?
LikeLike
Many in the typewriter community have had platens (and feed rollers) recovered by JJ Short and have been very happy with their services:
JJ Short website
I haven’t used JJ Short. I have used heat shrink for completely destroyed platens – and have had good results. Though some say heat shrink is too soft for platens, the material I have used is very hard – almost too hard. Here is a description of the platen recovering I did on a Remington Portable #2:
Platen Regeneration: Remington Portable #2
LikeLike
Hello,
I have this machine and have used it for years with no issues but then today the space bar decided to just stop working. Any chance you know what may have caused it/ how to fix it?
LikeLike
Hmm – that’s a tough one. One possibility (among many) is that something has lodged between the spacebar mechanism and the flat base of the machine preventing the spacebar from fully depressing. You could remove the machine from its base (four corner screws secure the typewriter to the base) and look under the machine for obstructions or something disconnected.
The Facebook Typewriter Maintenance Group is a very helpful crowd:
https://www.facebook.com/groups/typewritermaintenance/
You may want to become a member and see if anyone there has had a similar problem and a fix.
Good luck!
LikeLike