My plan last week was to clean Moe’s Oliver No. 9 typewriter on Monday and Tuesday and get it back to Moe’s shop when she re-opened on Wednesday. I hated to keep the Oliver off her shelves longer than necessary, especially since it was getting so much interest even in its nonfunctional state.
Working against a deadline keeps me focused. I am not a perfectionist – not in the very least. My philosophy is “better done than perfect”, but wow, this Oliver was in rough shape. Could I get it cleaned up and typing in two or three days?

Groundhog Day
Sizing up Moe’s battered No. 9, I experienced a palpable feeling of déjà vu. Moe’s No. 9 had the same problems as my own dear Oliver No. 9, Olive Dammit:
- Dirty escapement – check
- Rusty & corroded – check
- Broken mainspring – check
- Broken drawband – check
- Mashed typebars from a fall on the head – check
Dirty Escapement
I felt that this Oliver could type because the escapement was working when I pulled on the carriage gently to the left with key strikes. It worked in a gummy, dirty, erratic sort of way – and for good reason. It looked like birds were nesting the escapement:

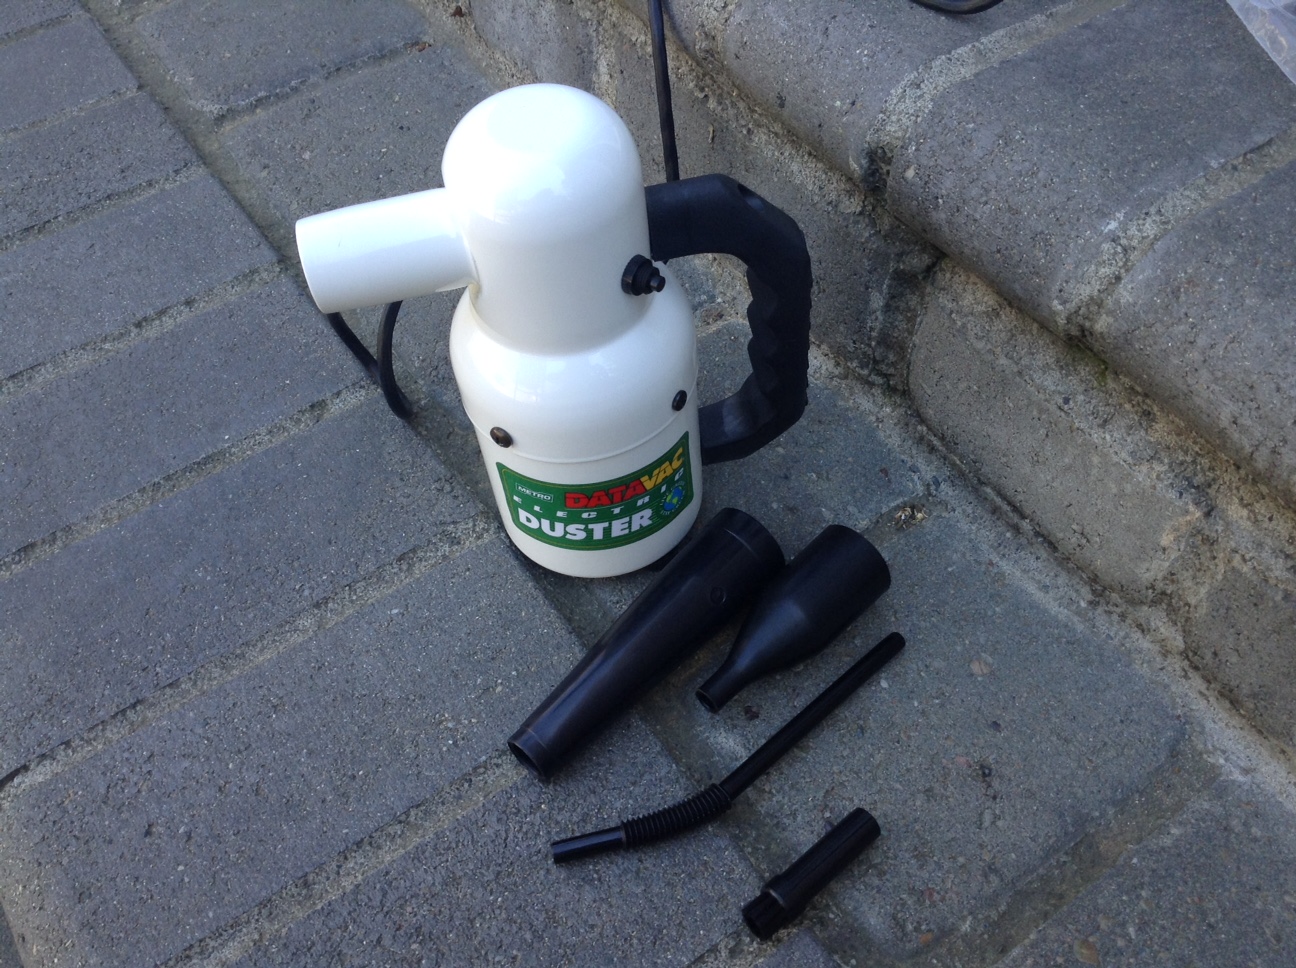
After removing the carriage, I blew out the insides with my DataVac Duster, doctored everything with PB B’laster and things felt a lot nicer.
Rust & Corrosion
I removed the rusty pieces I felt comfortable removing (typebar tower guards, pencil holder, bell and dinger) and threw them into an EvapoRust bath. Unfortunately, there wasn’t much chrome left on the typebar tower guards and pencil holder, so I polished as best I could.
Broken Mainspring
I could barely get the rusty mainspring case open. Yes, the spring was broken:

I carefully removed the broken piece from the case and fashioned a new end for the mainspring center spindle. Here’s a post on how I fixed the broken mainspring on my Oliver a few months ago.
Broken Drawband
The little Oliver drawband hook was missing, so I opted to tie my fishing line replacement to the end of the carriage. I worried that any hook I constructed may not be 100% reliable and I didn’t want to risk it slipping off the machine. I cleaned and lubricated the carriage rails and put the carriage back on. Here’s a post on how I fixed the broken drawband on my Oliver a few months ago.
Bent Typebars
So now with repaired mainspring and drawband, the typewriter could type – if its typebars could move, that is. The typebar towers were mashed, especially the left side. Look at this squashed tower guard and imagine what the typebars looked like:

It should be U-shaped, not V-shaped.
This is a back shot:

I very, very gently re-shaped the bent typebars into their distinctive U shape. This was Uri Geller-level typebar bending: I closed my eyes, visualized a perfect U shape and then gently, gently bent the typebars with my mental powers (bare hands).
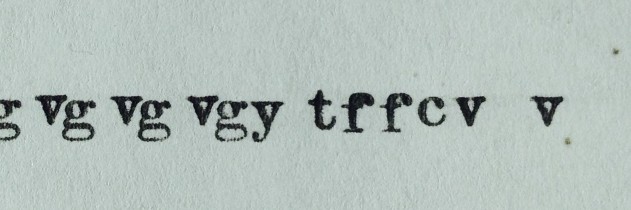
After I got the typebars into a rough U shape, I started fine tuning the text alignment. I first threw a clean ribbon on the machine and cleaned the slugs with a little denatured alcohol so that I could see what was printing out. Olivers use little wooden ribbon cores and spool clips. Winding ribbon onto these wooden spools was slow going for me.

Once I had a ribbon running, I started with the letters in the middle of the machine – they would have suffered the least of the impact when the machine was dropped on its head and would have withstood it best since they are short and stout.
They were level-ish in a very Oliver-centric sort of way:
I used this as my baseline – the rest of the kids needed to fall into line!
I worked my way up each tower, gently, gently bending the type bars with my bare hands hoping to accomplish two things: typebars that cleared each other and straight-ish text. The typebars were initially all over the place – way to high and way too low and bumping into each other, but slowly they started to assemble in an orderly fashion.

Gosh – I love Printype
The letters L, P and the period/comma are still rubbing against each each other in the tower. If the typewriter doesn’t sell this week, I’ll bring it home while the shop is closed and try to make those final adjustments.
The Lady Gorilla
The typebar towers were dragging on the carriage as it rode past, so in a move I call the “Lady Gorilla”, I gently bent the towers up and off the carriage. I figured that if anything broke during this maneuver, I could give Moe my functional Oliver No. 9. Fortunately, nothing broke.
Typewriter Hygiene
Last, but not least, I scrubbed down the shell with warm soapy water, being careful around the decals. Afterwards, I waxed it up. It’s cleaner now, but I preserved as much vintage “character” as possible.
True Grit
This Oliver is no fragile green flower: it has survived 95 years and all the abuse, disuse, rust, corrosion and catastrophic falls that could happen in 95 years – and that thing STILL TYPES! Cast iron twentieth-century Chicago engineering at its best! I can’t get over how adorable these things are. Here she is posing cutely out by the woodpile out back.


The Return of the Native
I took the Oliver back to her home at Moe’s shop on Wednesday morning. Moe was thrilled to see her again and even more happy that the Oliver was a little cleaner and typing. I left the typewriter with care and feeding instructions attached to a carriage knob.
Yesterday, I brought the LC Smith No. 8 to my house for a visit. It has a broken draw strap and other problems that I will try to straighten out over the next couple days.


Another stunning transformation!
LikeLike
I am happy I didn’t break anything in the process and that it’s typing again (abeit wackily)
LikeLike
Honestly, your bravery in gellering them typebars is inspiring I believe that your lack of trepidation is your finest asset 😀
LikeLike
Ha! It was like wrassling an alligator. I am sure that I have horrified the more cautious members of the audience, but when the typebars are that mashed, what are you going to do? It would never have typed again.
LikeLike
Wow, is all I can say. Wonderful job. I can’t imagine having the Zen-like patience to get those type bars formed just right. I think Ted put it best, about your lack of trepidation!
Looking forward to reading about your work on the L.C. Smith!
LikeLike
Thank you – I really should put another hour or two into the typebars – a couple at the top still collide and the baseline is bit too wacky even for me.
LikeLike
Wacky baselines seem to be an Oliver specialty. On a mainstream typewriter it would be impossible to get the characters that far out of line!
LikeLike
It’s actually rather charming to me – this Oliver just needs a little more tweaking to be a bit more readable.
LikeLike
Excellent work! Well done. Keep on that machine, it is working out well.
LikeLike
Very nice job! I’m working on cleaning and fixing an Oliver 9 and I have one typebar that doesn’t want to return to the vertical position. It doesn’t seem to be rubbing against the other typebars. Do you have any advice or can you point me towards information – like a service manual? Thanks!
LikeLike
Friction from rubbing against other typebars or dirt and grime are two things that might prevent the typebar from smoothly swinging and returning to position. Clean all the hinge points and typebars carefully with mineral spirits. A little bit of congealed grease or some grit may be interfering with smooth function. Cleaning will also help you see things better: disconnected, broken or missing parts may also be reasons the typebar doesn’t want to return to its vertical position.
I haven’t run across any Oliver repair manuals, but one typewriter blogger, Words Are Winged, has an excellent series on an Oliver 11 re-build with photos:
http://wordsarewinged.blogspot.com/2015/04/do-you-want-to-build-oliver-part-1.html
http://wordsarewinged.blogspot.com/2015/04/do-you-want-to-build-oliver-part-2.html
http://wordsarewinged.blogspot.com/2015/04/do-you-want-to-build-oliver-part-3.html
http://wordsarewinged.blogspot.com/2015/04/do-you-want-to-build-oliver-part-4.html
http://wordsarewinged.blogspot.com/2015/05/do-you-want-to-build-oliver-part-5.html
Oliver 11s are almost identical to Oliver 9s. Take a look at Part 1:
http://wordsarewinged.blogspot.com/2015/04/do-you-want-to-build-oliver-part-1.html
There are details on the typebar, levers and springs that may provide you some useful insight. While I don’t recommend dismantling your Oliver, his clear pictures and descriptions should help you understand the interplay of parts.
Good luck!
LikeLike