Since I got back from a recent family vacation, I have been alternating working on the 1922 L.C. Smith No. 8 and the Century 10. I have been switching back and forth. When I run out of ideas on one, I move to the other.
Ball Bearings at All Frictional Points!
When I first brought the L.C. Smith home, there were several immobile keys – the basket was dusty, rusty and gummed-up. And there was a circa 1920 cigar cutter jammed between the universal bar and the line lock bail.
After cleaning with denatured alcohol, the typewriter began to type and type beautifully. I happily typed out a long letter and it loosened more and more with each printed line. It has a light, springy touch which I assume is due to the ball bearings in the typebars. It is a joy to type on. Robert Messenger has a great post on his L.C. Smith 8 typewriter that includes images of early advertisements which extol the virtues of the L.C. Smith’s “ball-bearings at all frictional points”. If I were a decent typist, I could go smokin’ fast on this one.
My L.C. Smith’s most major problem is rust, especially underneath the machine. I would love to dunk her in an Evapo-Rust bath, but unfortunately Evapo-Rust is not friendly to paint – it softens up the paint quite a bit. It also leaves a messy, sticky sort of residue. I use it only for parts that I can remove, soak, and polish up afterwards.
So here is all the fun I had with the L.C. Smith:
Shift lock not holding
Could it be that the Enormous Grotesque Foot is interfering with the motion of the shift lock? Why, yes. I removed the foot and the shift lock was able to move.

The machine needed three feet, and I cut some really classy looking feet out of cork and colored them with black Sharpie.

Original foot on left. On right: cork replacement foot being carved into shape. Covered in Sharpie.
Thanks for the cork replacement foot idea, JustAnotherGuy.
Left carriage release not working
I compared right and left carriage release mechanisms and determined that a lever wasn’t in the right spot.

Wrong.

Right.
I loosened a screw, moved the lever to the correct spot, re-tightened the screw, and all was well.
Dirty platen
Yes, it was FILTHY. I typed a letter to a fellow typospherian and there was debris all over the page.

It is very easy to remove the platen from an LC Smith No. 8. It it held in place with a screw at each end in a knobbed plate and then pops right out. So easy – I wish they were all like this.


The platen is nice and soft and cleaned up beautifully with a little Soft Scrub. From the Craigslist pictures, I thought there were rips in the platen, but it was just crusts of rust.
Missing tab connectors
Functional tabs are little low on my list of priorities, but the missing tab linkages and sunken keys bugged me.

Missing tab linkage

Resulting in sunken tab keys
I cut some thin pieces of metal to size to temporarily replace the missing connectors. I need more rigid metal if I want to use the tabs, but these work for keeping the sunken keys up.

New tab connectors made from thin metal

Tab keys sunken no more
Outstanding Issues:
Malfunctioning line lock
This is still an issue I haven’t been able to resolve. I get to the end of a line and the typewriter allows me to continue typing, piling letters on top of letters at the end of the line. The line lock should engage at the end of the line, but doesn’t. The line lock bail is rusted into position and does not move at all. I am getting some Liquid Wrench today to see if I can free it.
Missing tab stops
The tab stops are nowhere to be seen (and I didn’t see them under the universal bar with the cigar cutter). I went to internet and asked about it. I am not the first person to run into this problem.
I love Knife141’s posts at Instructables: this guy Gets It Done. I have run across his very informative posts before:
Knife141 has a post called, “Making tab stops for an LC Smith Typewriter”. I have bookmarked this page so that if ever I get ambitious, I will make those tab stops.
The vertical alignment of the capital letters is a bit high
This typewriter is basket shift. The capital letters are printing a little high:

Thanks to Knife141, I believe that I need to make an adjustment to the nuts directly under the segment to bring it to the right height with shifting. I just don’t have the right size crescent open end wrenches, but Good Neighbor Brian has offered the use of his set. First off though, I need to get some Liquid Wrench because the nuts are very rusty.

Cleaning, touch up and waxing
I cleaned the exterior of the typewriter with soap/water and a little Soft Scrub. I was very careful around the decals – cleaning all around them.
I touched up the bare metal spots with a very thin layer of Testor’s black paint pen that I rubbed on. Sharpie was not a good match, but the paint pen was very close. On future projects, I’d like to experiment with India Ink (Encre de Chine) which was suggested by RobertG as it is less permanent and is an almost perfect match.
I bought some Renaissance wax polish and shined up the typewriter. I avoided the decals as I was worried that I might rub them off. I don’t know if this is a legitimate worry with the Renaissance wax, but I didn’t want to take the chance. I love those insane horsies so much.
1922 L.C. Smith No. 8
Serial number: 460128-8
-

- Cleaned up nicely
-

- Typebars still corroded looking
-

- Red and black!
-

- Replacement feet made with wine corks
-

- Squidward carriage return tentacle
-

- Horsies a-stompin’
-

- Missing tab stops
-
- Cigar cutter found in typewriter
-

- Serial number behind back space key
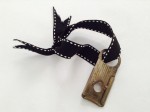
I’ve attached the cigar cutter with a ribbon to the typewriter for easy access. I believe that the “best practices” use of this machine involves cigar smoking, so I lit up a stogie and enjoyed an afternoon of typing en plein air.


Great work! It’s certainly looking very fine now. Does the cutter work too, now that it’s derusted?
LikeLike
Nicely done! “Free cigar cutter with purchase” 😀
LikeLike
I love freebies with a story.
LikeLike
It does! I gave it an Evapo-Rust bath and loosened it up with some PB Blaster. I am careful not to get my fingers caught in it 🙂
LikeLike
Great post! Informative and useful!
Crescent wrenches are adjustable, y’know, and because of that they’re pretty big; maybe you mean open-end wrenches. At your automotive store, get a set of Ignition wrenches. They are very small and very useful on typewriters.
LikeLike
Ha! I am still a little shaky on my tool terminology. Thank you for the automotive store tip. I couldn’t find any teeny wrenches at the hardware store, but the automotive store may be just the ticket.
LikeLike
Wonderful, all of this!
Renaissance Wax has never harmed decals in my experience. Of course, apply it gently.
I recently got some deruster on eBay which used the name “Evaporust” in its auction title but is actually an imitation. Probably the chemical principle is the same. It worked just fine, and was clear and wholly non-sticky.
LikeLike
I may need to try some of that eBay “Evaporust” – the price is right.
LikeLike
Great job, that LC Smith looks fantastic. I’ve found some interesting things inside of typewriters (my favorite was a receipt from a repair shop!) but I think the cigar cutter beats them all! Your cork feet sure look better than mine does.
LikeLike
I am very glad that I ran across your idea to use corks as typewriter feet. They are almost a perfect match in diameter for my LC Smith feet.
LikeLike
These are relatively easy to work on and so rewarding when they do work. I think these old LC Smiths might be my favorite non-portable machines to type on.
LikeLike
I have developed a taste for open-frame cast iron beasts – everything is so large and accessible. I’m having a lot of fun with this one.
LikeLike
Great and impressive to see how such a machine comes back to life and improves its looks too. Think it really is fun to be able to tackle these issues of a machine 🙂
And of course, like a user instruction for HMV gramophones put it; “disuse is bad for the machine” – mechanical machines do benefit from being used.
LikeLike
This has been a very satisfying project – it’s the little things like cleaning that make a huge difference in performance.
LikeLike
Hi, I love your blog. It’s very informative and I love how intrepid you are with repairs. Turns out I’m doing an LC Smith 8 for my second restoration (first was a Torpedo Modell 16, much harder to work with). All has gone well except the paper fingers, which have flats. Sent them to the platen people for recovering, along with the feed rollers. Platen people sent them back, said they couldn’t remove the tiny pins holding the paper finger rollers in place. Can you share what you did with yours, please? The paper fingers are so tiny but pivotal since the 8 has no paper bail. Very much appreciate any assistance you can lend and thanks again for your blog, it’s just outstanding!
LikeLike
I haven’t had to dismantle paper finger rollers, but I’ll take a look at my LC Smith and think up a couple options for you. Stay tuned.
LikeLike
I took a look at the paper fingers of an LC Smith I recently brought home. It is very rusted.

My guess is that you could use a punch to tap out the center pin. Let me throw this paper finger into a de-rust soak, apply lubricating penetrant, and get back to you on whether that’s an option.
LikeLike
Much appreciated. My fingers (luckily) are in fine shape. Problem on this end seems to be the pins. They’re really in there. Tapping and punching doesn’t seem capable of knocking them out without damaging the pin mounts.
Again, thanks!
LikeLike
I very much like your well illustrated postings. This one is of particular interest to me as I recently acquired a LC Smith 8-11.
After much cleaning it does type excellently. The only thing not quite right is the carriage return. It’s okay but, even though I cleaned and oiled the rails, the dents, and the wheels, it’s still a little stiff, at least compared to my gliding LC Smith Super Speed carriage.
Does your Smith 8 carriage move effortlessly?
LikeLike
Your LC Smith should glide smoothly. Here are a few possible causes of your stiff carriage return:

1. Carriage rail and moving parts are still dirty and need more cleaning
2. You are missing a ball bearing in the carriage assembly – there may be a wobble in your carriage:
3. You have some carriage interference with the tab rack. I had an LC Smith with a sticky/jammed carriage that was caused by interference with the tab rack:
Tab interference in LC Smith 5
I hope this helps – LC Smiths are just lovely when they are in good working order.
LikeLike
Funny, I’ve been staring at that same figure for the last 2 days trying to understand how it works.
1/ I used repeatedly mineral spirit and then PB Blaster on the carriage rails and moving parts, which I believe are clean.
2/ I don’t think so. The carriage doesn’t wobble.
3/ A real possibility. But my 1933 Smith 8 with return lever on the left looks different from yours. In fact there is no tab rack that I can see (https://imgur.com/a/Rblgp3R). Knife141 “Making tab stops” shows a Smith 8 which looks exactly like mine, but it has a tab rack, unlike mine.
The clue I have is that if I press the carriage release lever, the carriage moves freely. But when I don’t and use the carriage return lever there is a slight resistance.That’s why I was looking at the diagram to understand where friction could originate. After reading your response I slightly loosened all the screws I could see, but that didn’t change anything.
Again, it’s not really stiff. But because of ball bearings I was expecting a quasi friction-less gliding, as on the Super Speed. Maybe such a smooth return is not to be expected on the earlier Smith 8’s? Or I’m still missing something.
LikeLike
If the stiffness only occurs on carriage return then it may be that the main escapement and/or its parts that interact with the carriage rack are a bit gummy or dirty:
The old LC Smith 5s and 8s that I have worked on have had a very smooth return action when cleaned and lubricated.
LikeLiked by 1 person
That was the other figure I was looking at, but as it turns out the problem is elsewhere.
I queried the Antique Typewriter Maintenance Group and it was suggested the main spring tension was too high. In fact it was way high. I released all that tension in the main spring, and the carriage now flies.
Smokin’ ball bearing indeed. What a machine!
LikeLike
Wow! That’s great – I will file away that fix for later. Thanks for letting me know. Maintenance Group is a great resource.
LikeLike