We have a couple special books for our grandson on the mantel at our house. One is called Bad Hair, and it’s just a collection of weird hair photos from vintage barber magazines—my grandson finds it fascinating. Another favorite is a book of dog photos taken by Elliott Erwitt. We handle these two books very carefully (soft-soft—no chewing!) and examine the pictures.
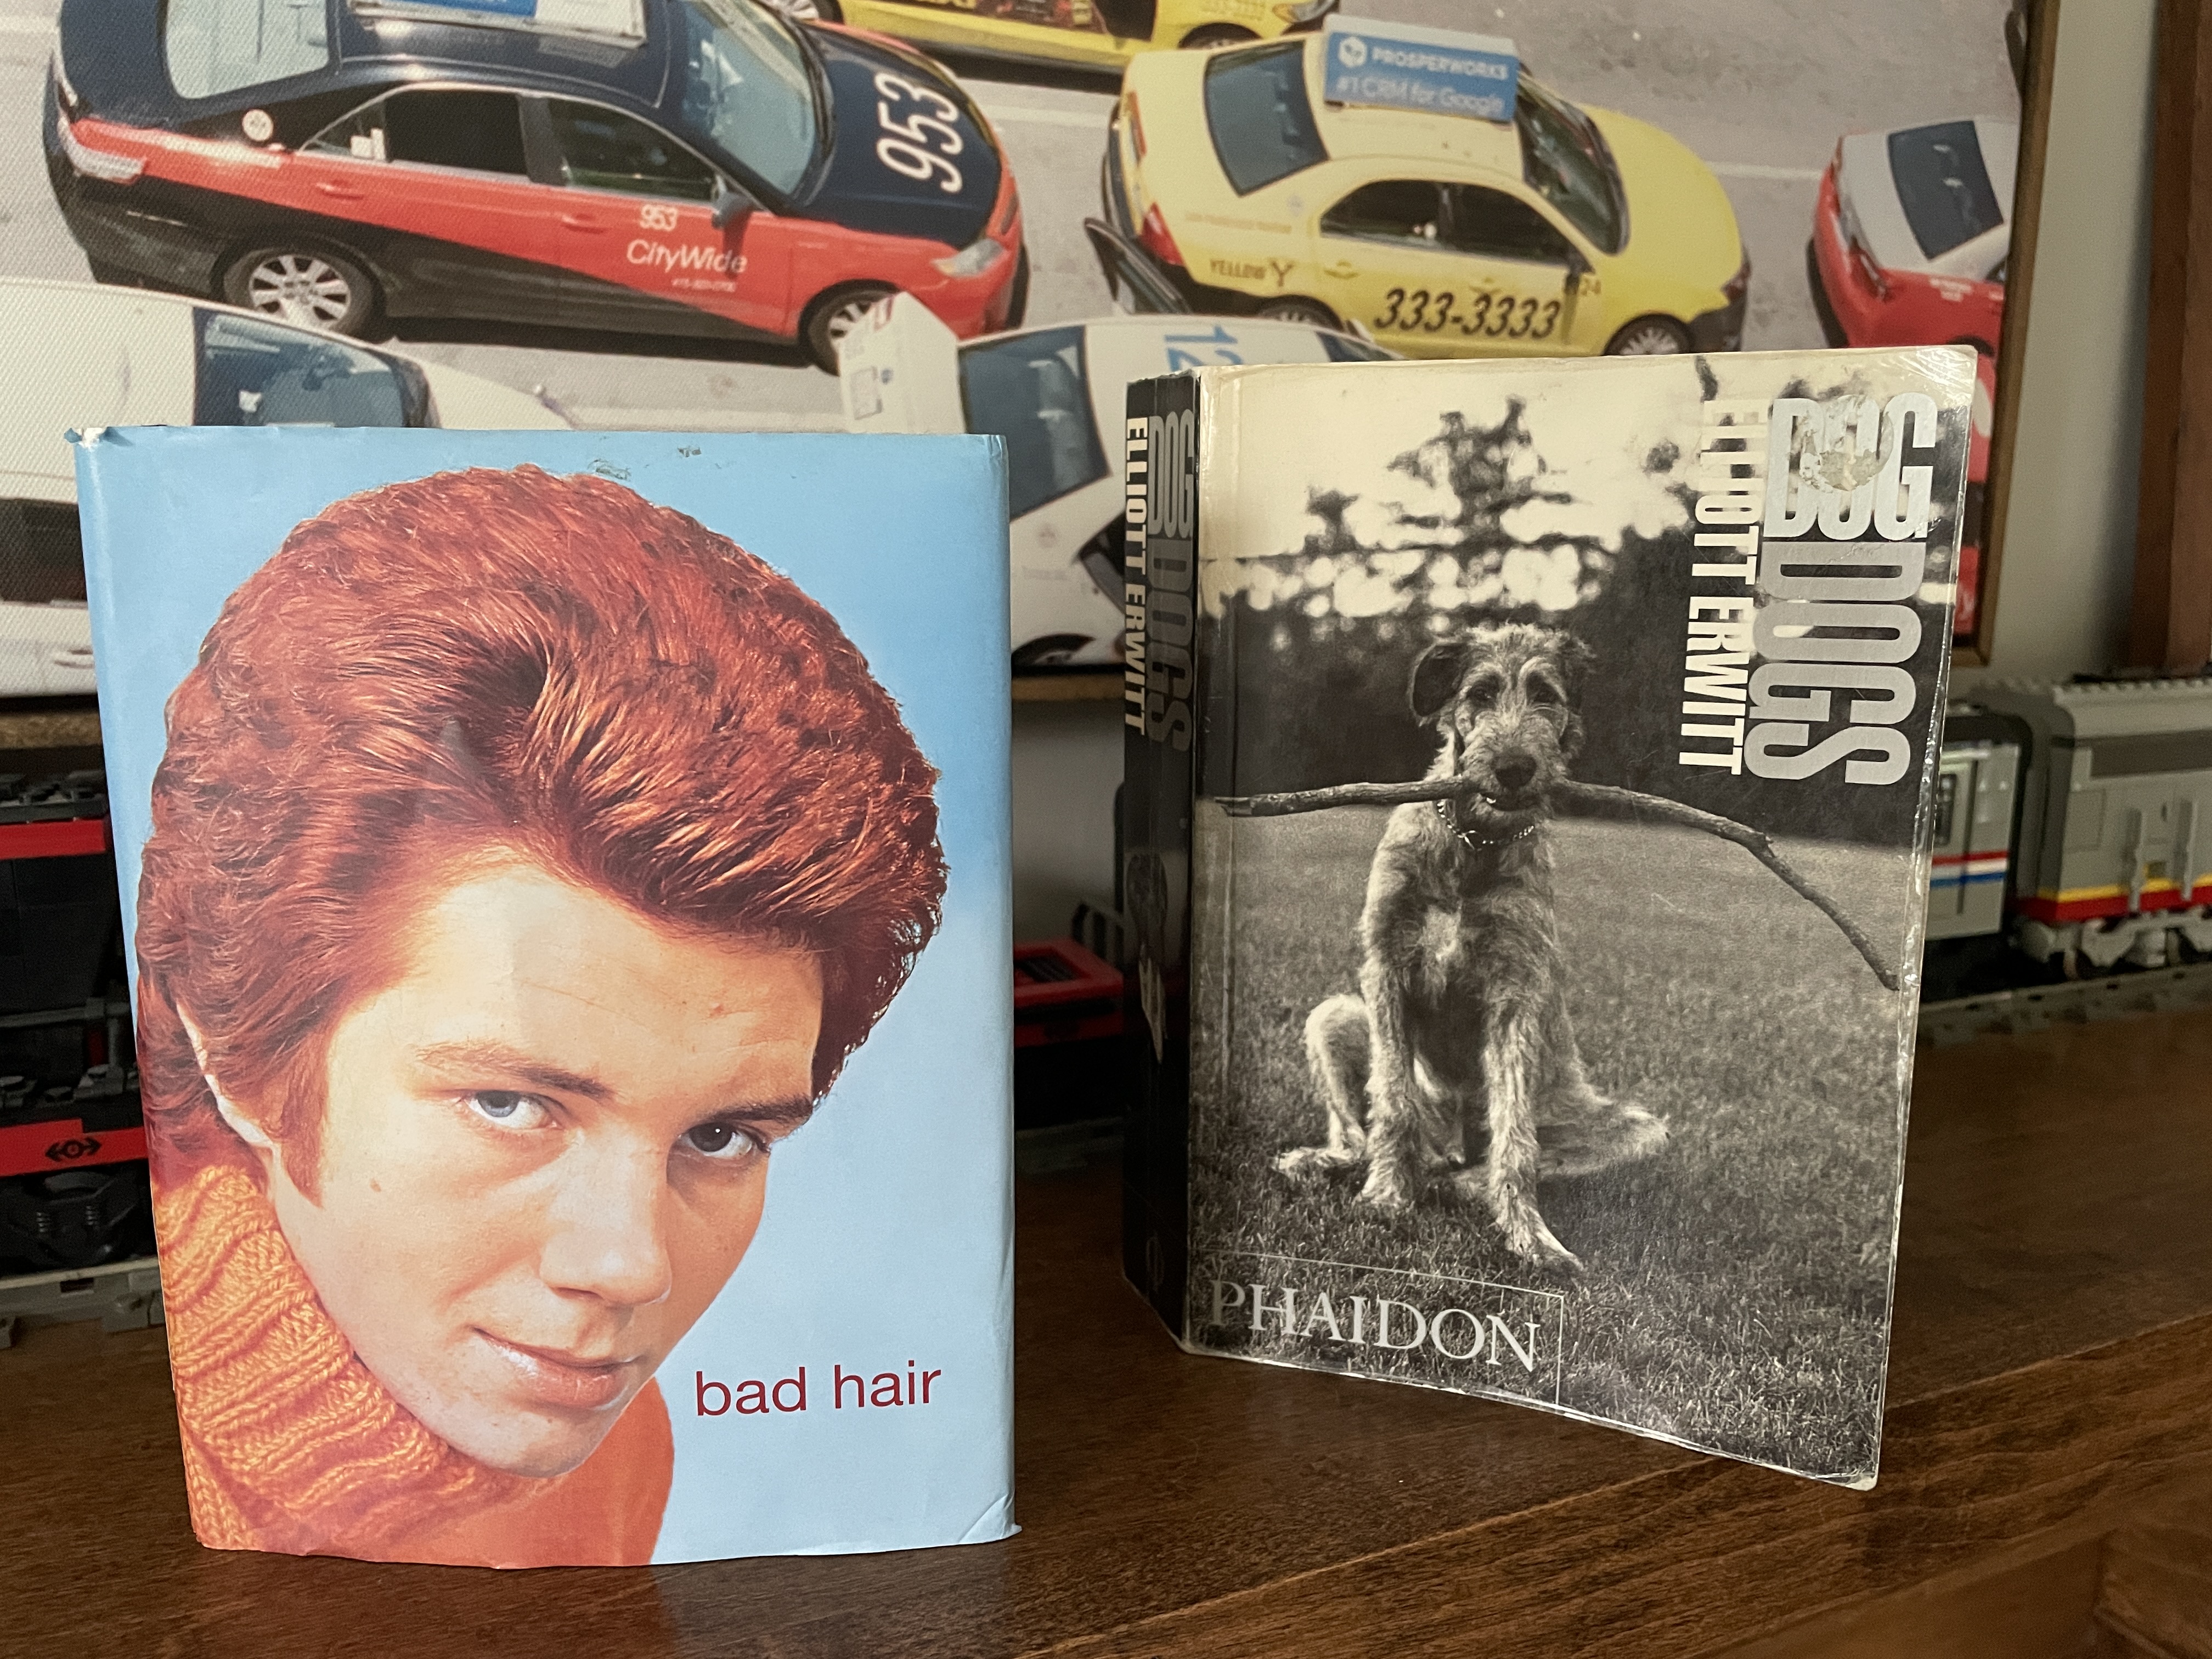
We have a couple Elliott Erwitt dog books because we love dogs. We don’t have any canines in the house, but we live in a neighborhood full of friendly dogs.

Across the street dog neighbors Hazel and Pearl
Dogs are so wiggly and funny and intelligent and truehearted and warm in bed. But there are bad dogs out there, and I recently encountered one—in a Royal Quiet De Luxe.
I’ve had a lot of recent typewriter comings and goings. Rick and his wife picked up his grandfather’s Underwood 4. After I took this photo, the Underwood 4 sprang into Rick’s arms and licked his face.

Rick and his wife brought me flowers which made me smile every time I looked at them.

I agree with my son: “Flowers make a nice gift”.
At the recent type-in in Annandale, I ran into local enthusiast Ross who had a misbehaving Royal Quiet De Luxe with him. I took it home and fixed it up.

When Ross came to pick up his repaired Royal QDL, he thoughtfully brought me a couple more recalcitrant Royal portables including this 1939 Royal QDL. Ross admits that he has a thing for Royal portables.

In my head, I call these dysfunctional typewriters “Right Arms” because if the escapement doesn’t catch and the drawstring is intact, it will pull the typewriter’s right arm over.
I pulled out my headlamp and magnifying glasses and after poking around a bit, I saw the problem:
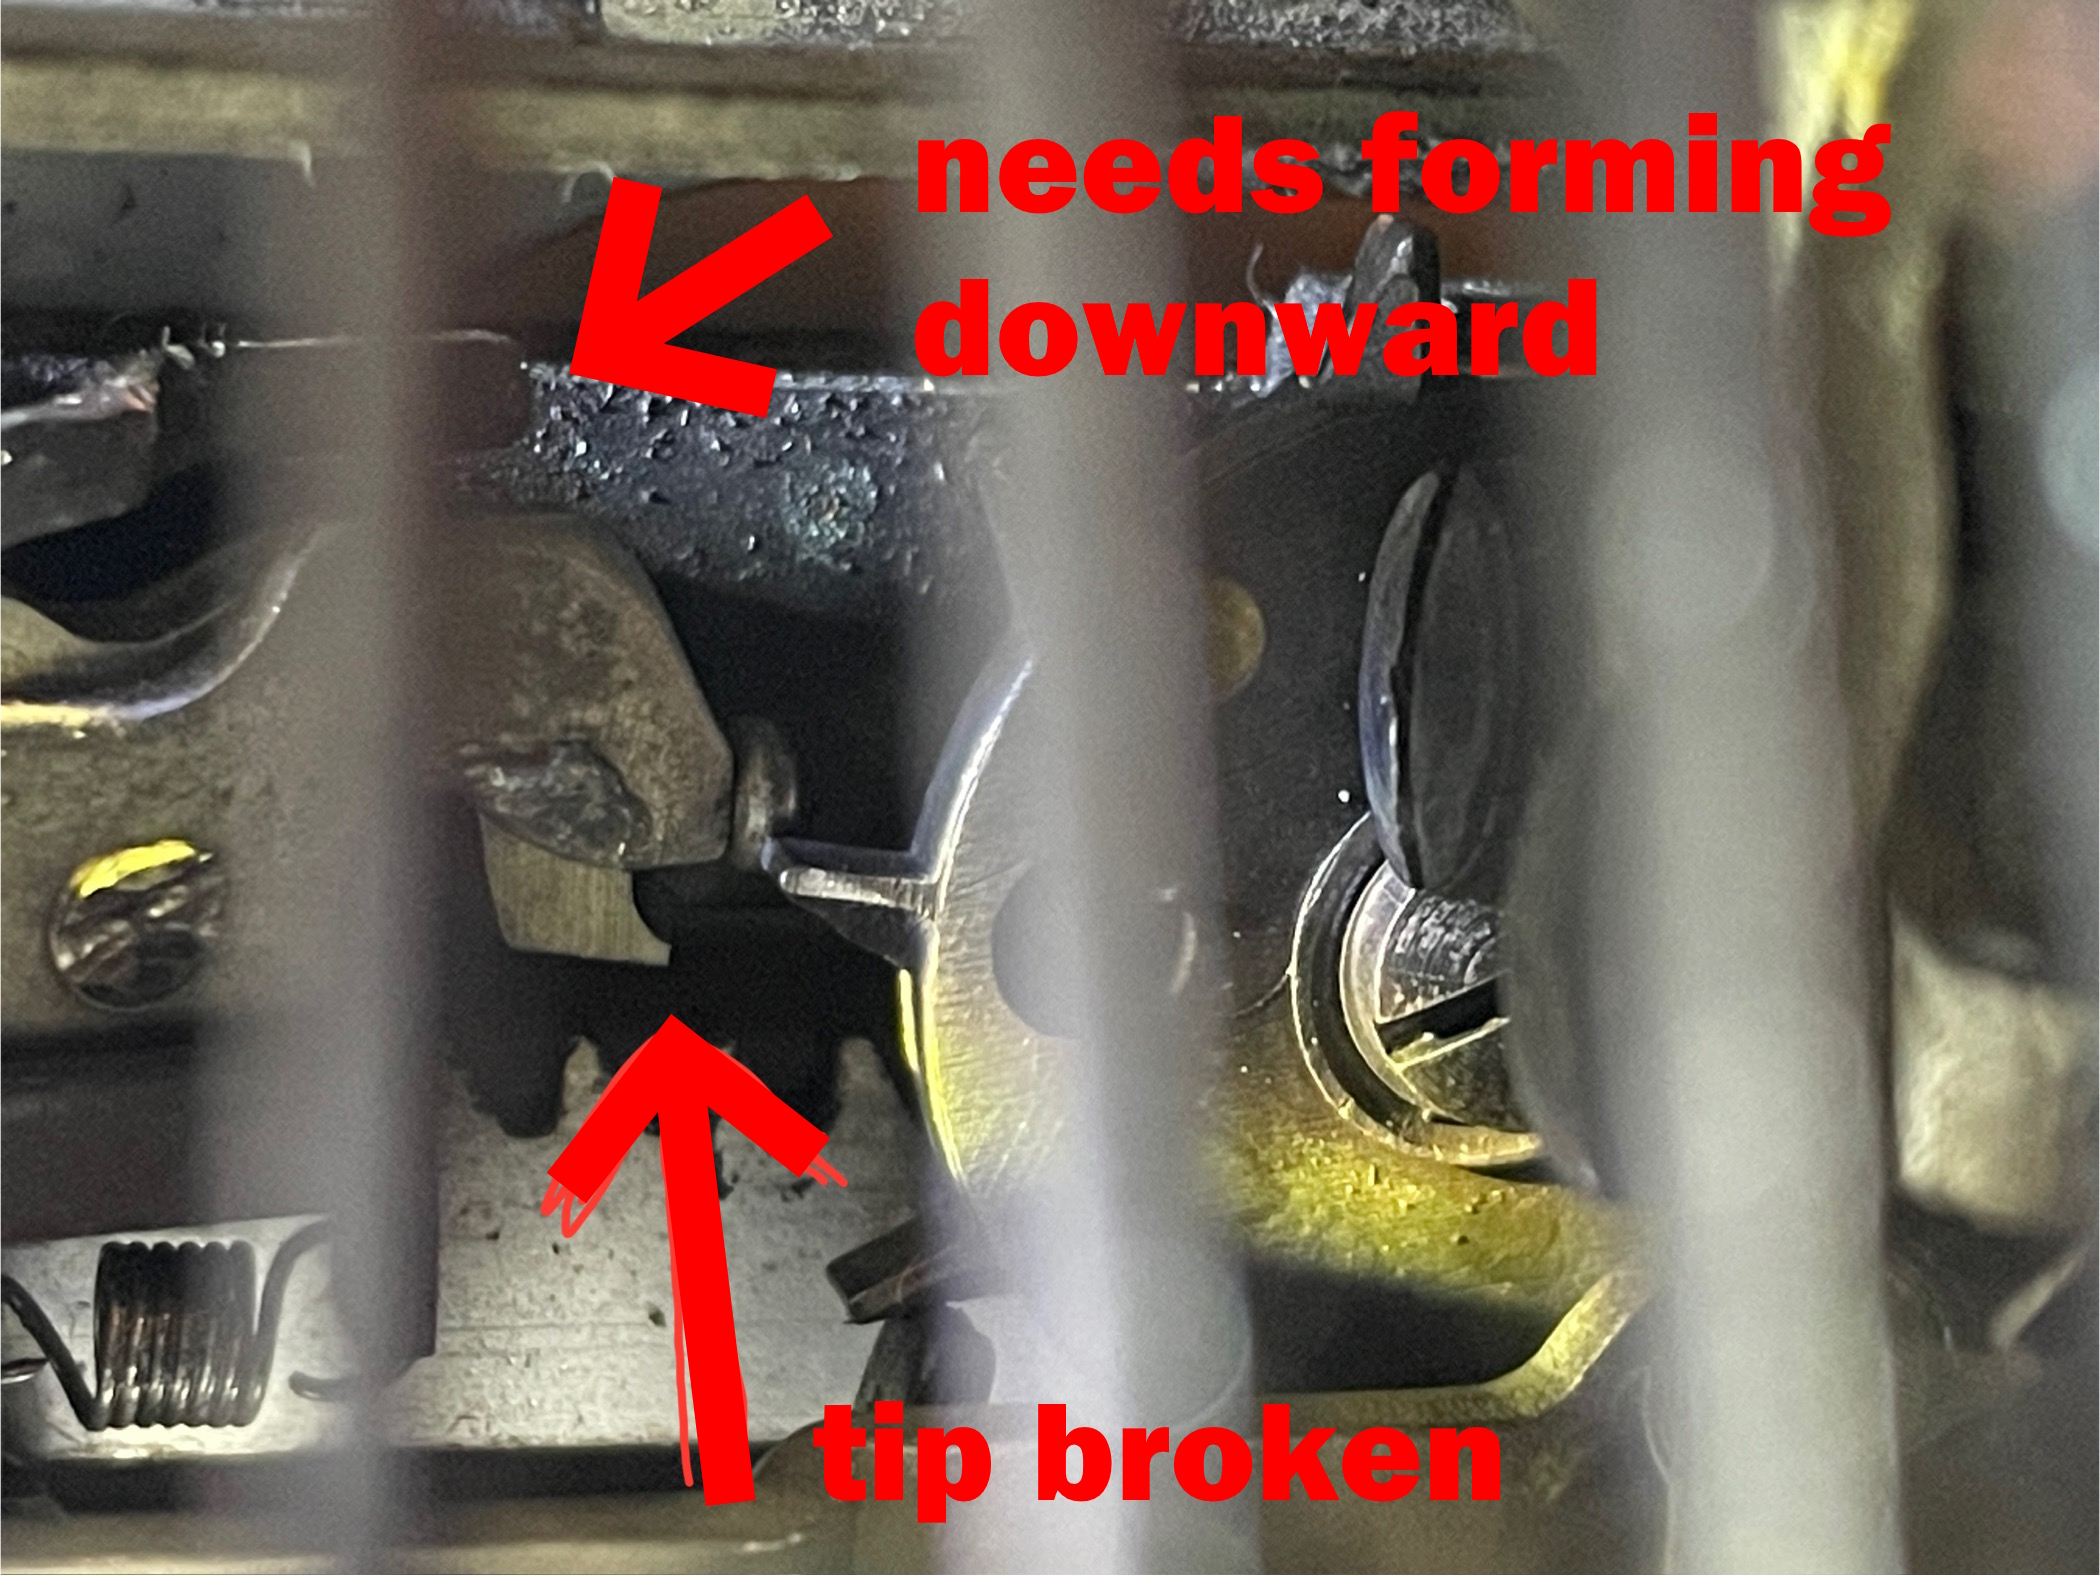
The tip of the loose dog was broken off, and that’s why the escapement wouldn’t catch. Also the arm that stops the loose dog was a touch high and needed to be formed downward.
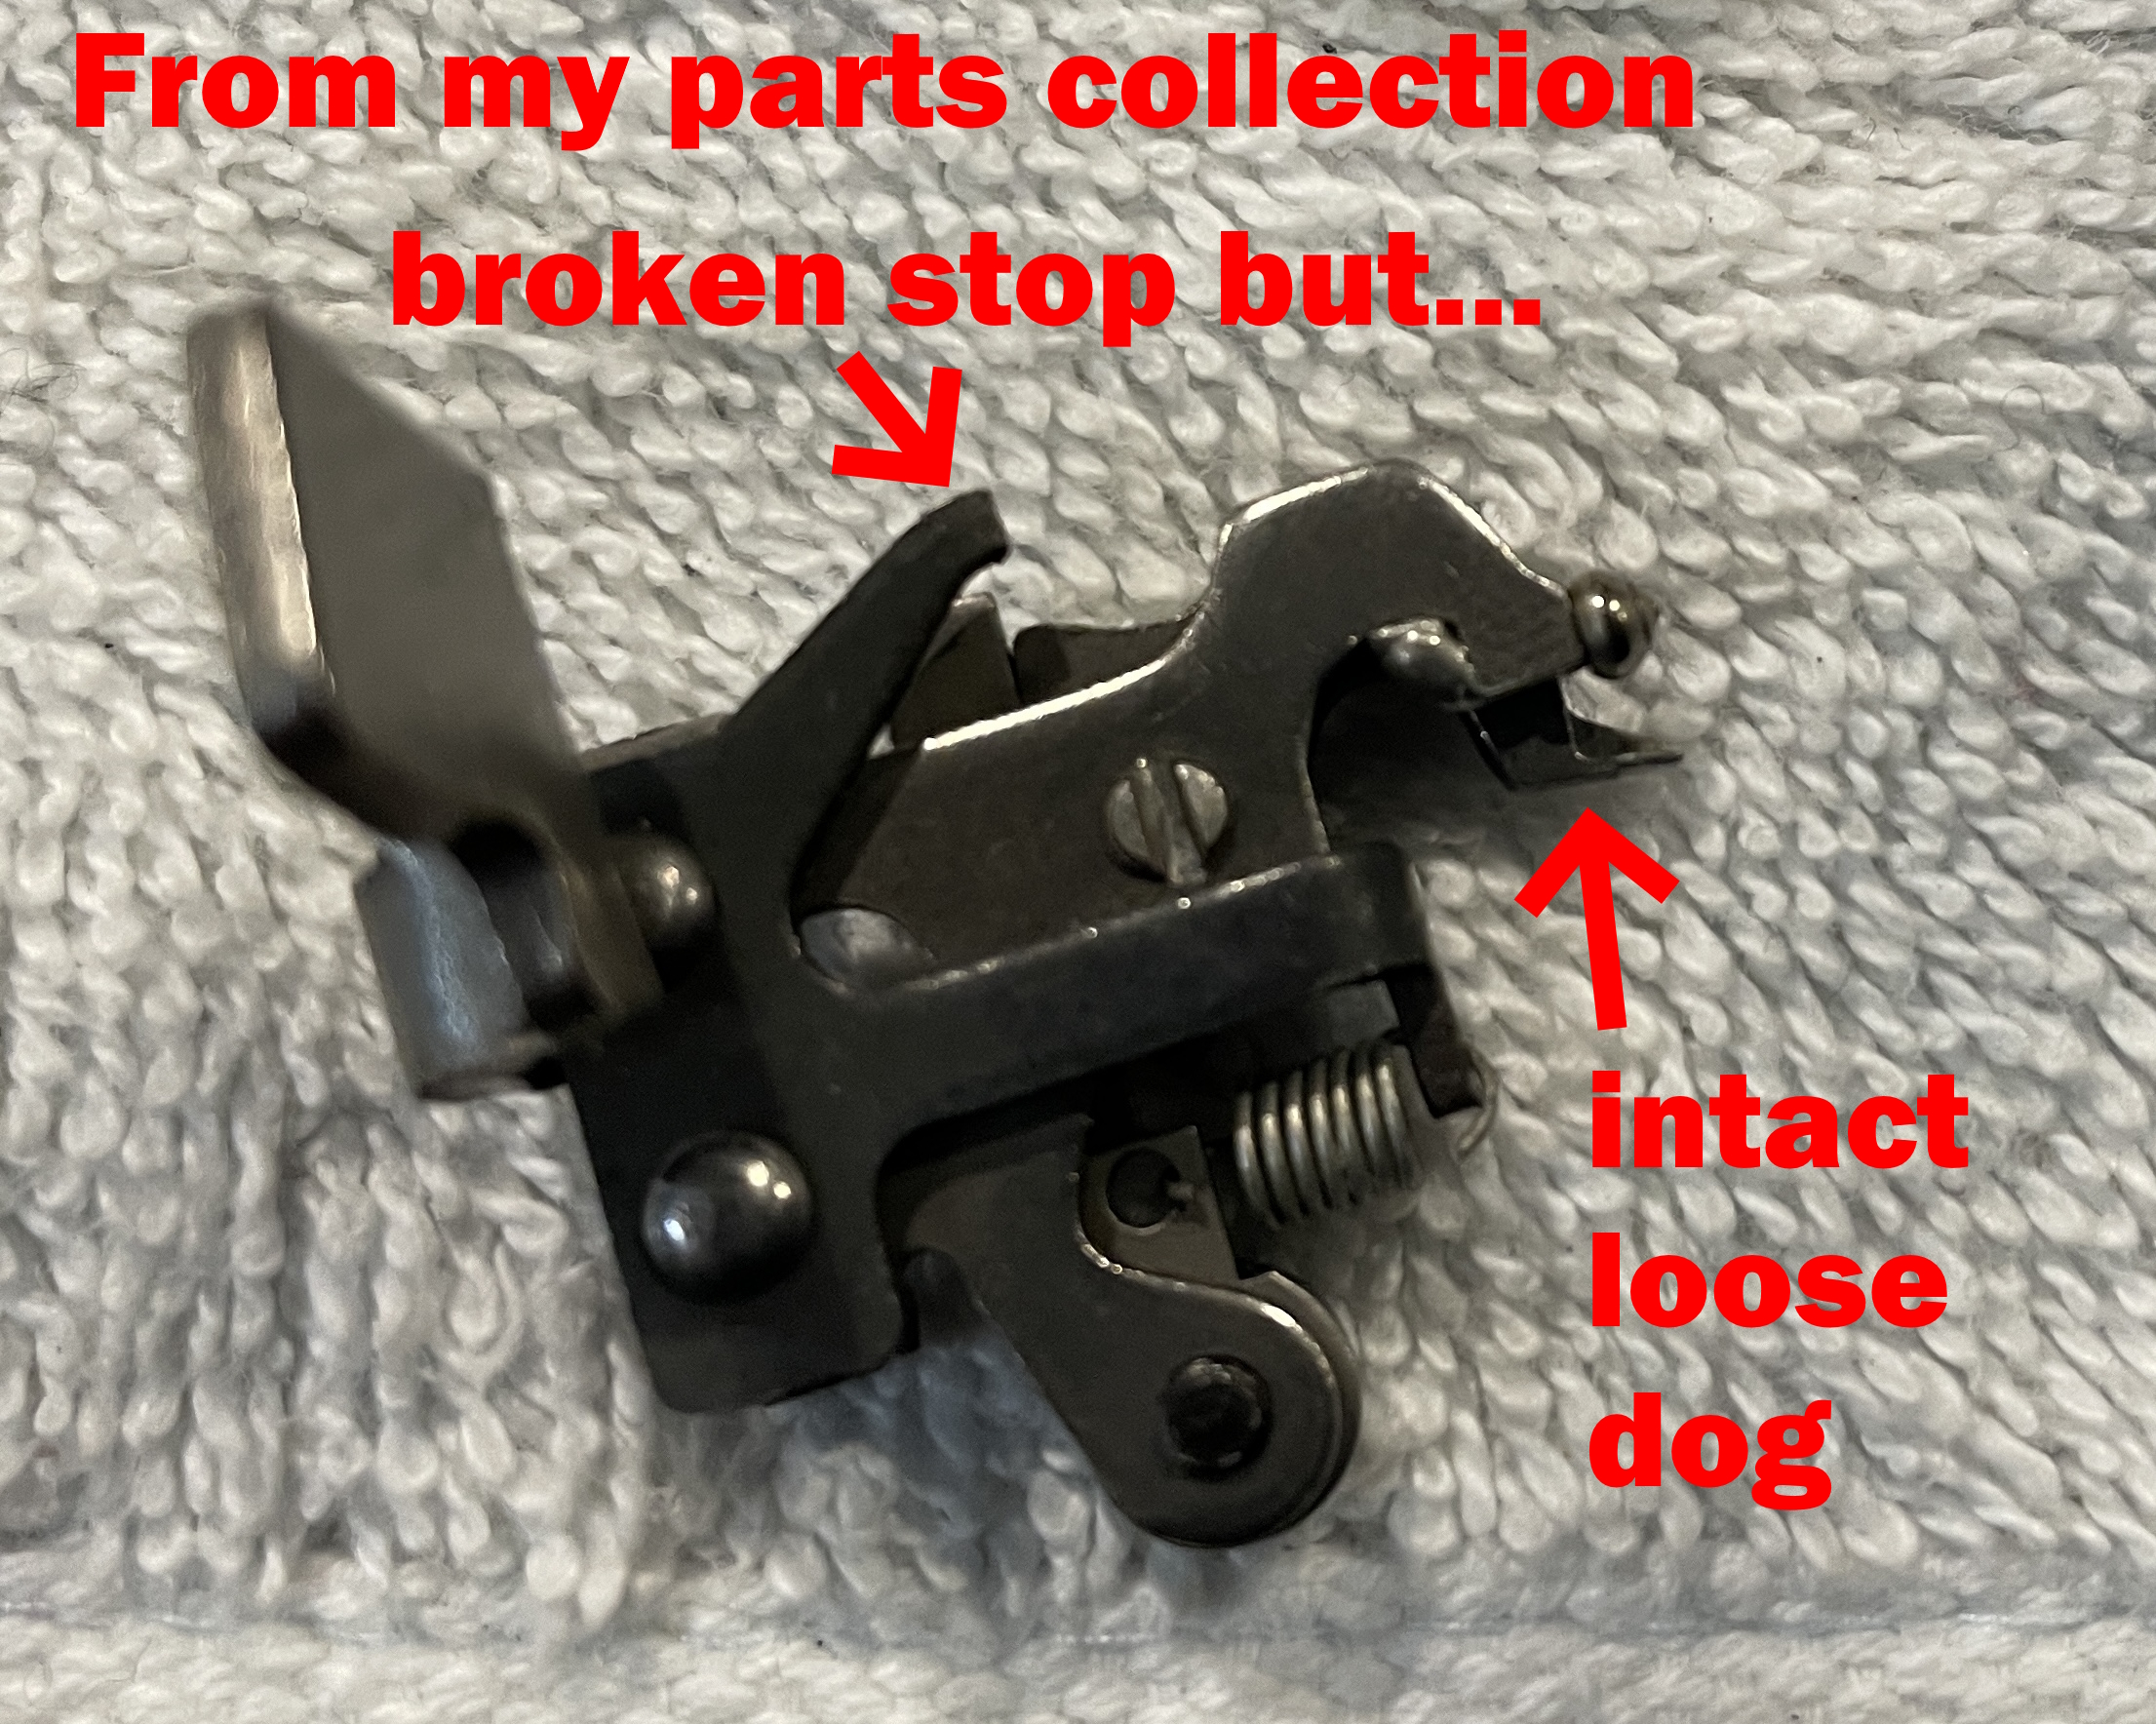
Fortunately, in my parts collection, I had an escapement plate I had replaced in another Royal portable last year. That typewriter had a broken loose dog stop, BUT the loose dog itself was intact.
I’ve discovered that Royal portables after serial number about 850,000 have the same escapement plate as portables 20-30 years younger. This is really convenient because escapement parts are easily damaged during shipping and often need replacement.
This 1966 parts machine Royal Safari has the same escapement plate as the 1939 Royal Quiet De Luxe:

I decided to remove the cover plates from the Royal QDL to make swapping in the escapement easier. This is tricky, especially removing the main base cover plate of the machine. I looked through the removal steps in the Manual Typewriter Repair Bible and watched a video.
Once it was naked, I blew out the cobwebs, doctored the guts with mineral spirits, and cleared out the worst of the crunchy stuff:

I prepped for the anticipated escapement plate replacement by watching several of Duane Jensen’s excellent videos on Royal portable escapements.
In this video, the problem is just a sticky pawl in the escapement plate assembly:
And here is Duane with a jammed spacebar, jammed typebars, and a nonfunctional backspace due to a stuck escapement that he corrects by forming the loose dog stop.
And this video is an excellent demonstration of an adjustment of the escapement outside of the machine.
Duane is a typospheric treasure. I made a donation to Duane’s tip jar and mentally prepared myself for a fairly technical task.
I pondered, researched, and re-read my old blog post about replacing the escapement on a Royal portable. I’m glad I documented the process in my blog because my memory was hazy. I wouldn’t need to take the carriage off to replace the escapement. Removing the carriage makes things easier to access, but I had replaced an escapement plate before with the carriage on. I really hate removing and replacing carriages.
I kept flipping the typewriter upside down and belly up and turning it all sorts of ways and poking and peering and trying to decide on my best approach when suddenly I had a sickening feeling. Something wasn’t quite right.

Ugh. The carriage bearings and pinions were starting to fall out thanks to the contortions I was putting the typewriter through. I was going to be removing a carriage that day whether I wanted to or not.
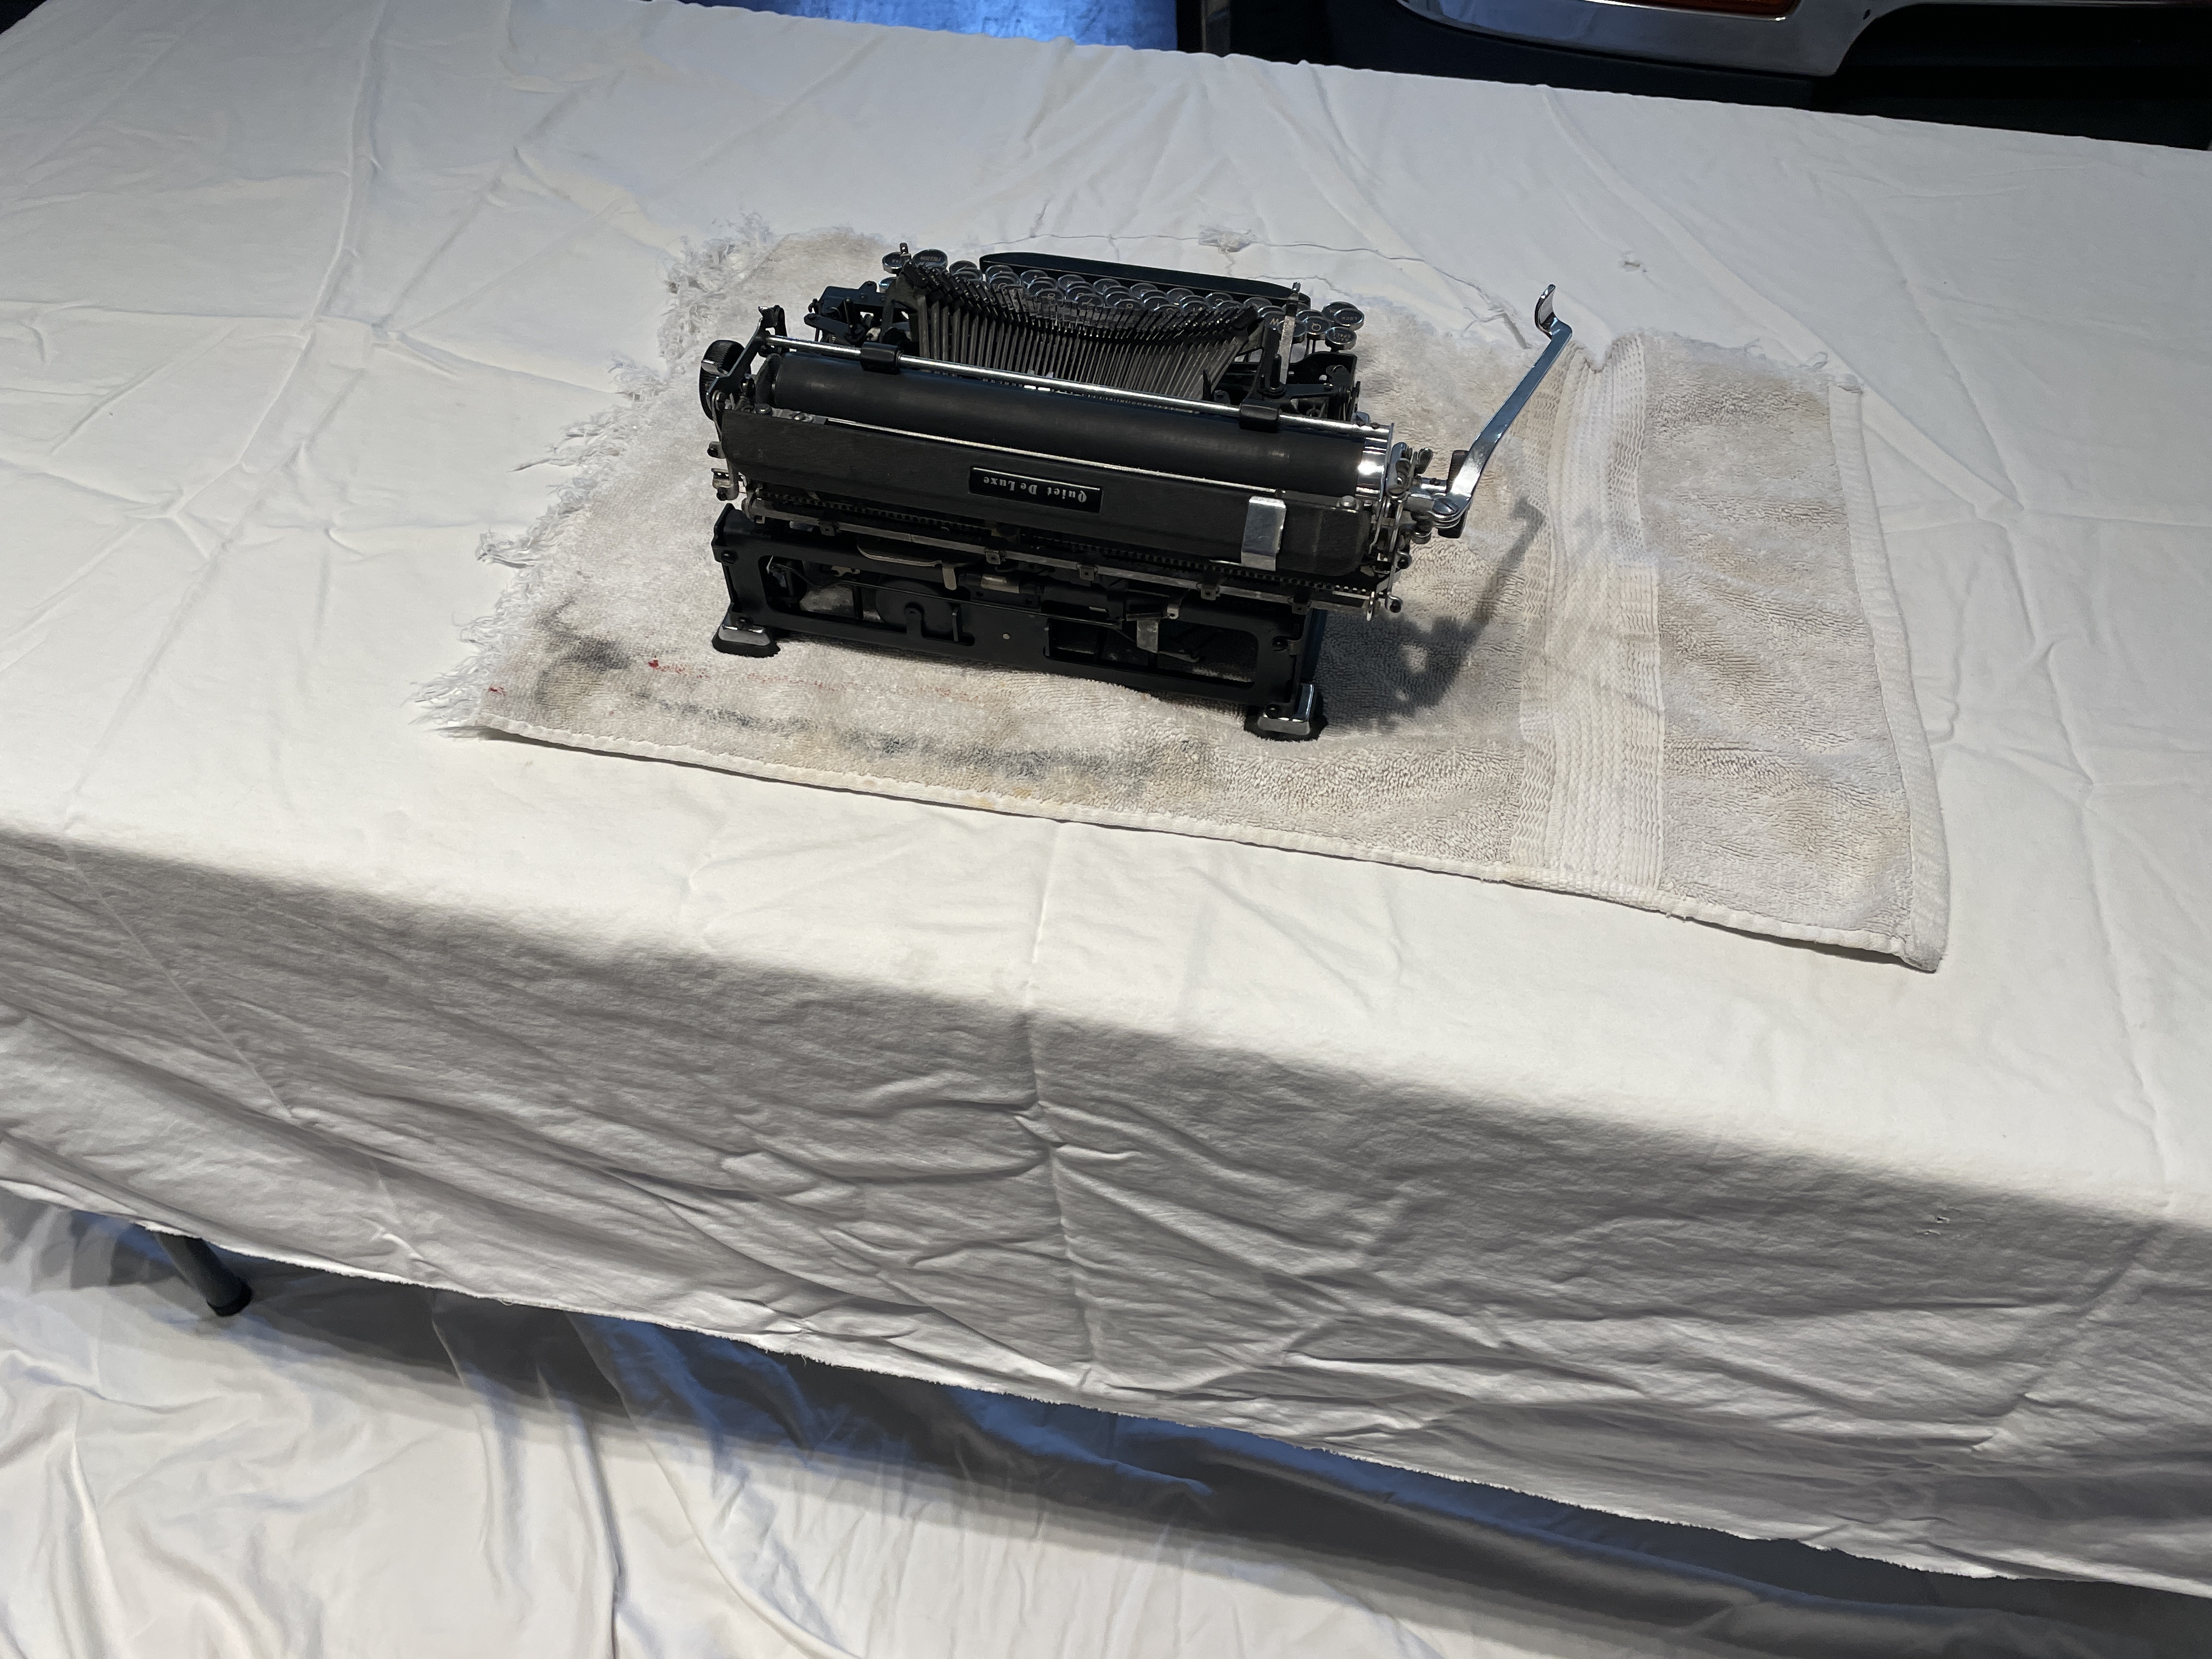
I set up an all-white operating theater with a white sheet on the ground and a white draped table. I did not want to be chasing ball bearings across the garage floor.
I had recently bought a 3D-printed reproduction of a Royal portable ball bearing feeder tool, and here was my chance to try it out. Spoiler: I removed and replaced the carriage four or more times during this escapement fix and the tool was very helpful.

I read through the Manual Typewriter Repair Bible instructions on carriage removal:

After removing and replacing the carriage four times (or more), here are my notes.
A. Disconnect the drawband and secure it to the hook on the bedplate.

B., C., D.: To make your life easier, remove the tab rack and tabbing mechanism (if present), and the center stop assembly. You will need little tools like mini wrenches and a thin punch.

E. Remove the carriage stop screw found on left side of back carriage rail.

F. Once you do this, you can slide your carriage off the rails and four sets of little ball bearings with pinion retainers will drop out. Work on a white field so that you can spot them easily.

Anyhoo, now onto removing the escapement plate. You can remove the trip arm to open up space around the escapement plate (called the “Rocker” in these instructions) which is especially helpful if you leave the carriage on.
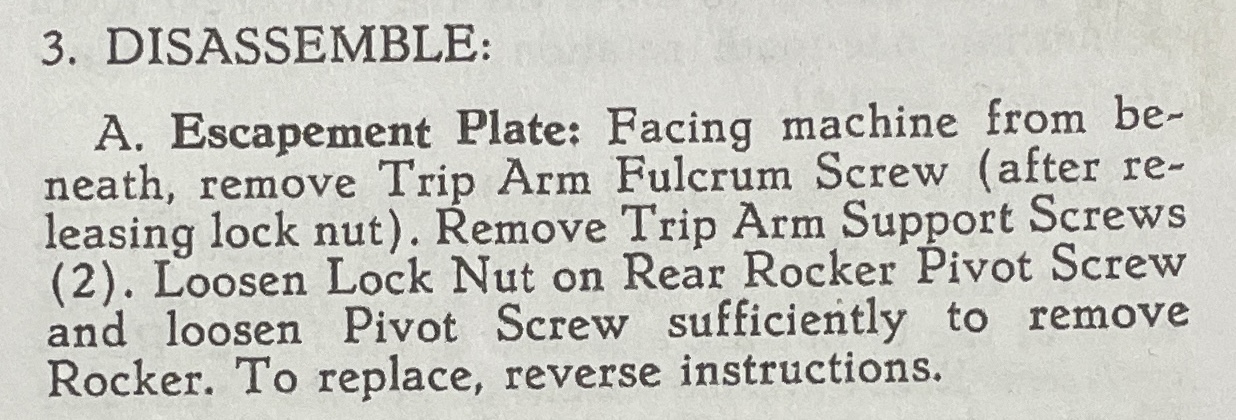
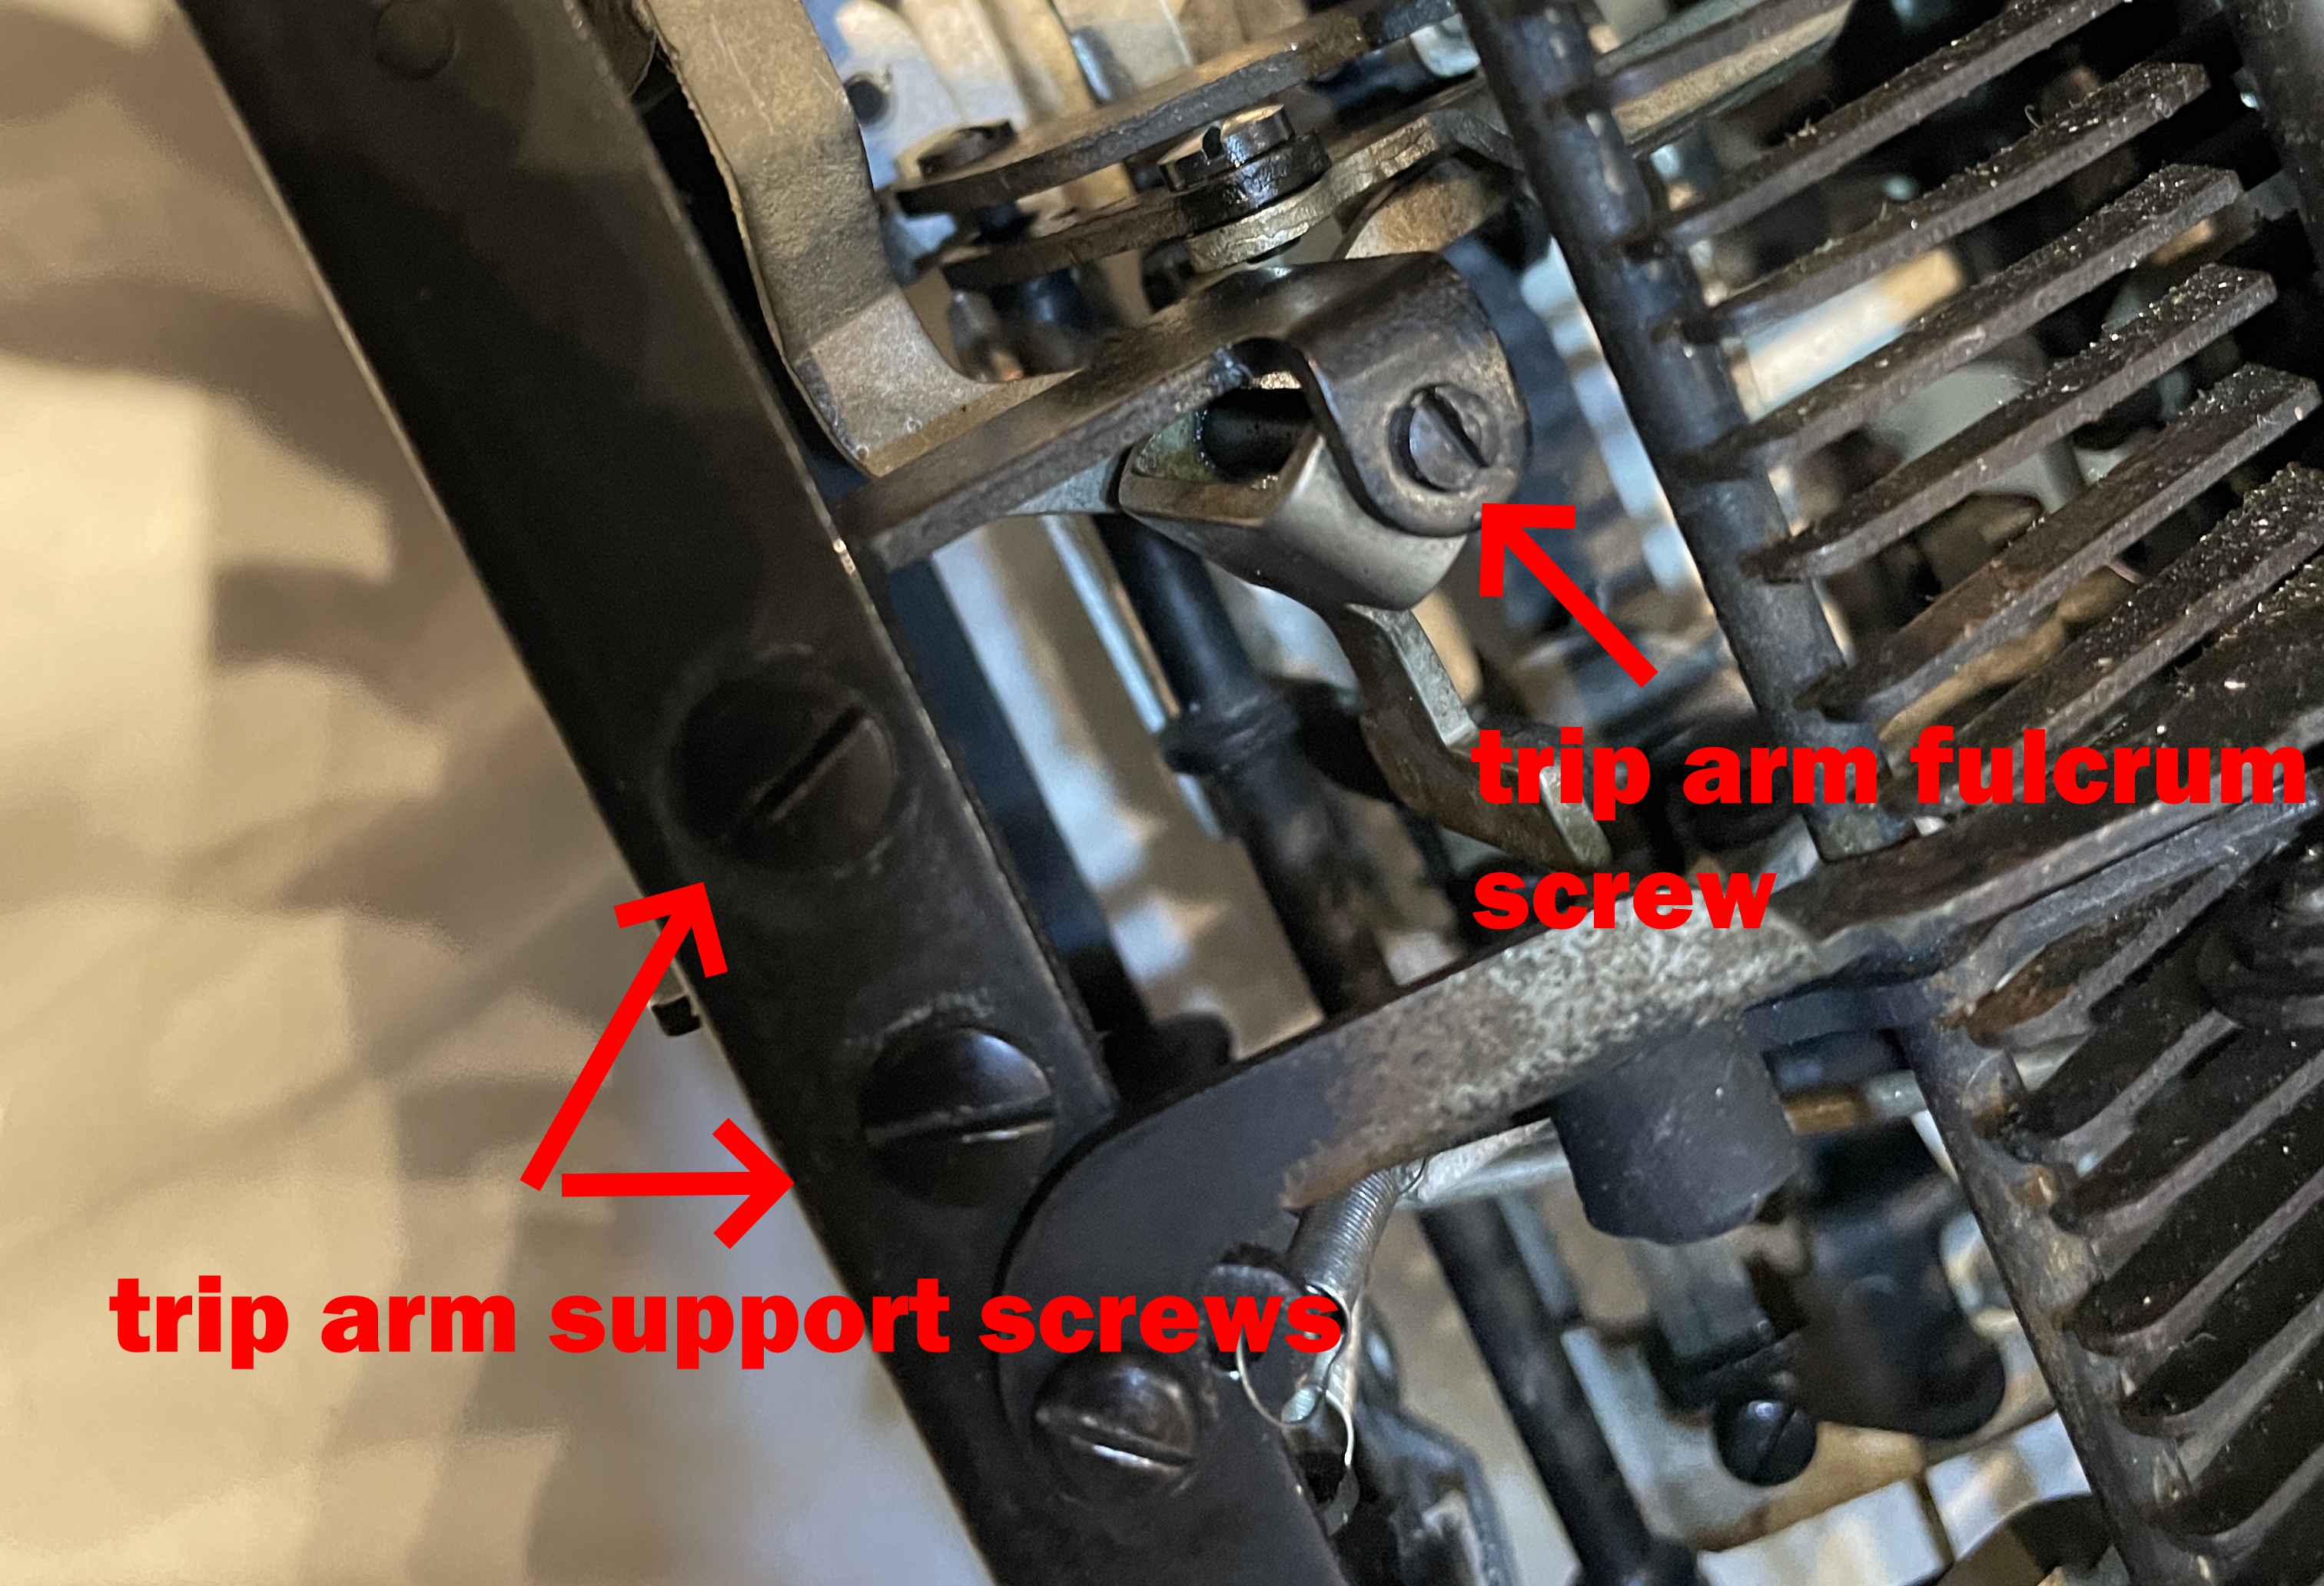

With the carriage off, the escapement plate is easy to access. You’ll need to loosen a barrel-shaped lock nut and pointy tip screw that the escapement plate pivots on. I have a very krappy set of metric mini tools and the 5mm nut driver seemed to work okay on the lock nut.
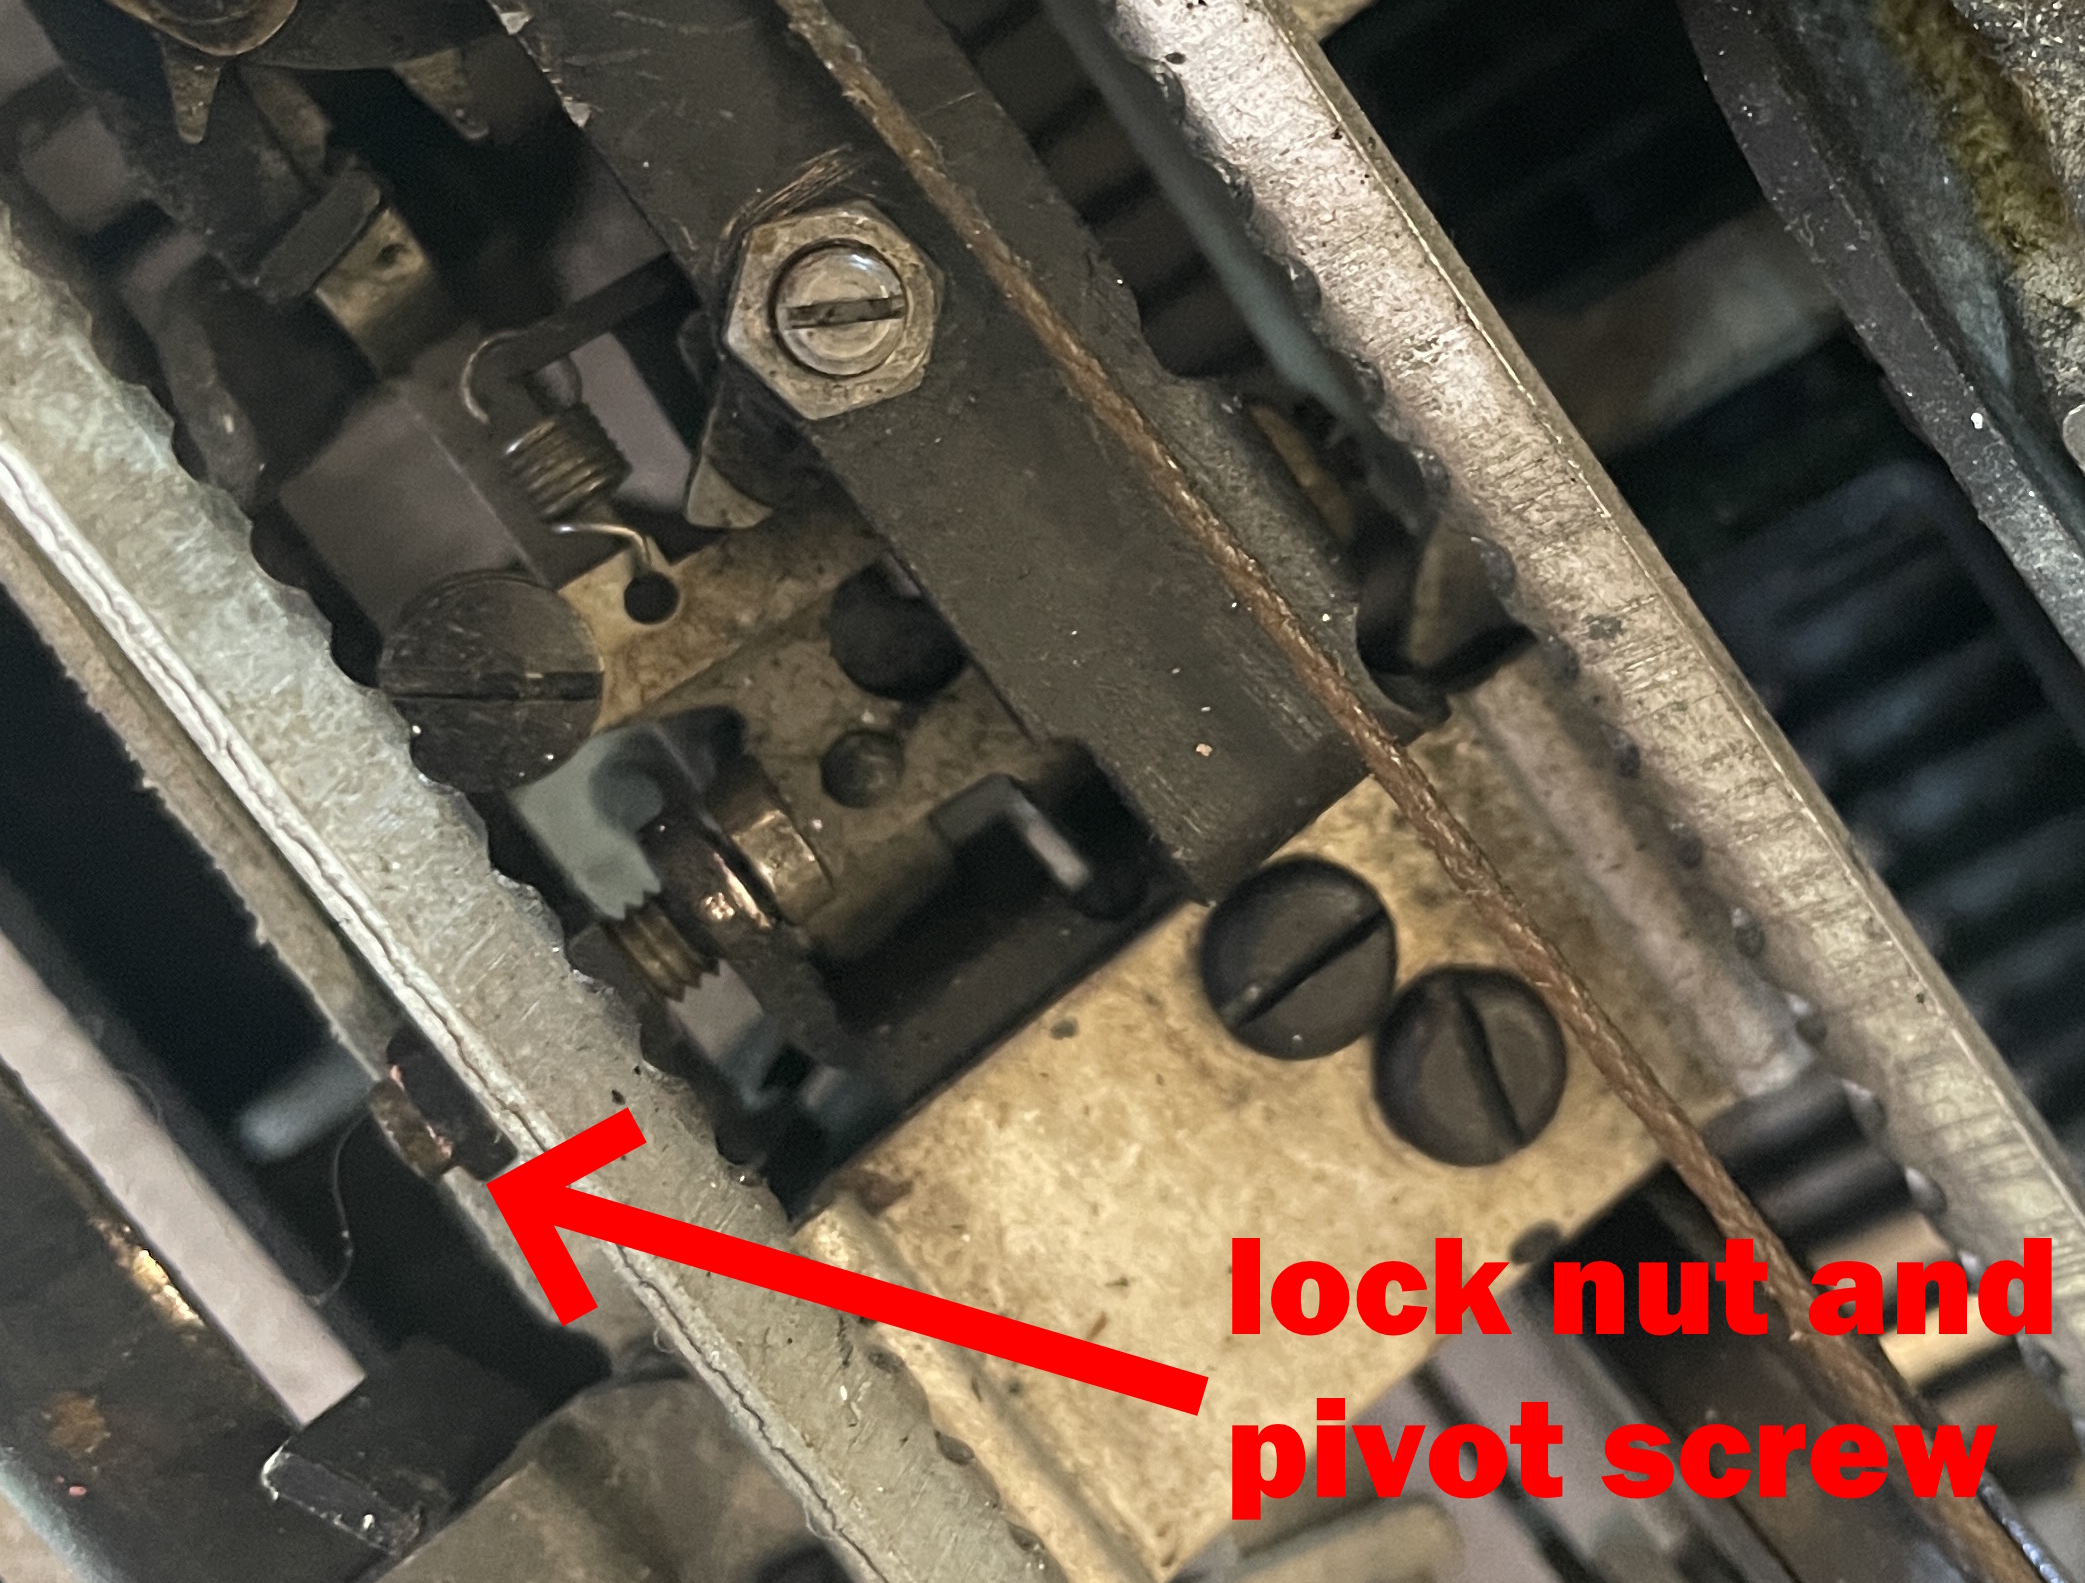
I unhooked the rocker spring and fished out the escapement plate with the broken dog. Yup, that’s a bad dog.
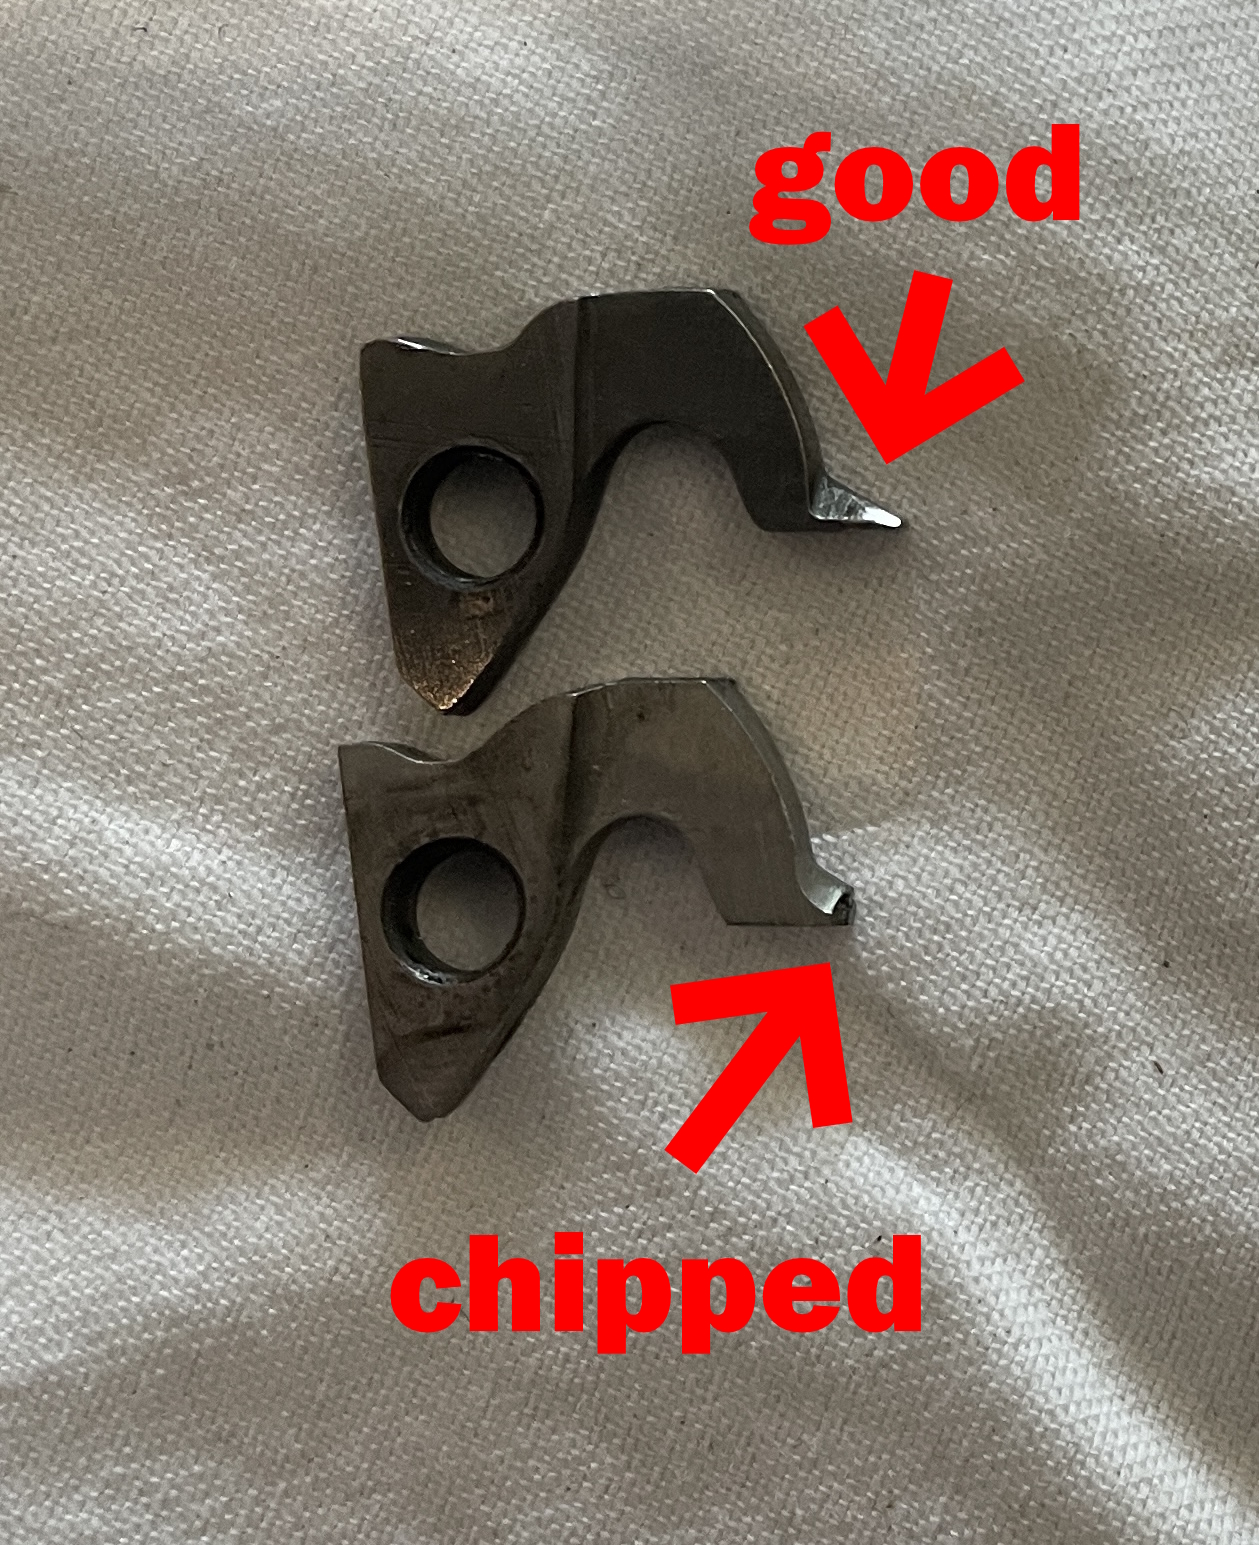
I swapped in my spare intact dog into the original escapement plate and reinserted the plate. A good captive spring hook is key in hooking up the rocker spring, Thank you, Bill M., for your gift of a captive spring hook.

Once the escapement plate was back in place. I put the carriage on. The four loose ball bearing and pinion sets that the carriage ride on are very fiddly. Marty’s tool was so helpful in placing the bearings properly. It’s still a very tricky task, but if you move slowly, it works just like the video below. Note: in Marty’s video, he hasn’t taken out the center stop. I found that removing the center stop (and tab system) made the task easier.
Once I got the carriage on, I tested typing. It was working properly only with the lightest of touch. Moderate or heavy key strokes or space bar hits cause jamming or crazy skipping. When I checked the escapement, I saw that the escapement plate was flinging itself upward toward the carriage rails. It was either jamming the escapement star wheel or missing it entirely with moderate or hard trips.

I wondered if I hadn’t seated the escapement plate properly, so off came the carriage again. It looked okay. I pulled it out and formed the dog stop down a touch.
If only there was a way to limit the escapement plate’s movement. Hmmmmm.
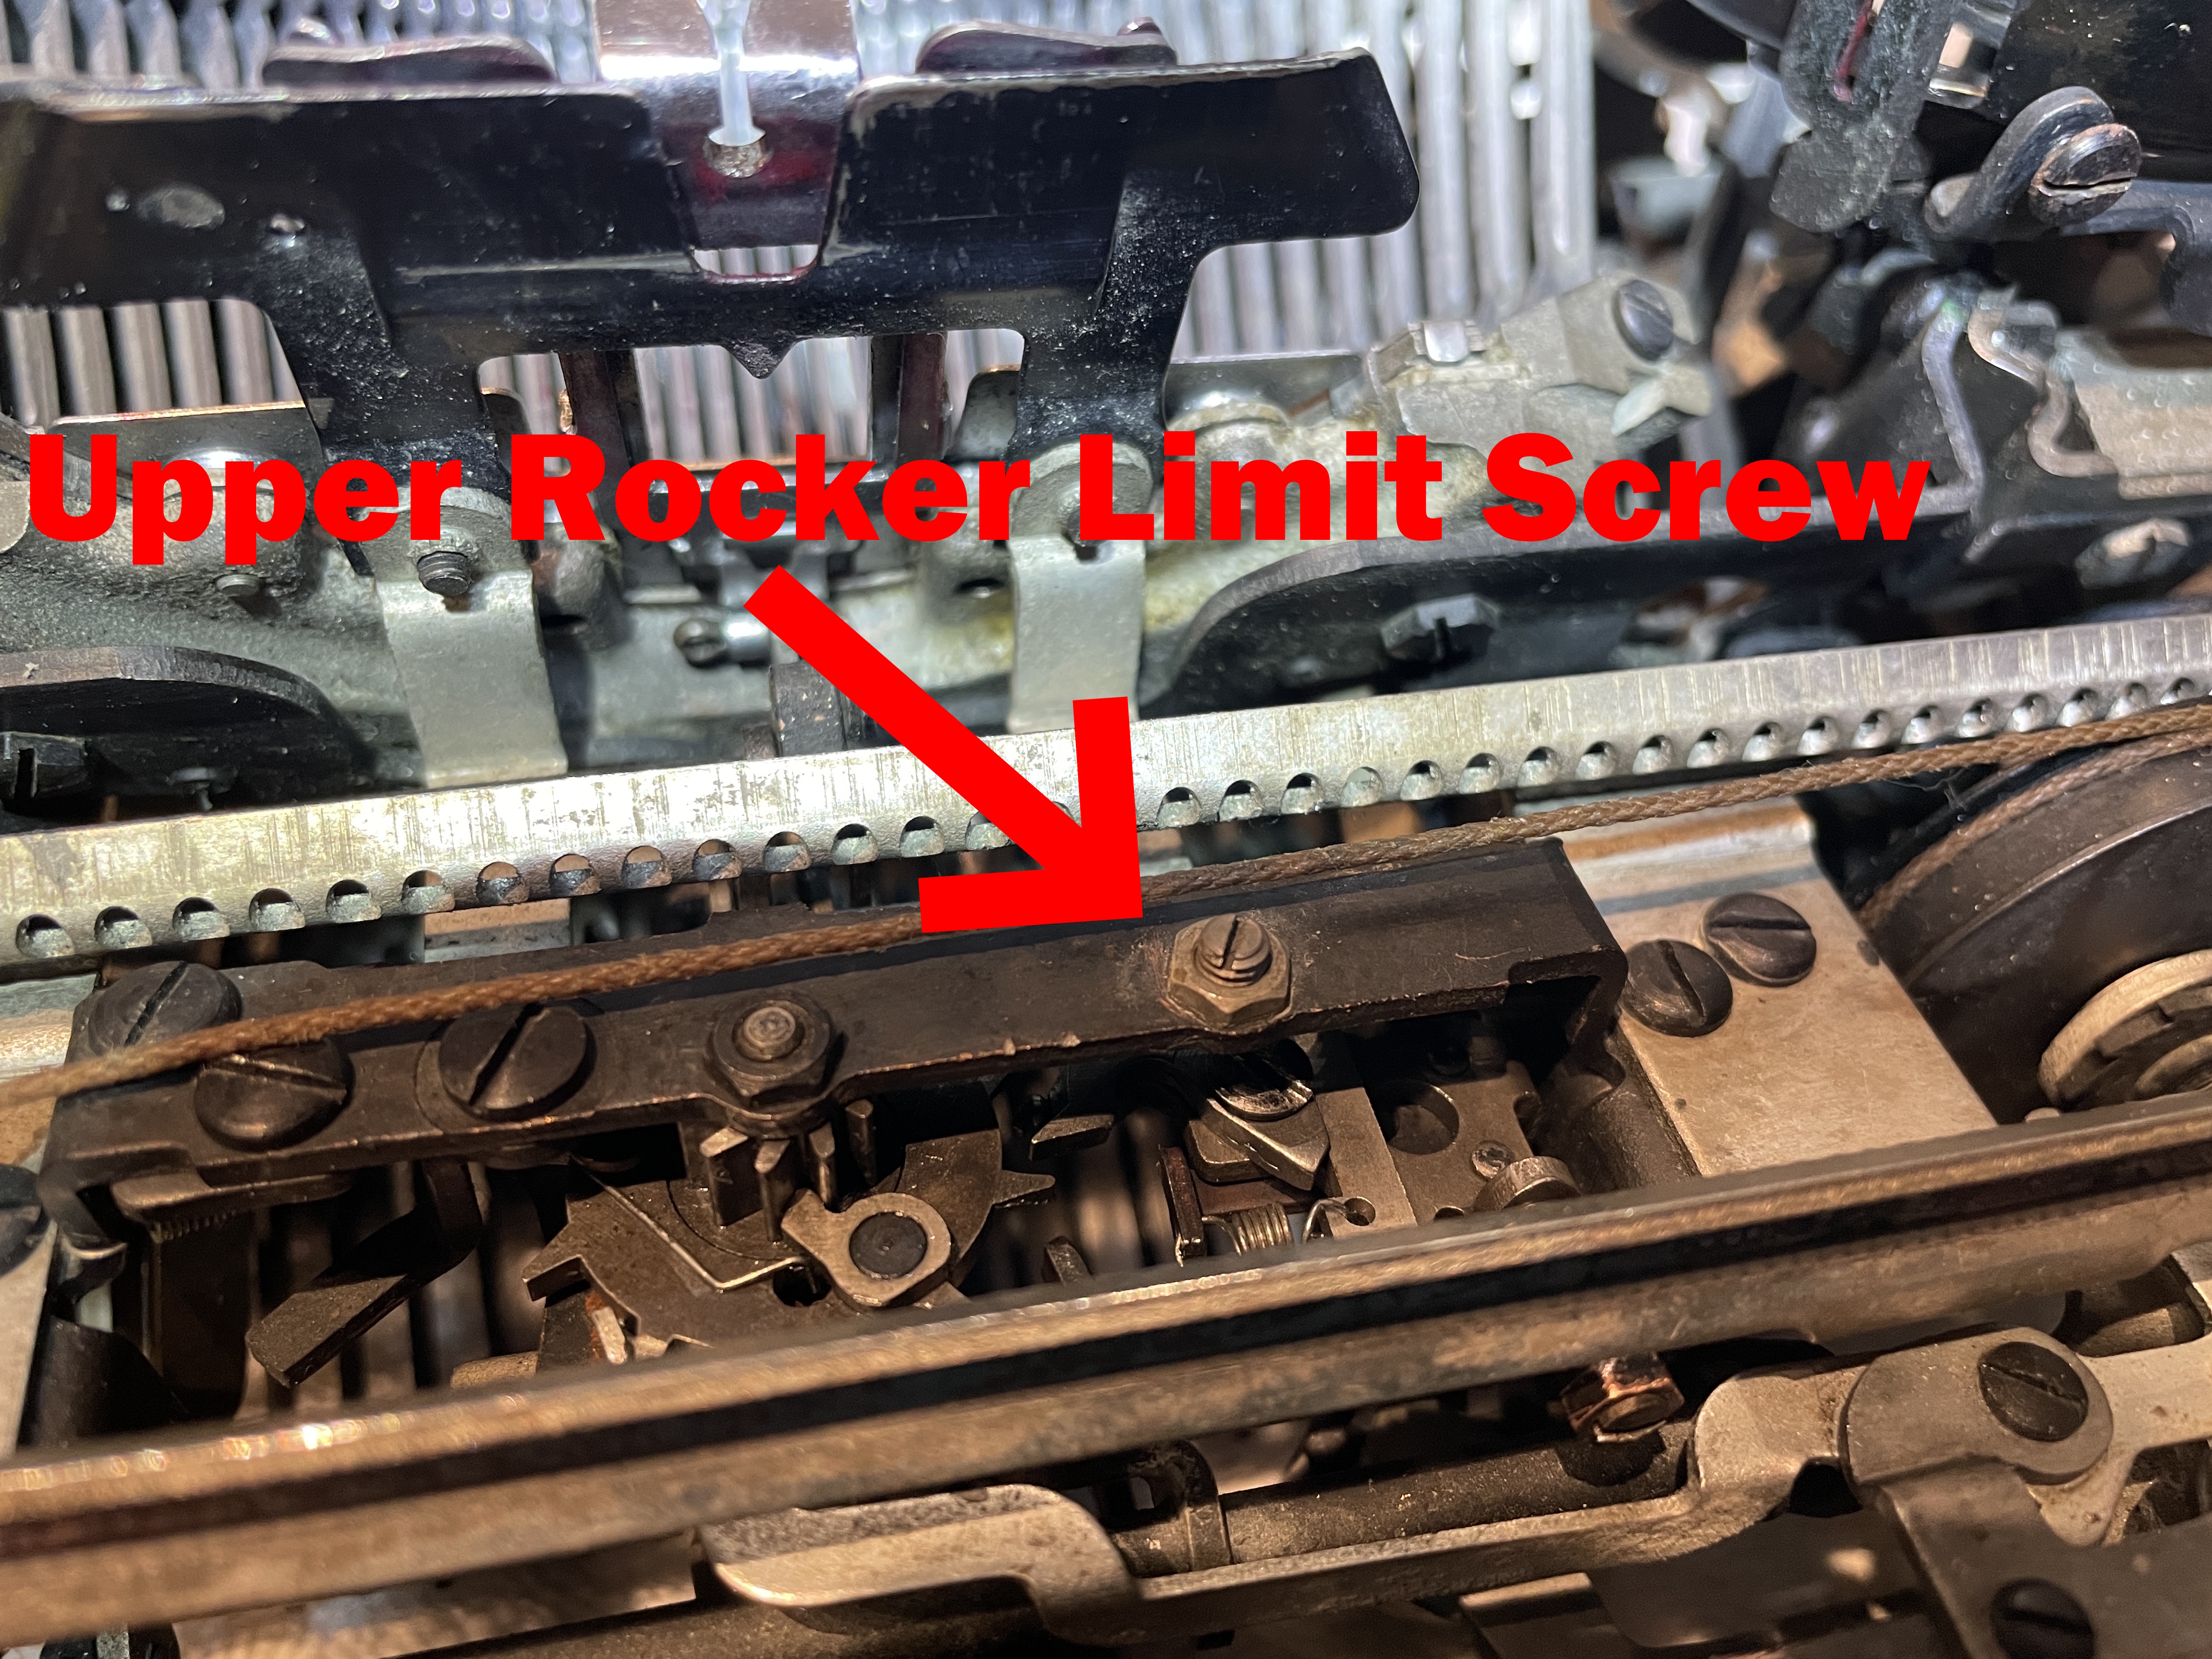
I gave the limit screw a couple turns so that the escapement plate did not rock so far. I put everything back together and ta-da! No more jamming or skipping.
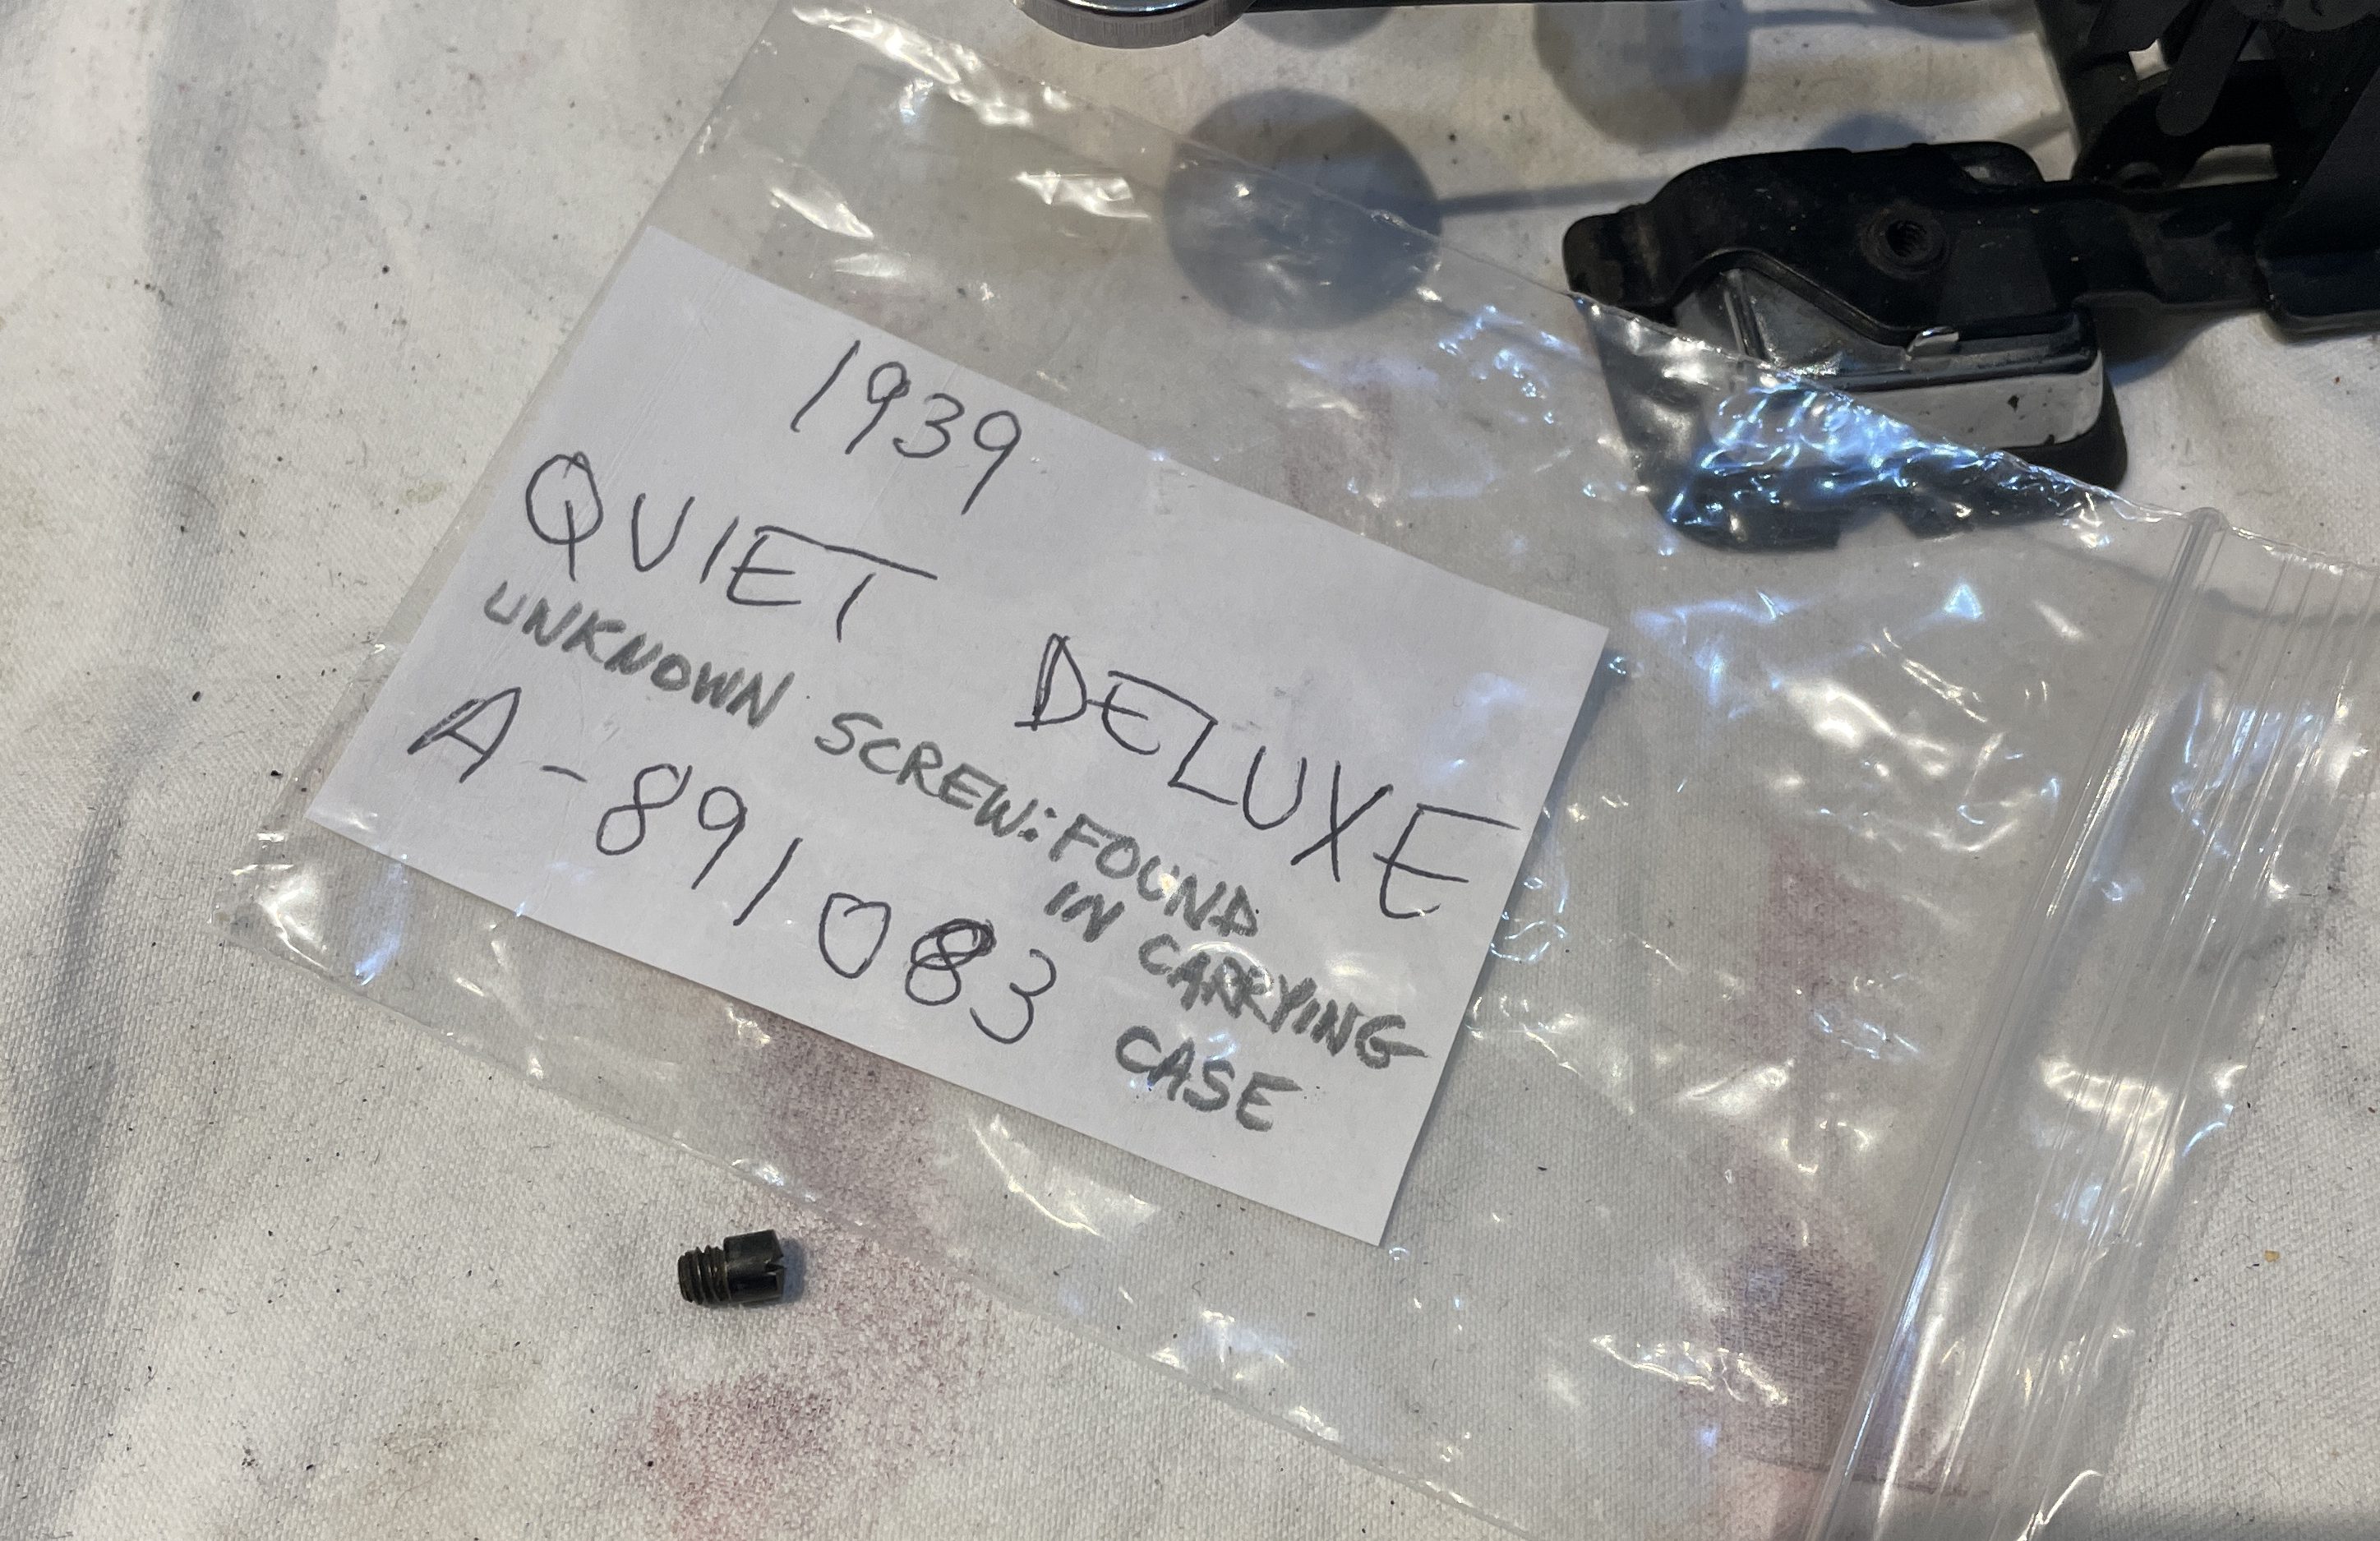
I wasn’t done yet. The shift wasn’t working. I saw that there was a missing screw and a detached spring at one end of the shifting mechanism.

Fortunately, Ross had saved a random screw that was rattling around inside the QDL’s carrying case, and it turned out to be the missing shift screw.
I inserted the shift rod screw and re-attached the detached spring (it was for the shift lock-out). There was some binding on shift, and Duane has an excellent video on shift adjustments on QDLs.
I have been making bender tools out of cheapo screwdrivers with my Dremel.

And I made the adjustment. No more binding.

Everything was looking good, so it was time to put the cover plates back on. Replacing the shell is no walk in the park. In fact, I struggled more with the base cover plate than replacing the escapement or the carriage. The video below is good. Depressing the front row of keys was very helpful.
I got all the cover plates back on and tested typing. Everything was good…oh, good grief!?

The Hh testing at the top was typed prior to replacing the shell and the Hh testing below was after. Something was messing up the shift now that the cover plates were back on.
Halfheartedly, I removed the base cover plates and tested the shift. It was still messed up. Hmm. And after some poking and pondering, I saw my problem. A degraded, swollen rubber foot had rotated and was obstructing the shift key on the left and not allowing the shift full motion. I trimmed it with a utility knife and all was well.

After the foot fix, I had to return the typewriter to its shell. There were three very challenging tasks in the repair of this typewriter: removing and replacing the carriage, removing and replacing the escapement plate, and returning the typewriter to its base cover shell. It’s all back together now.

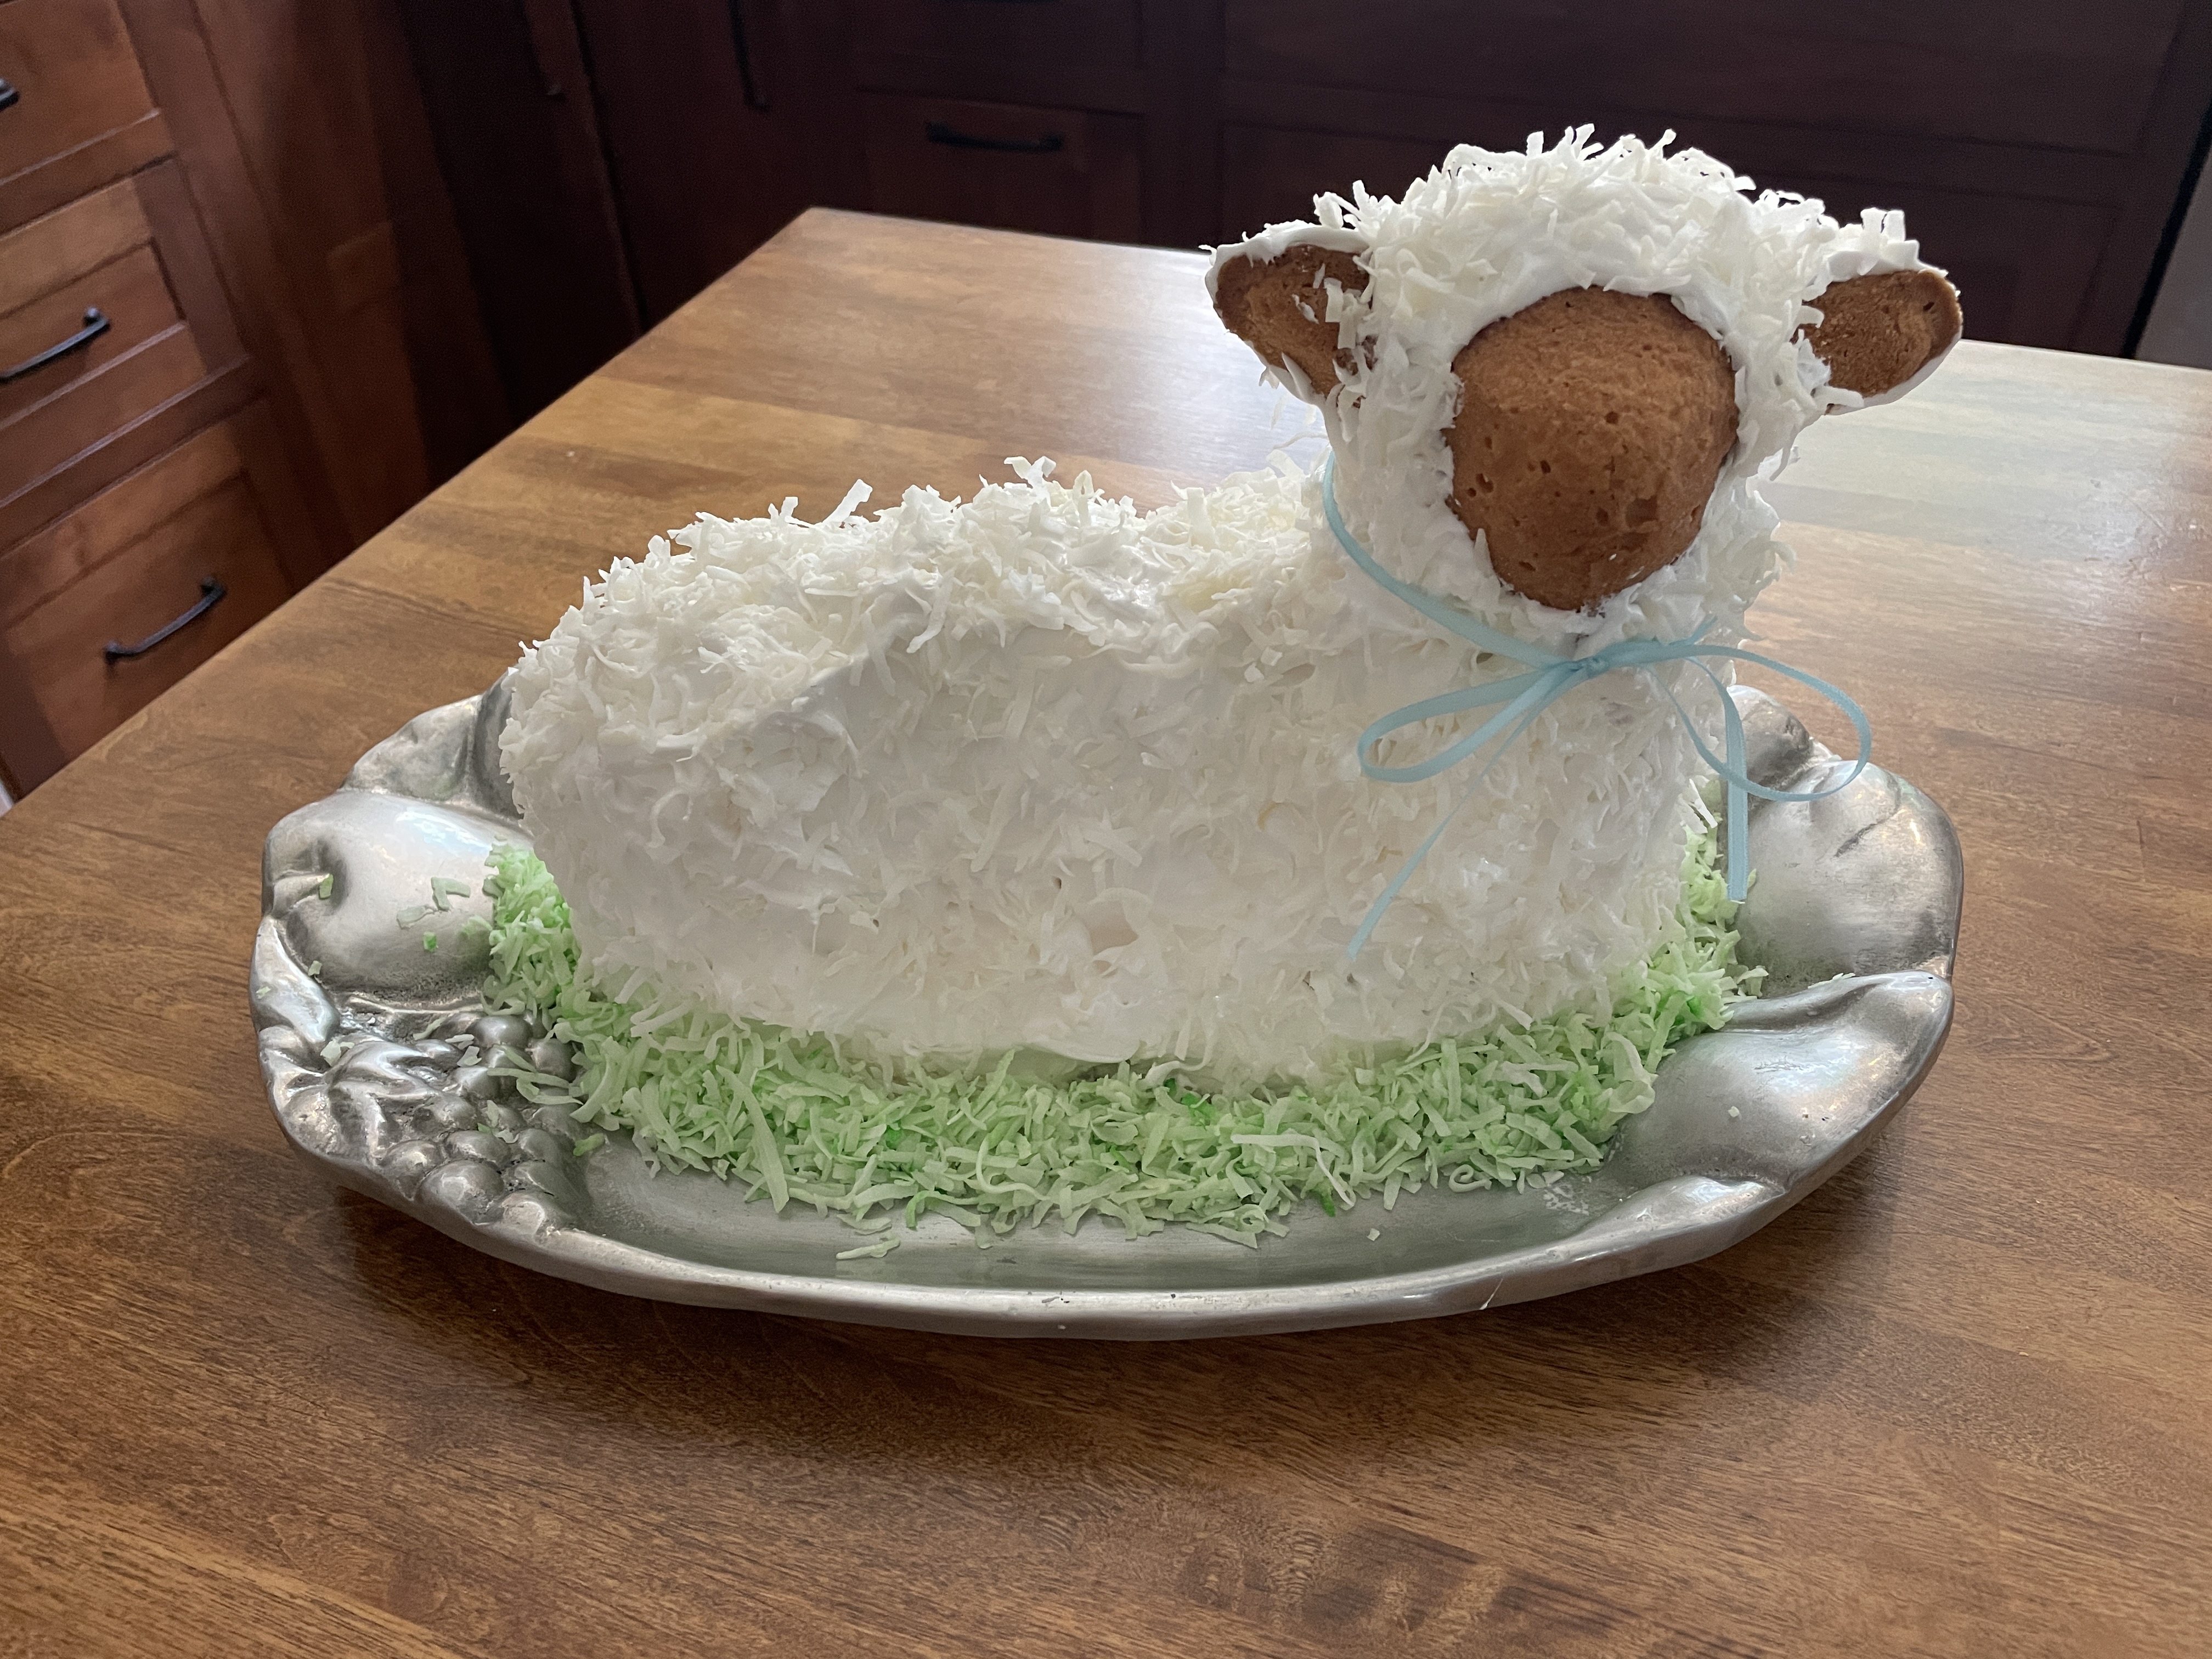
Speaking of challenging archaic technology, I am The Keeper of the family lambie cake mold, and it is my responsibility to create the Easter lambie cake each year. It’s a highly technical, two-day process, fraught with expected and unexpected challenges. My go-to lambie cake resource is RetroRuth’s Mid-century Menu.

It turned out very cute this year, like a shaggy white dog.

Another great, informative, and inspiring story, thank you!
LikeLike
Fantastically done, and very well documented! 😀
Lambie Cake looks tasty, too!
LikeLiked by 1 person
Wonderful! Your discussion about the escapement plate limiting screw, makes me wonder if that might be a good place to look for fixing the commonplace skipping and jamming/bunching tendency of QDLs. Do ya think?
LikeLike
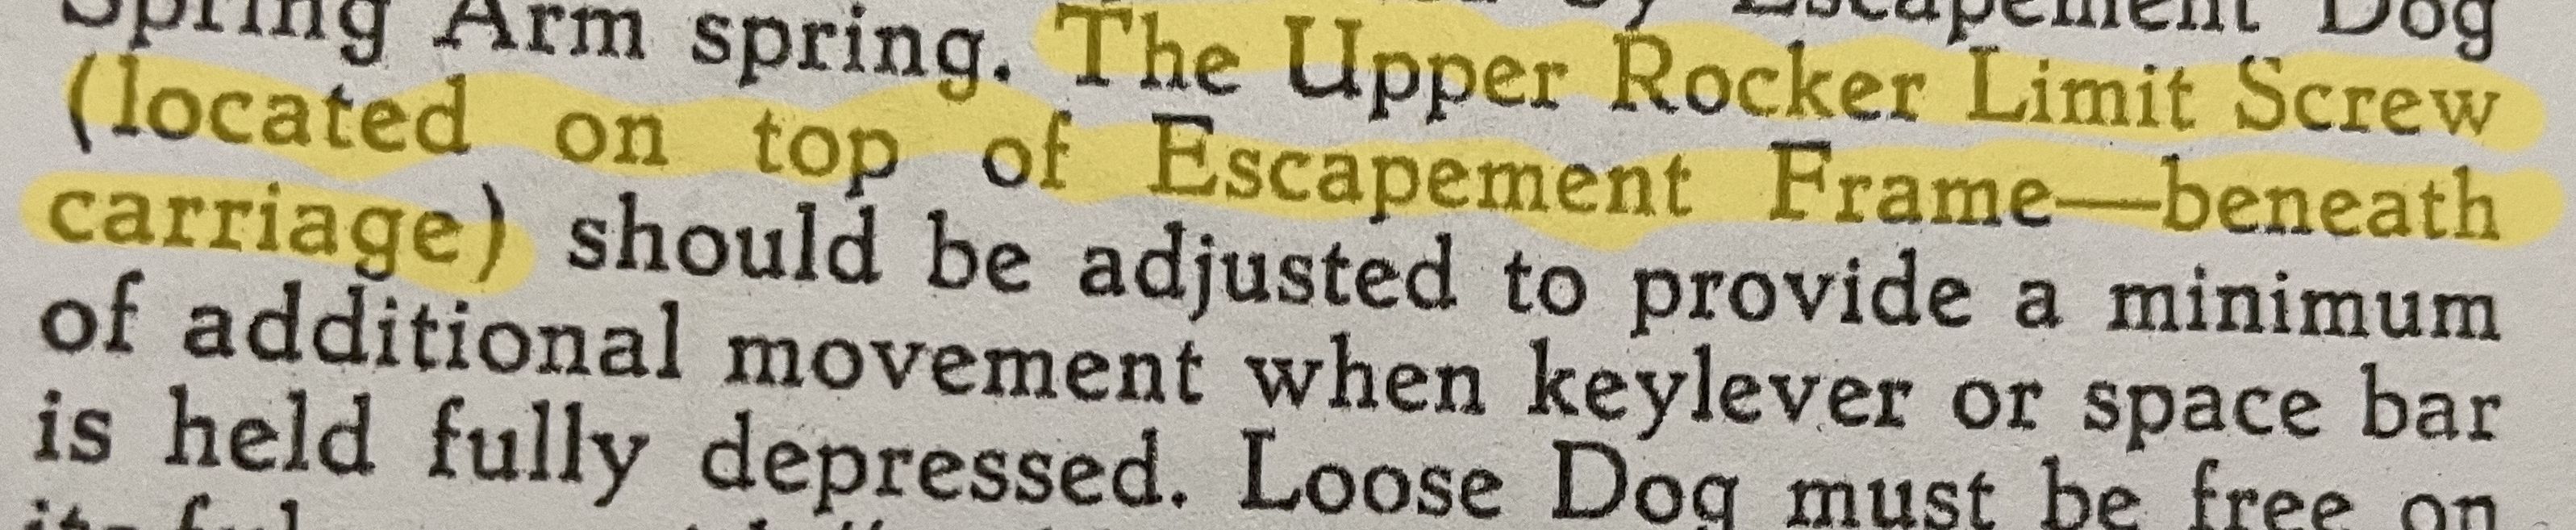
Replying to and clarifying my own comment above, I’m referring to the upper rocker limit screw. Thanks!
LikeLike
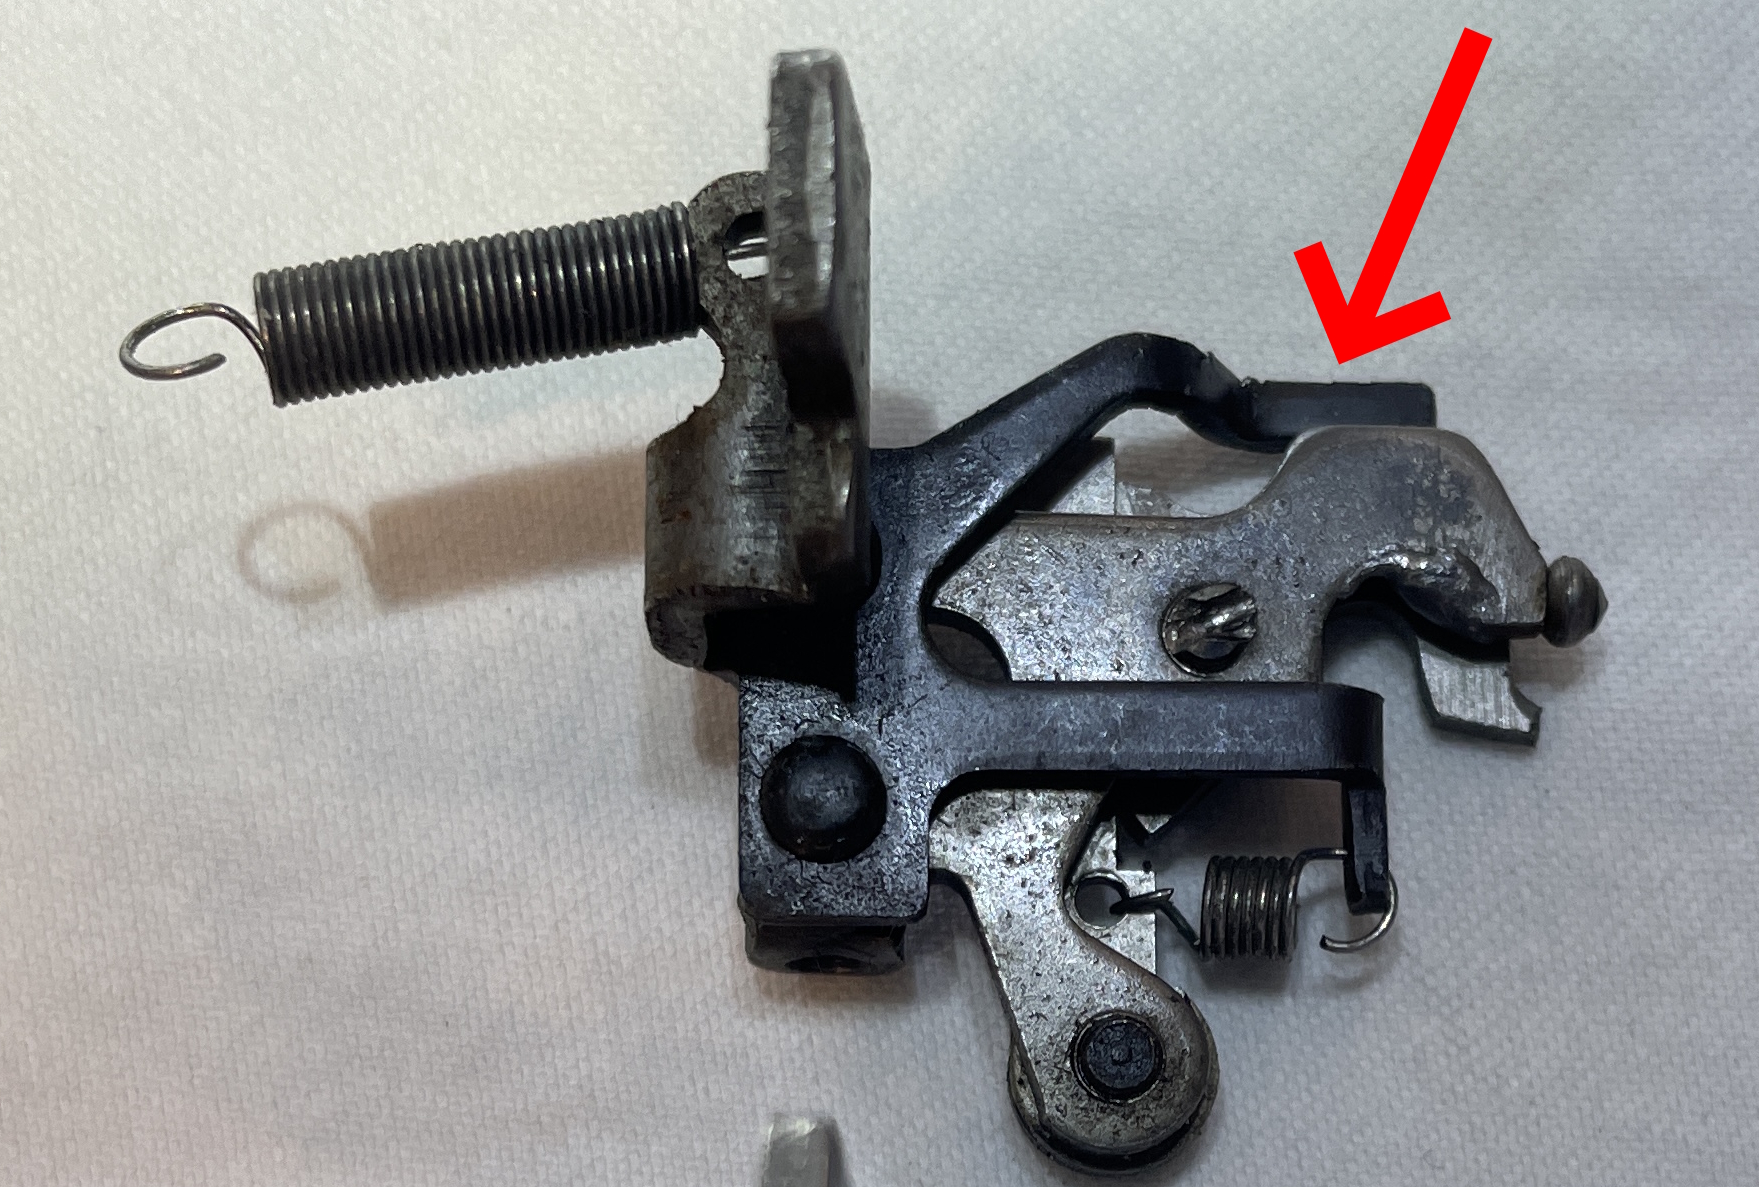
This QDL was both skipping AND jamming in the same line. When I watched, I saw the escapement plate rocking too far and the dogs either missing the star wheel or fouling it. The Upper Rocker Limit Screw is located directly underneath the carriage in the center of the machine. Fortunately, I had the carriage off so I could make adjustments. If the carriage is on your machine, you may want to start first with adjustments à la Phoenix Typewriter to the loose dog stop. This part here:
LikeLike
Got it. Have done the loose dog adjustment per Phoenix in the past. Sill run across the (more than?) occasional QDL that seems wired to skip or bunch. Many variables! Thanks again.
LikeLike