Sometimes a typewriter comes to me that bears evidence that someone has poured much love and attention into it. I worked on a gorgeous 1934 Remington Portable Model 5 last week that had obviously been worked and fretted over.
This is another one from Monica and Stephen’s collection of sometimes dysfunctional typewriters. They had picked it up an antique mall in Allentown, PA.
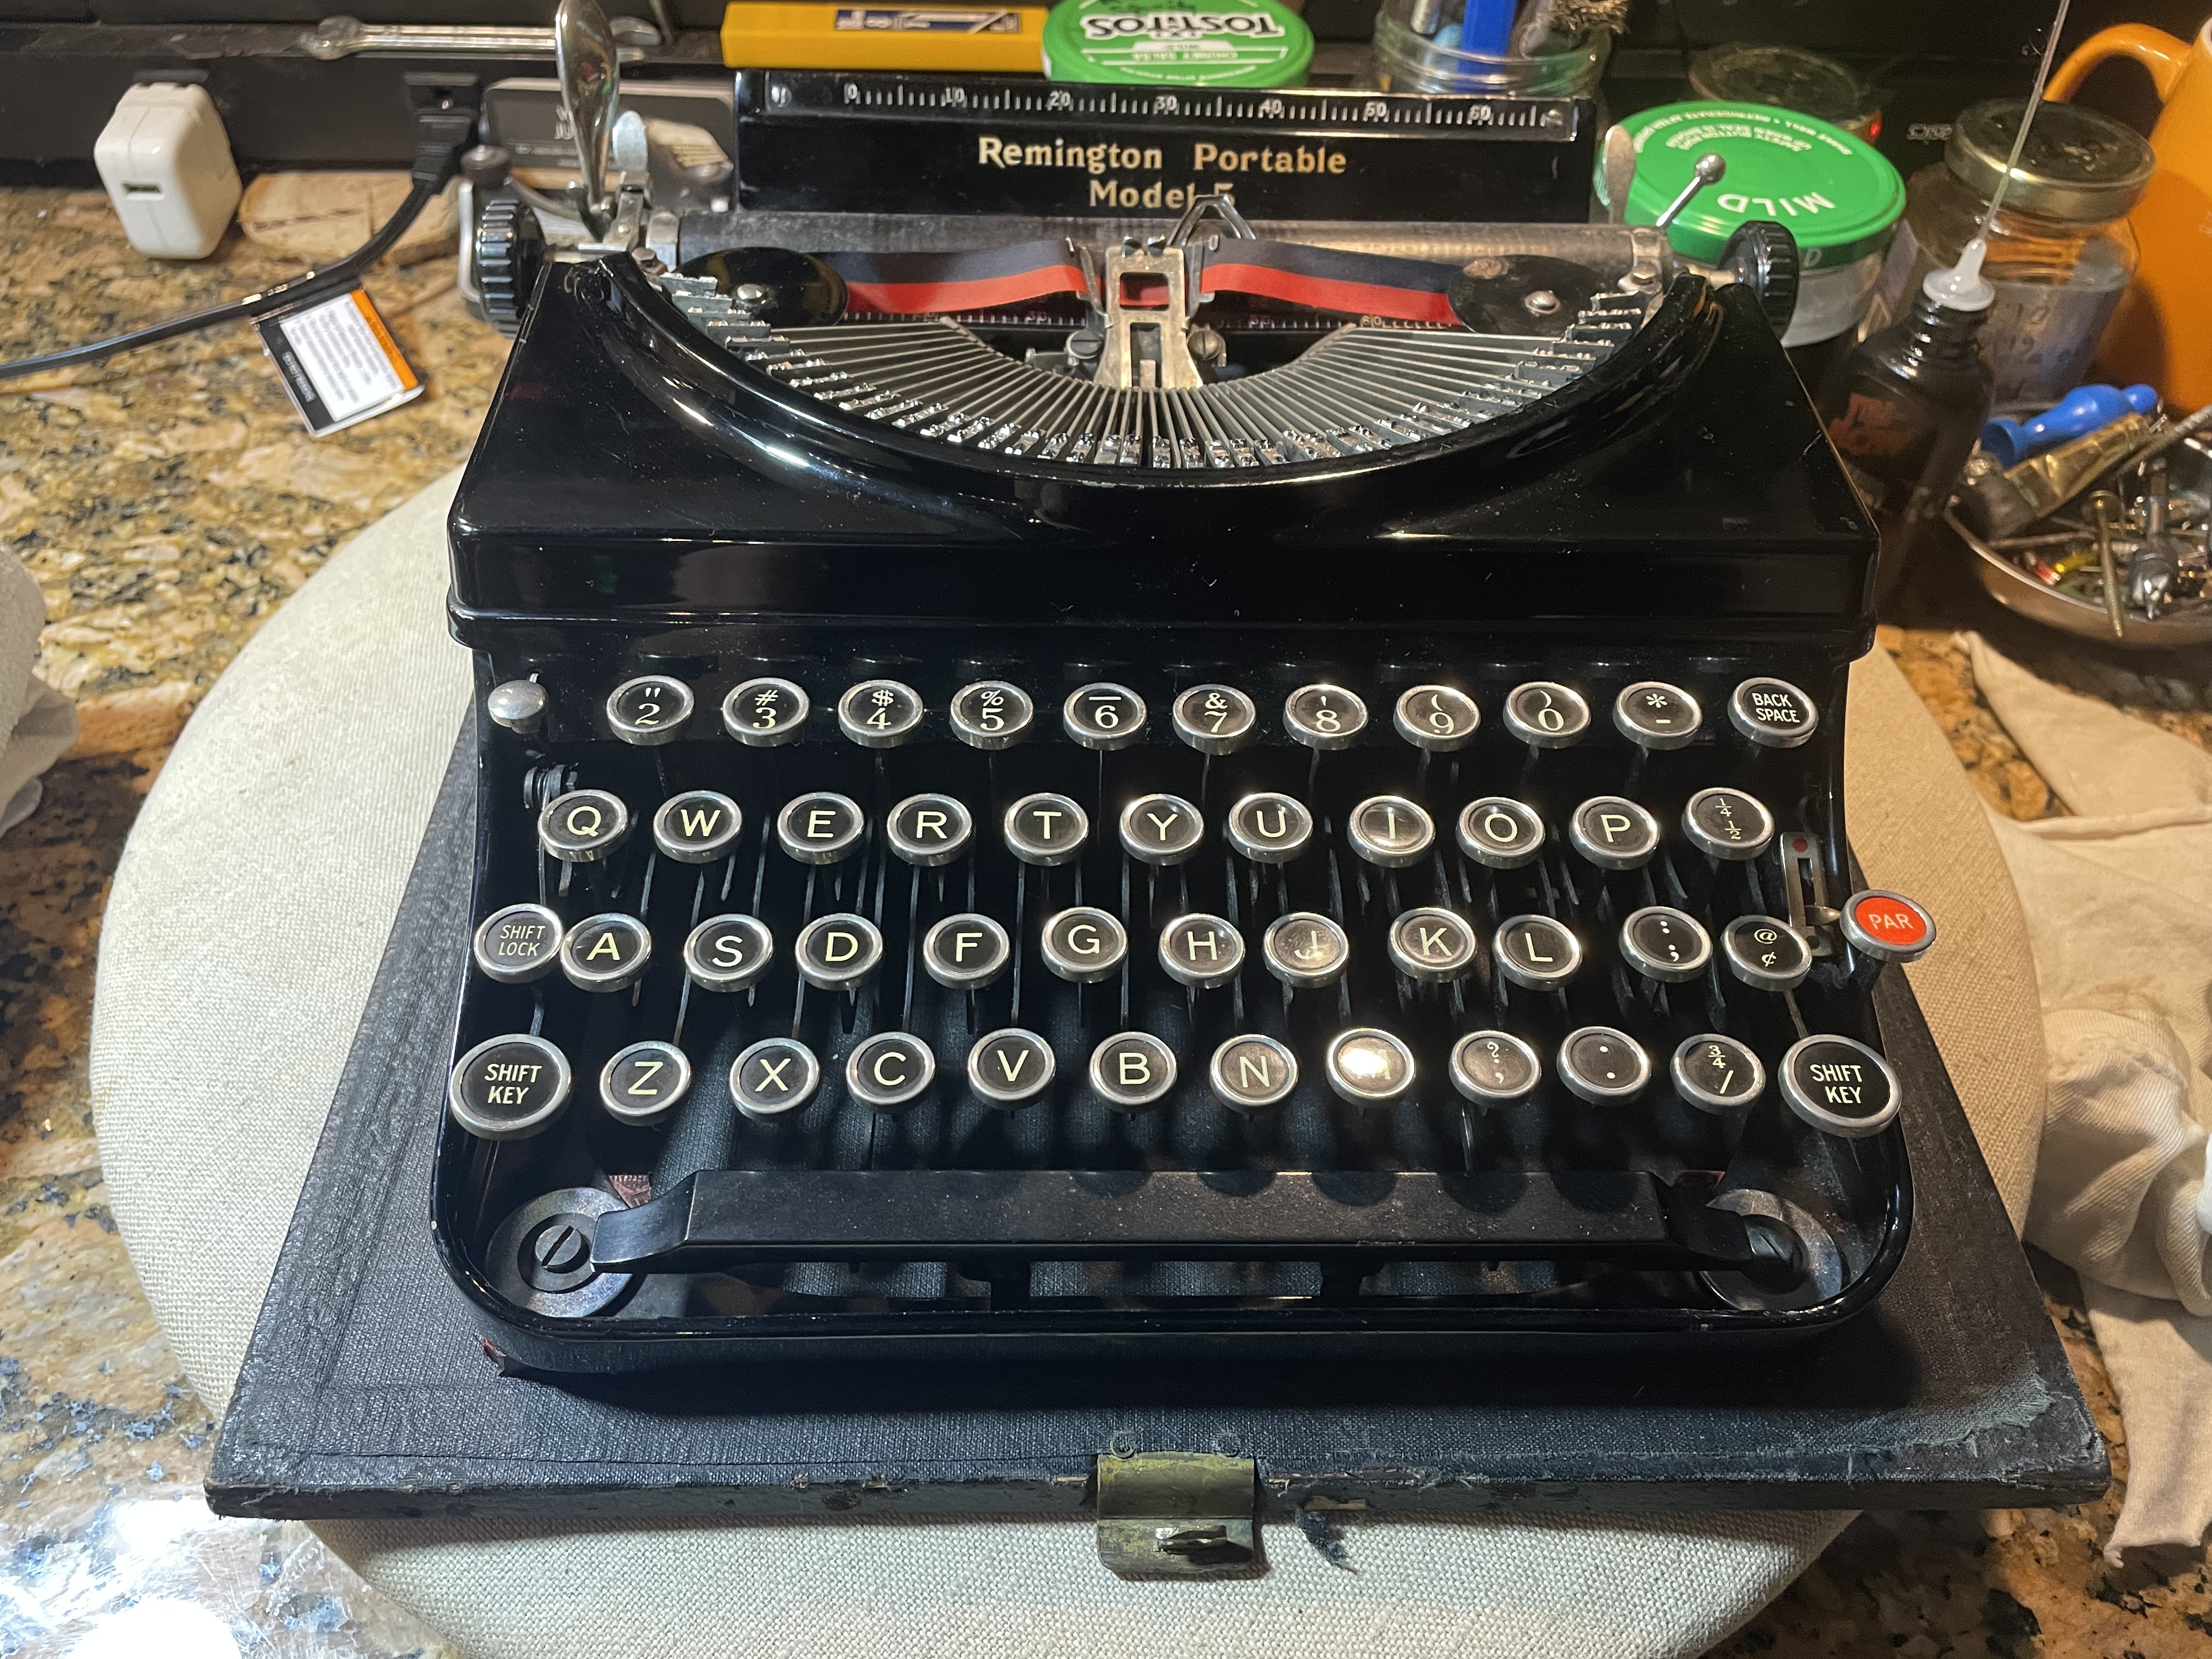
It’s a boxy Model 5 from 1934. If you want to learn about old Remington portables, Richard Polt has a section of his website dedicated to them. The curvy streamlined styling of the Remington 5 was introduced in 1935.
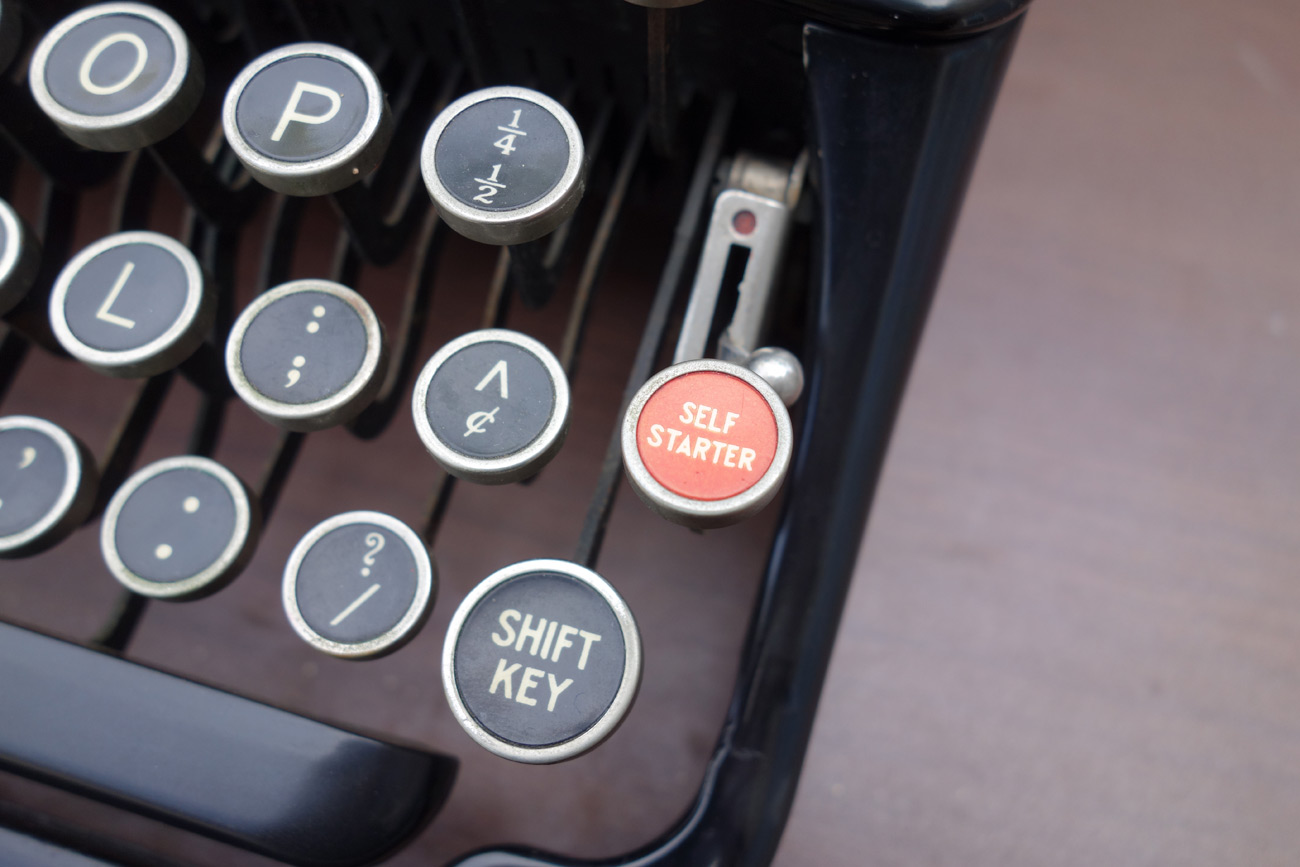
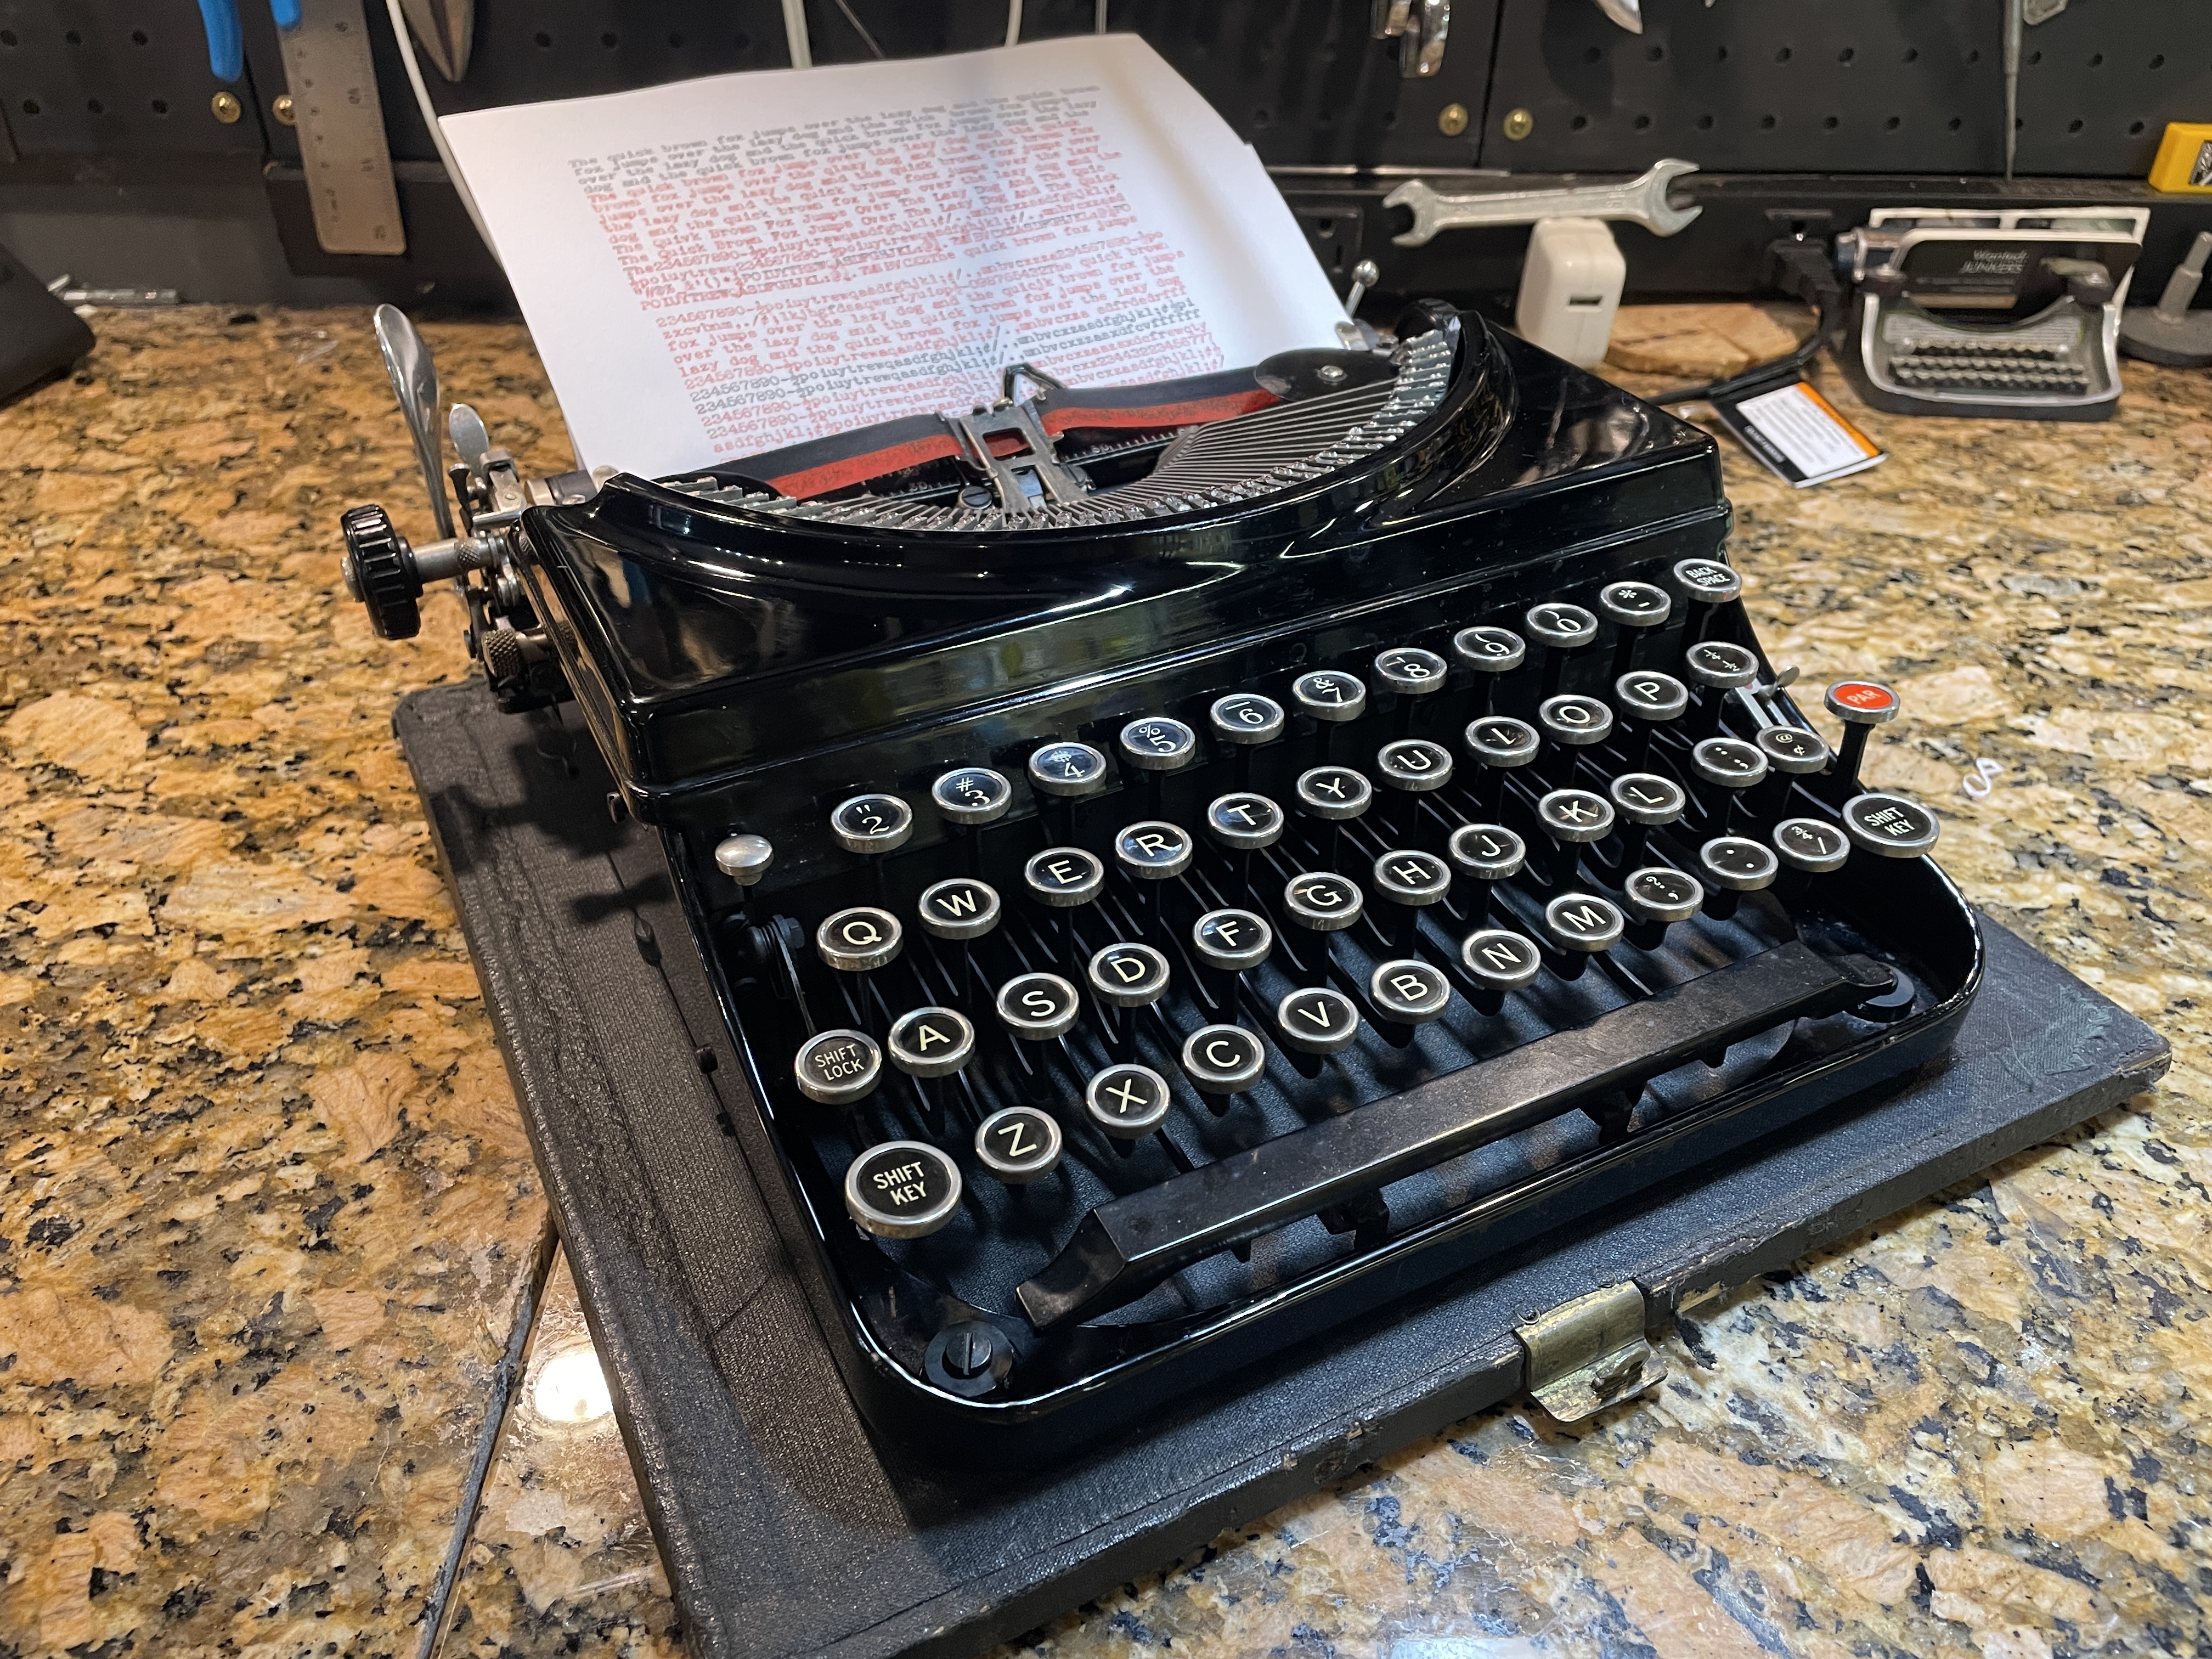
I love the red “PAR” key’s punch of color. “PAR” means “paragraph”, and sets an indent of five spaces.

Later Remingtons named this key “Self Starter”, and it did the same thing.
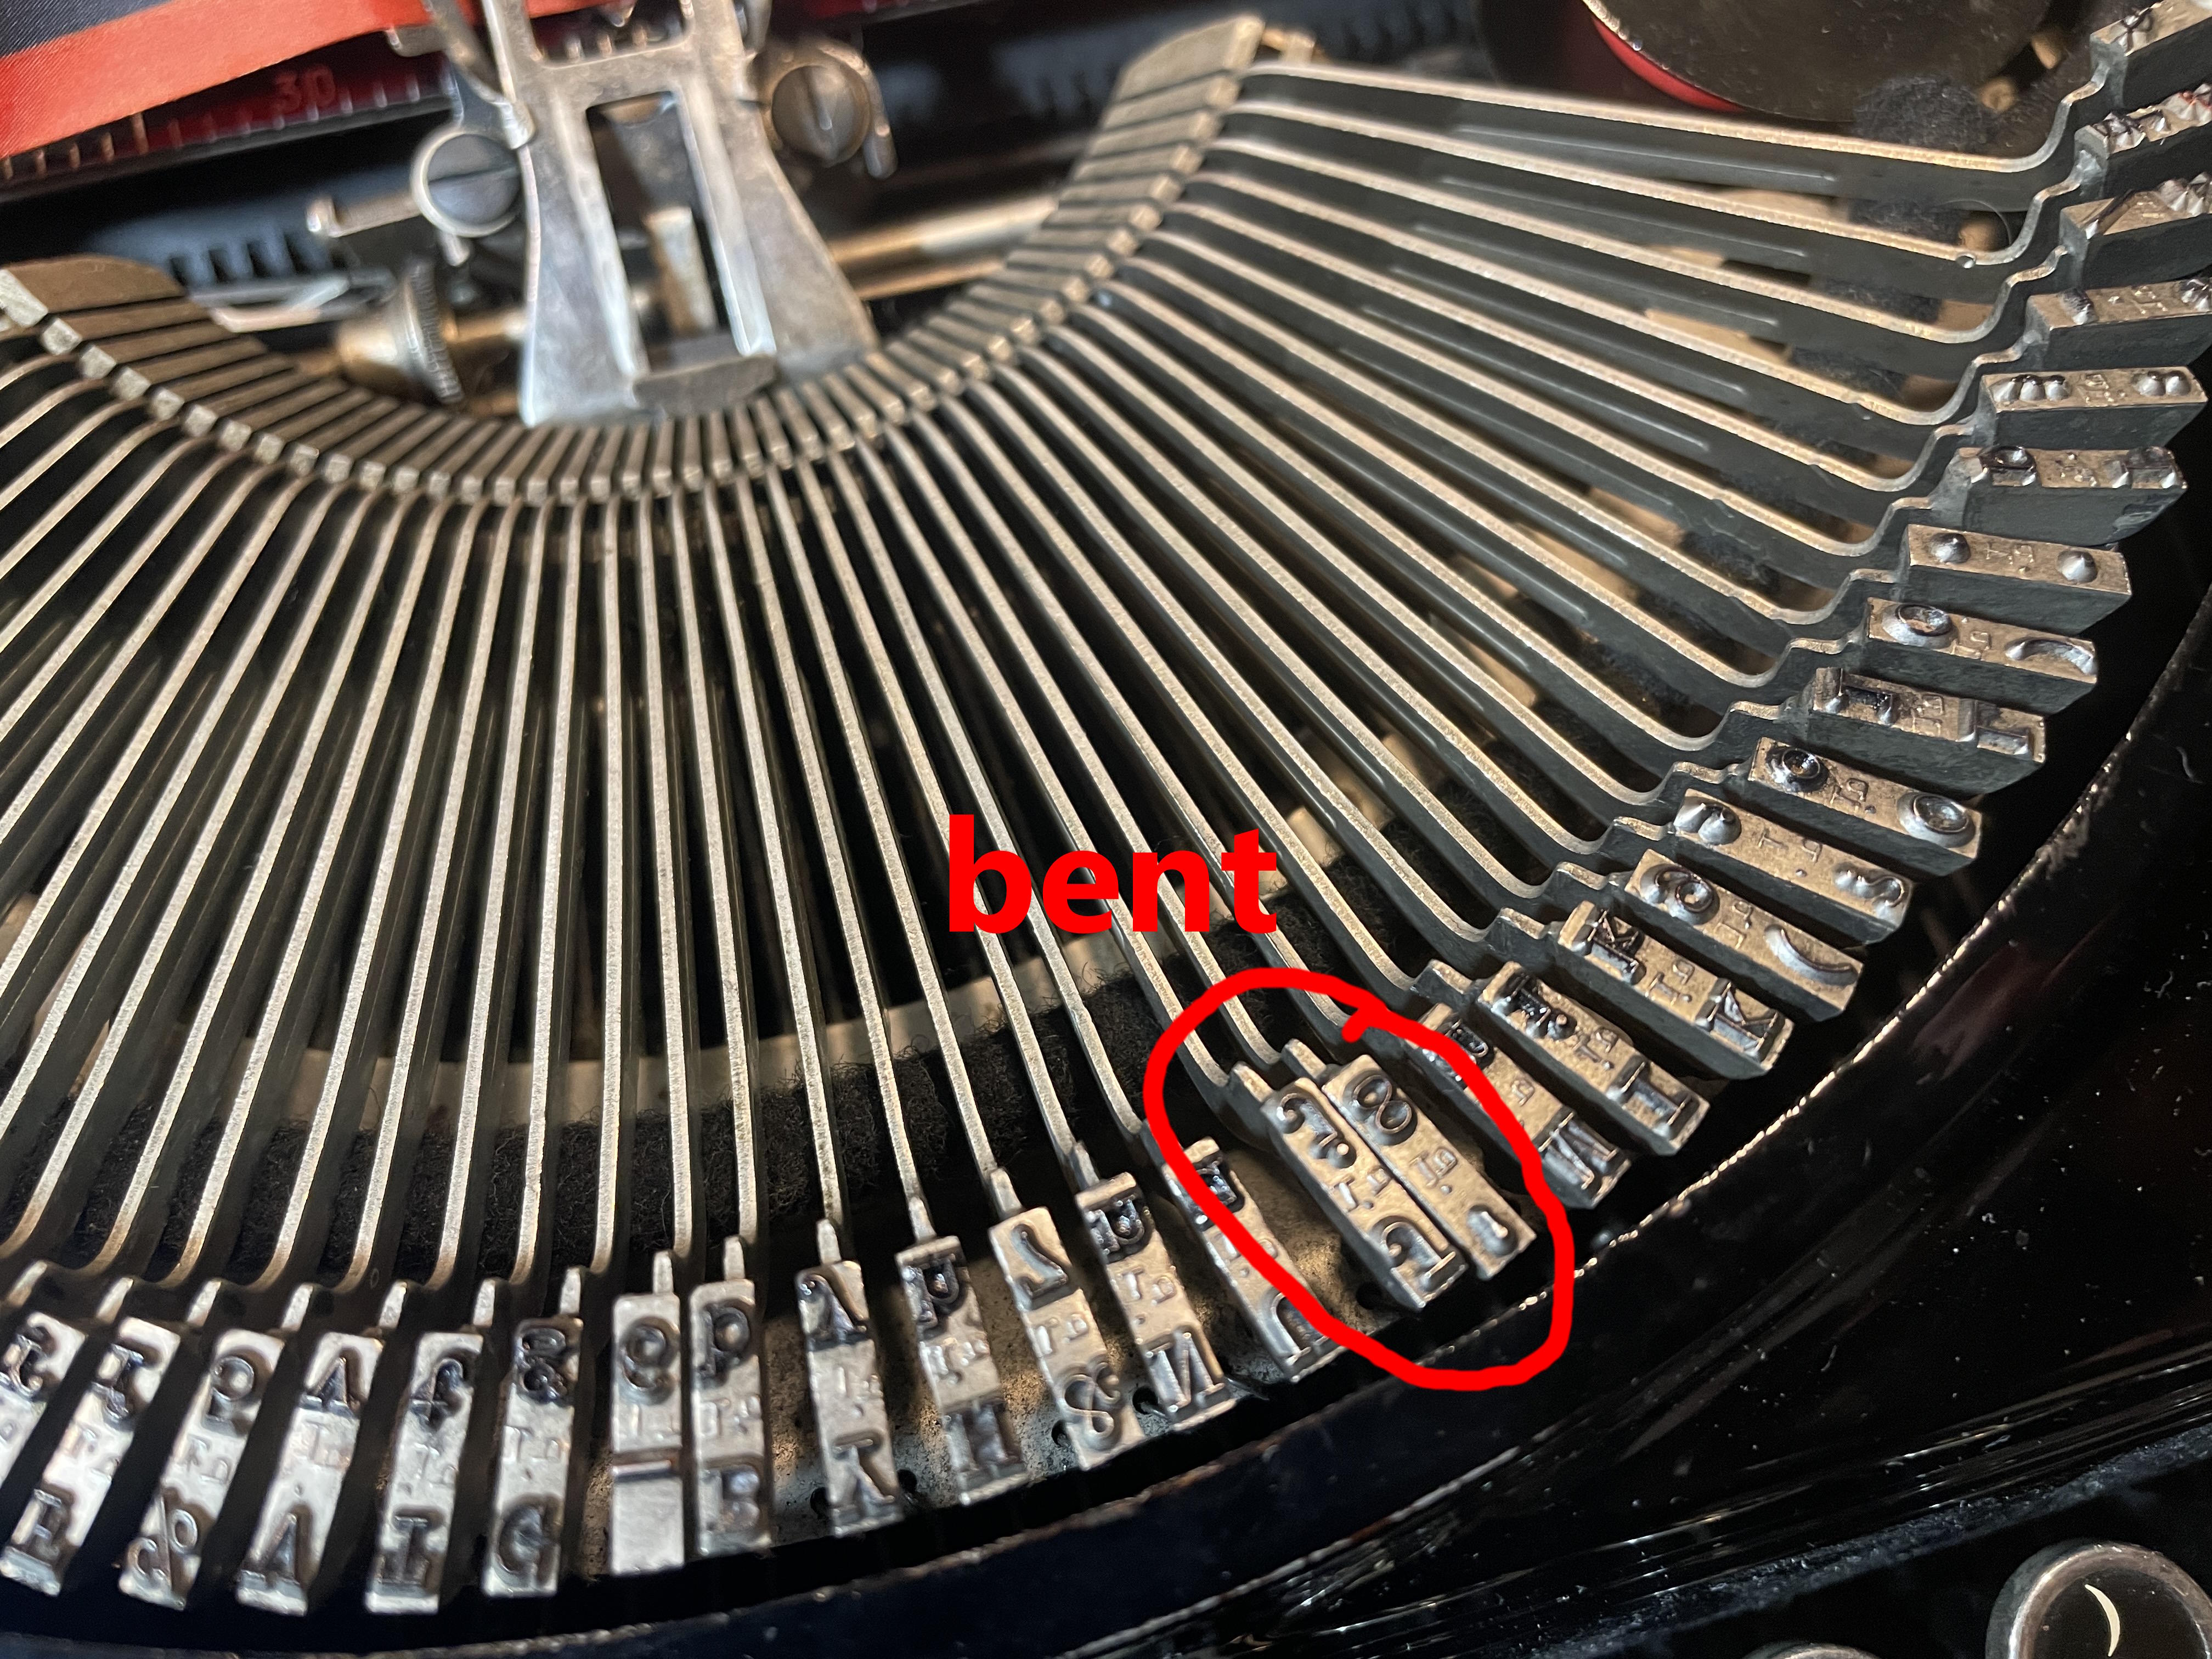
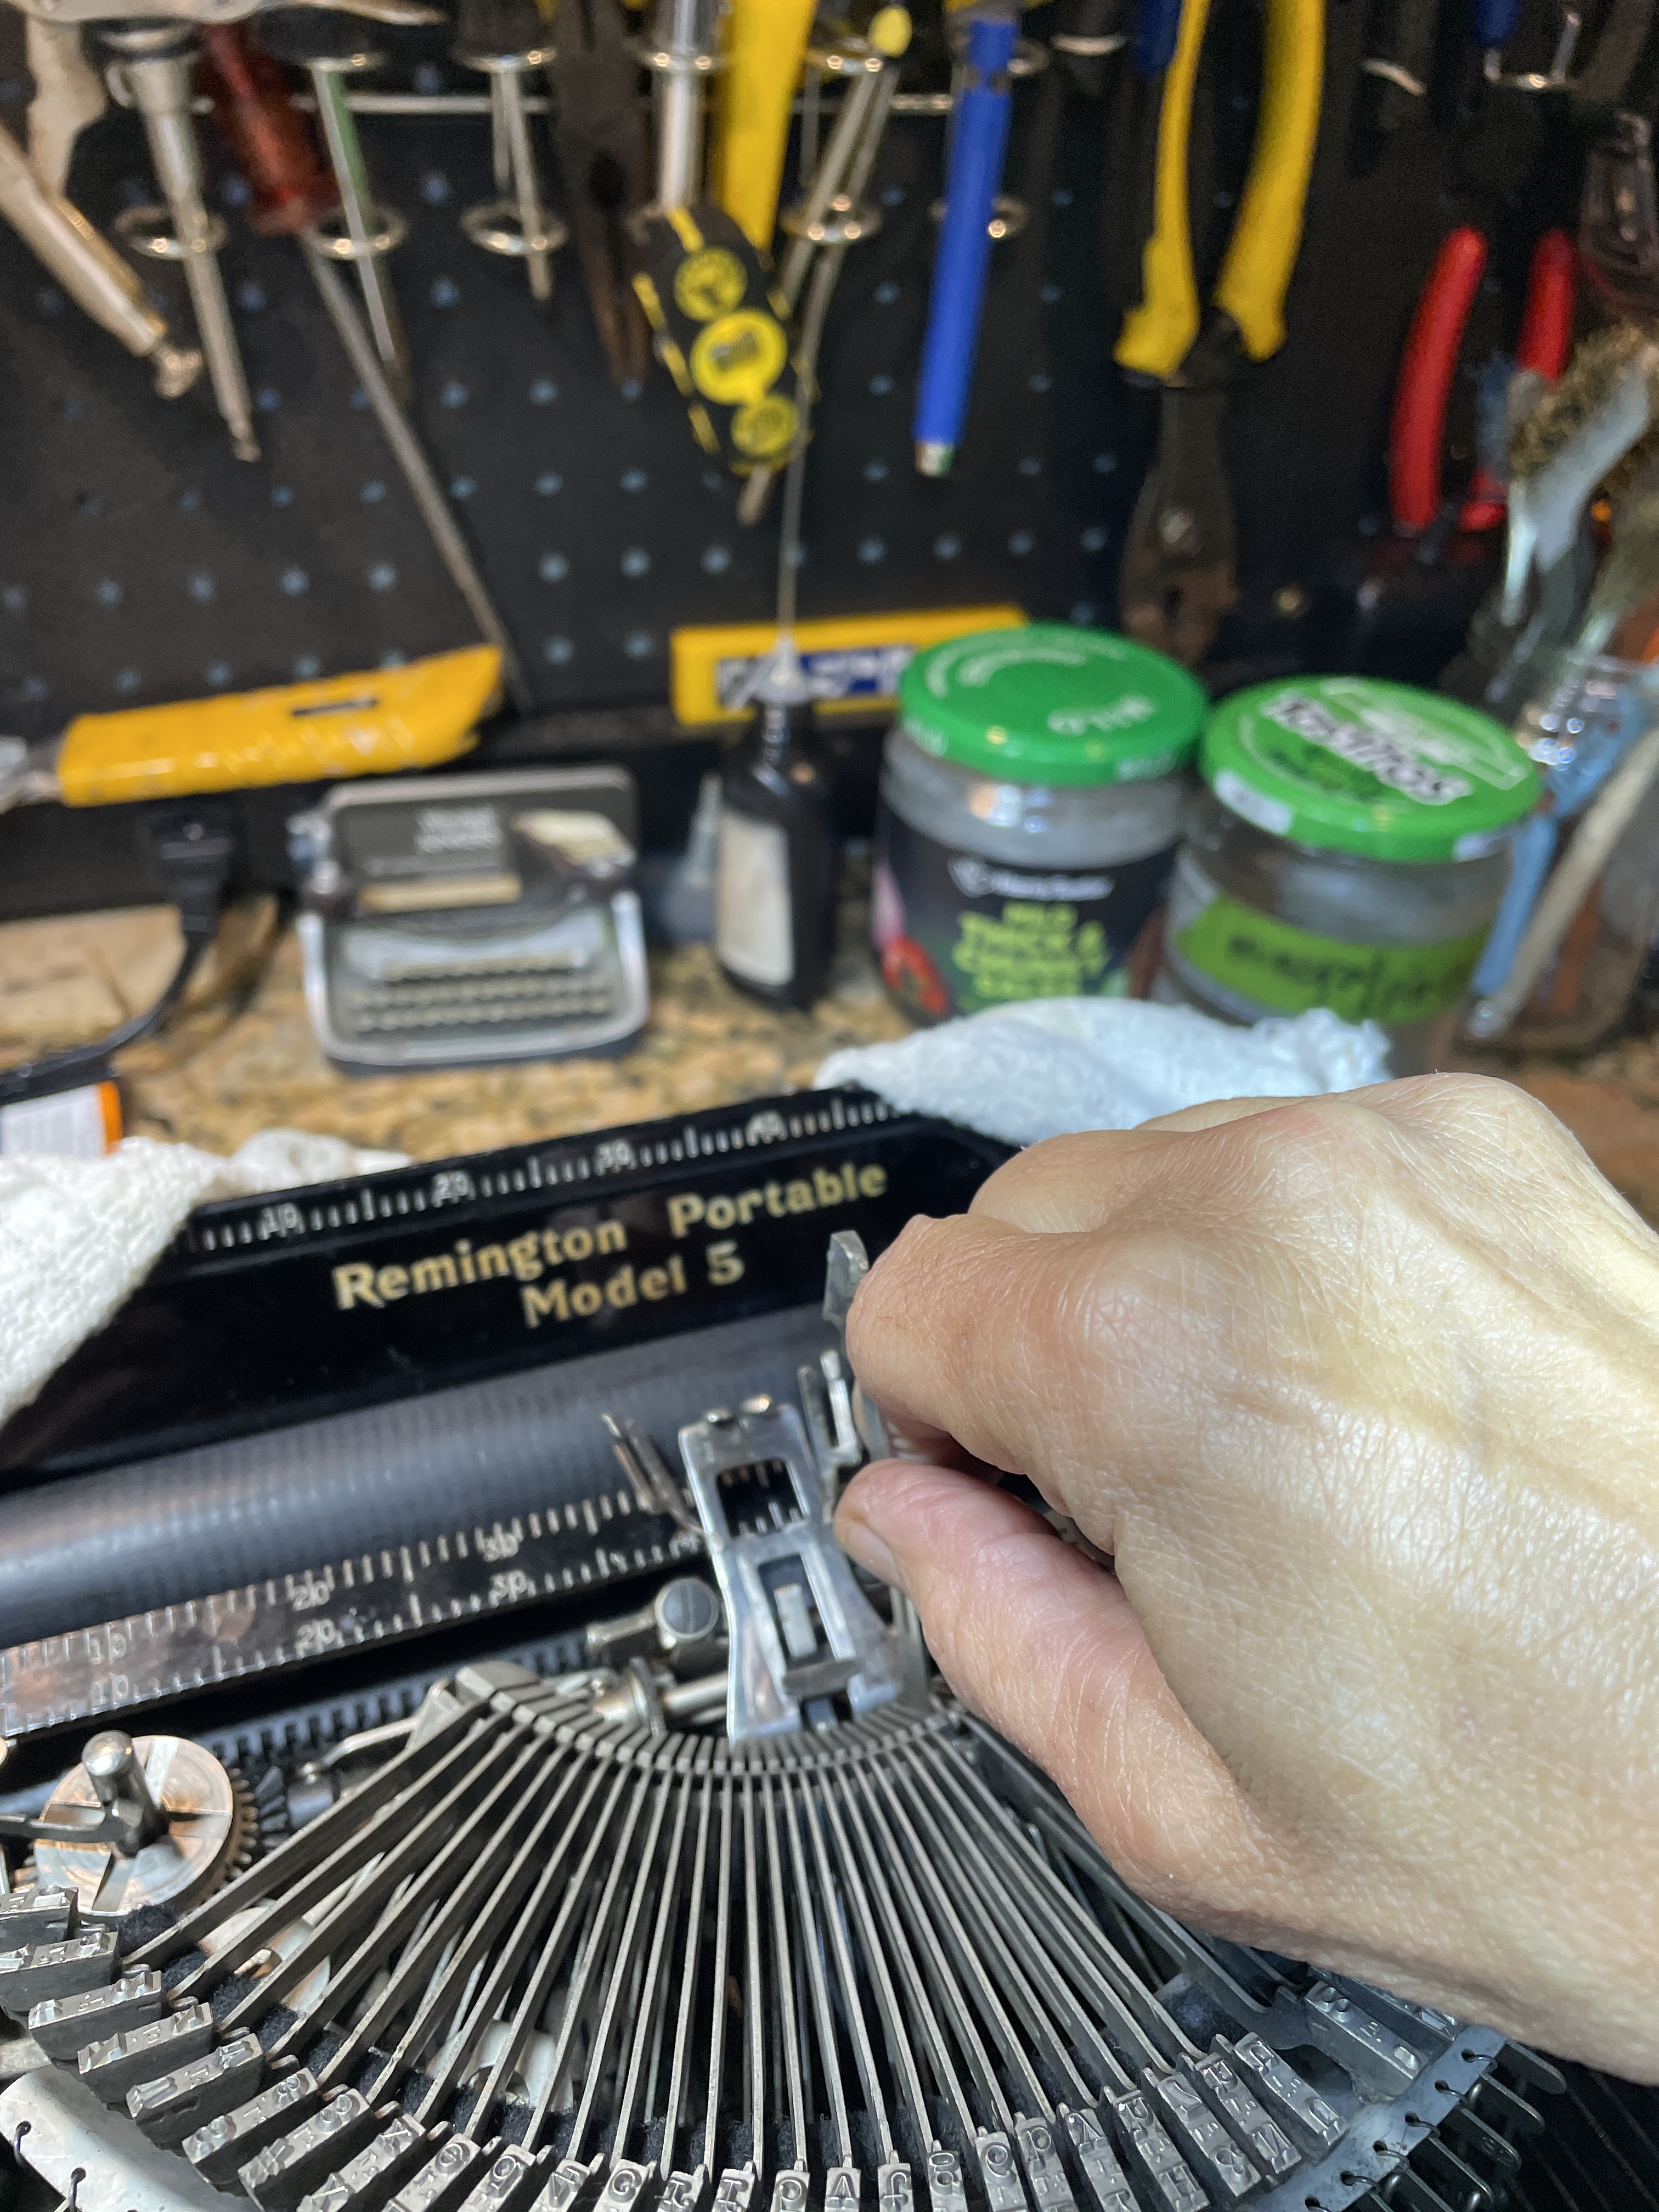
Monica and Stephen said that the problem with their Remington was that the “J/j” key was getting stuck in the type guide, and they hoped I could fix it. Okay, that sounds easy, I thought. I could see the problem: the key lay too closely to its neighbor. It just needed a little bending so that it could hit the type guide straight on and not get stuck.
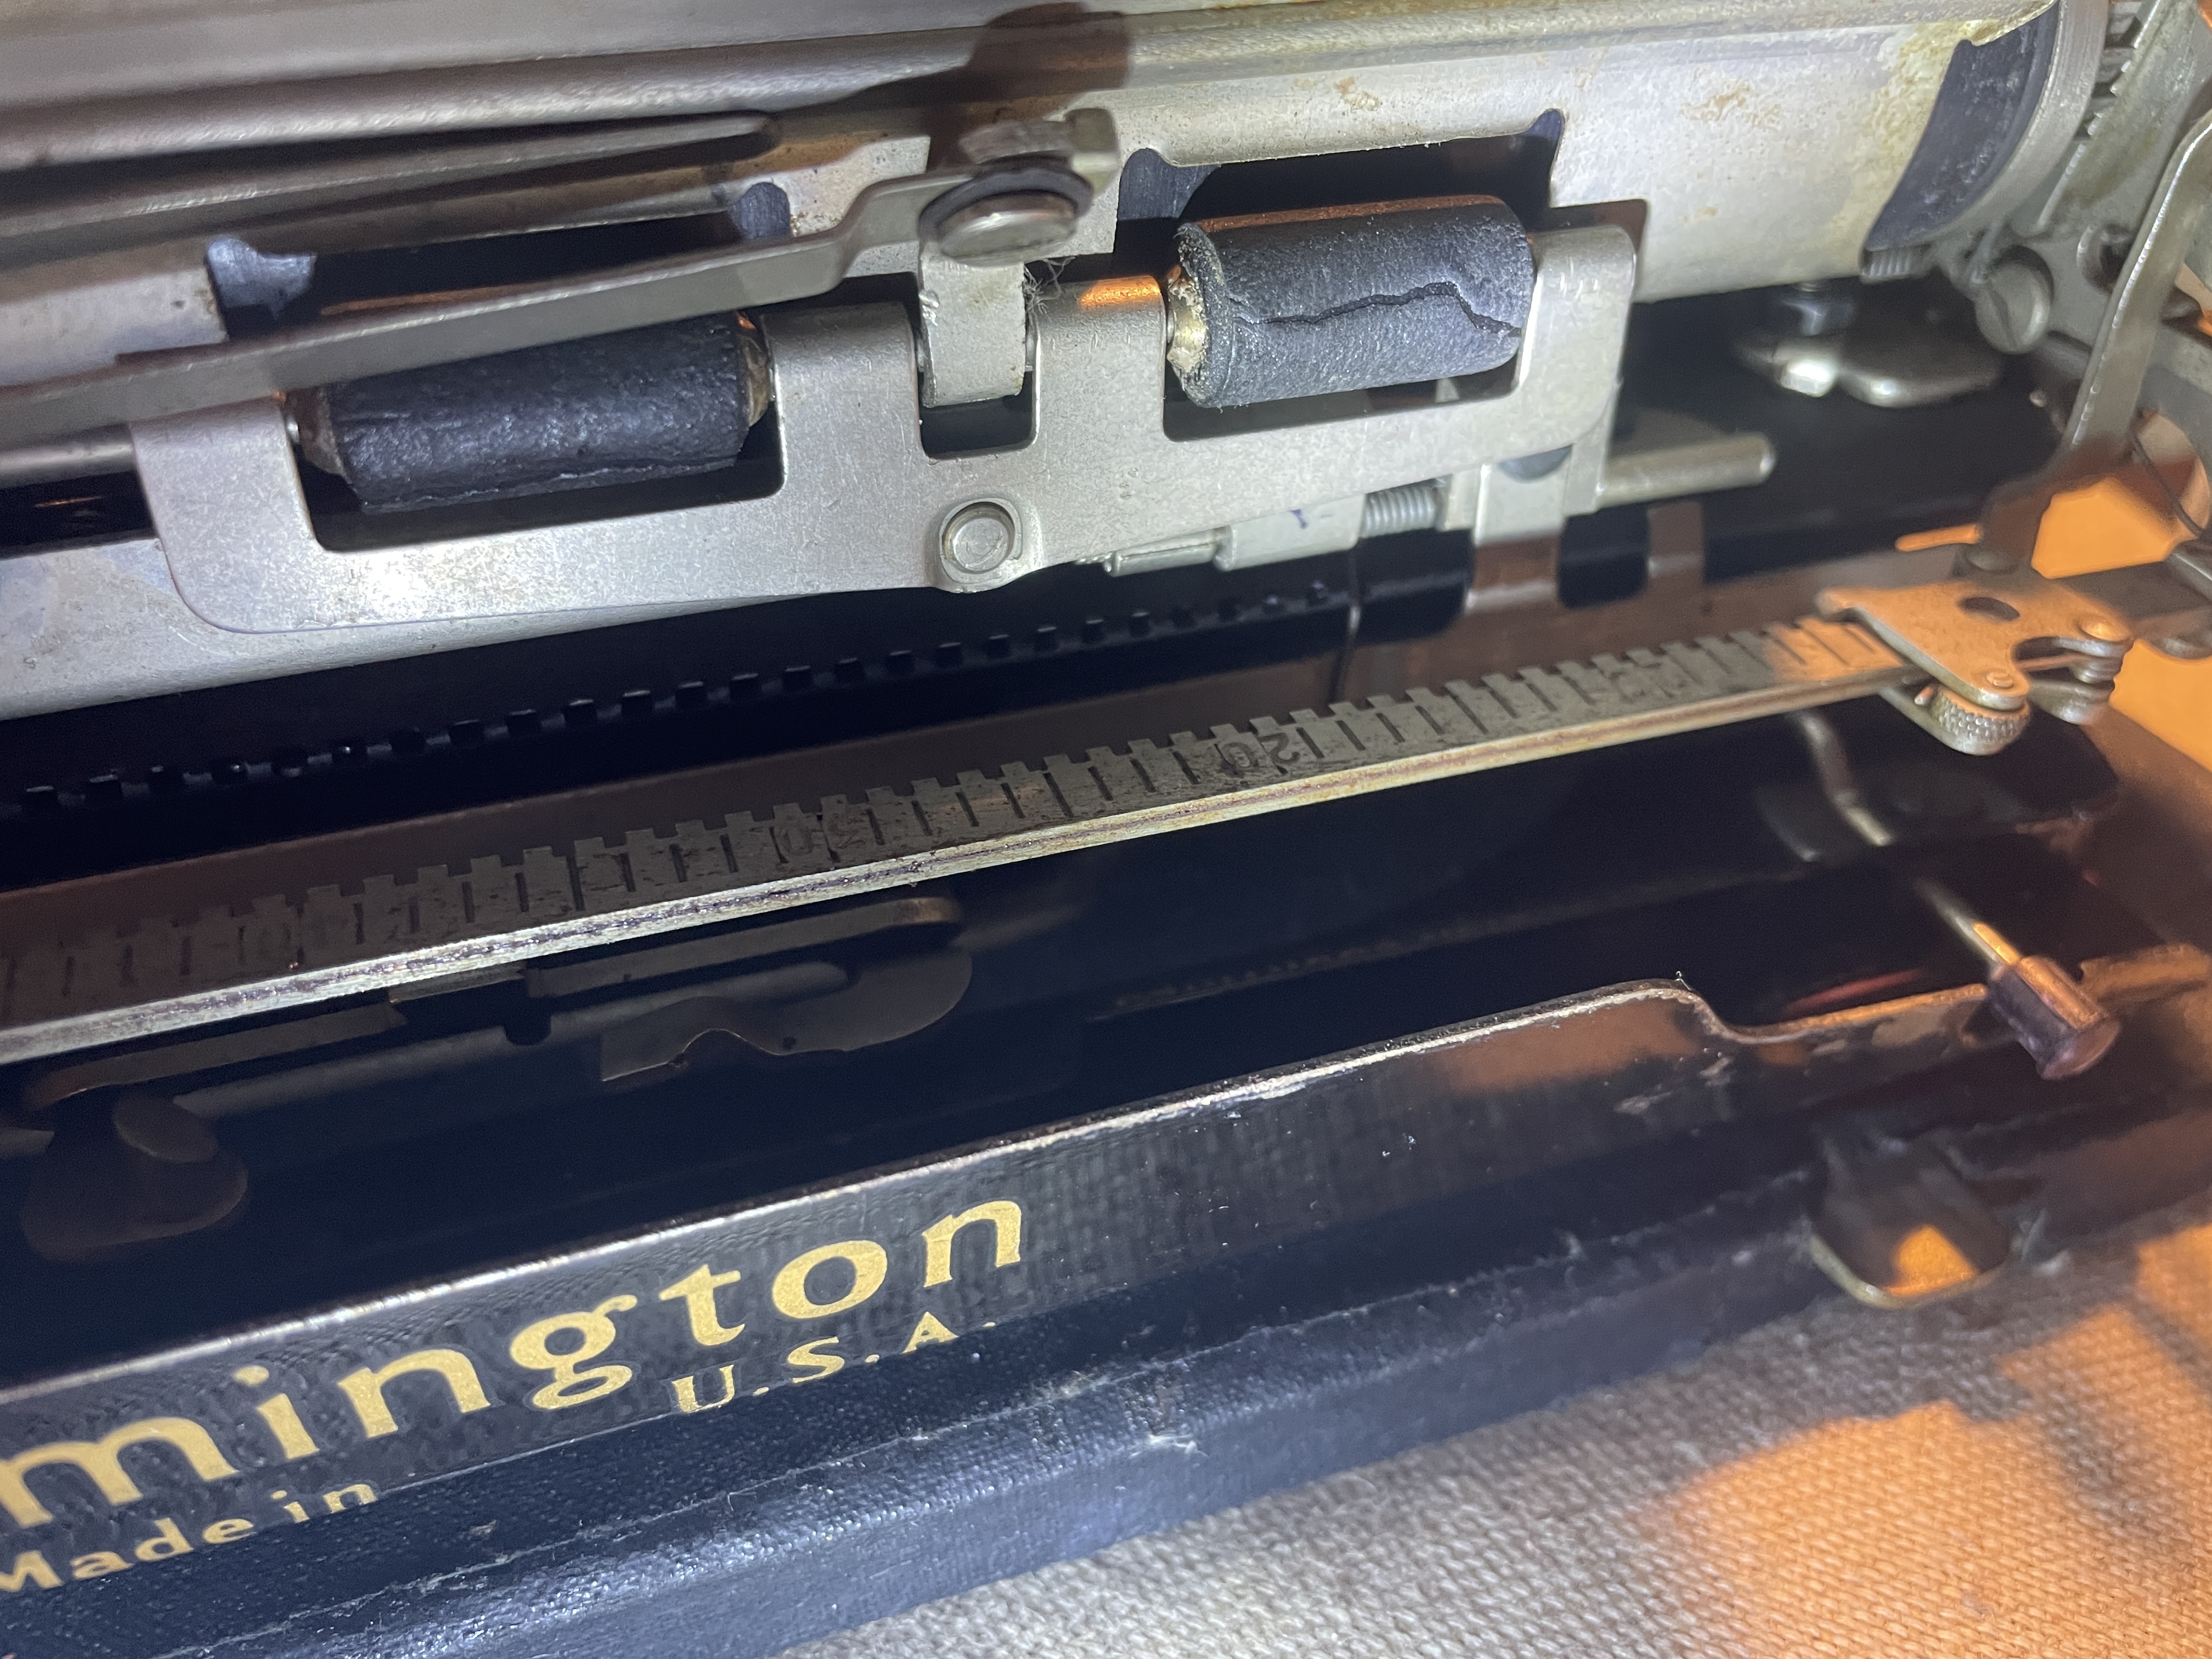
I tried to feed paper into the typewriter to see if there was anything else wrong with it, and that didn’t happen. The front and back feed rollers were too misshapen and hard to feed paper.
There appeared to be not too much wrong with this one except for the bent typebar and bad feed rollers, so I took it on.
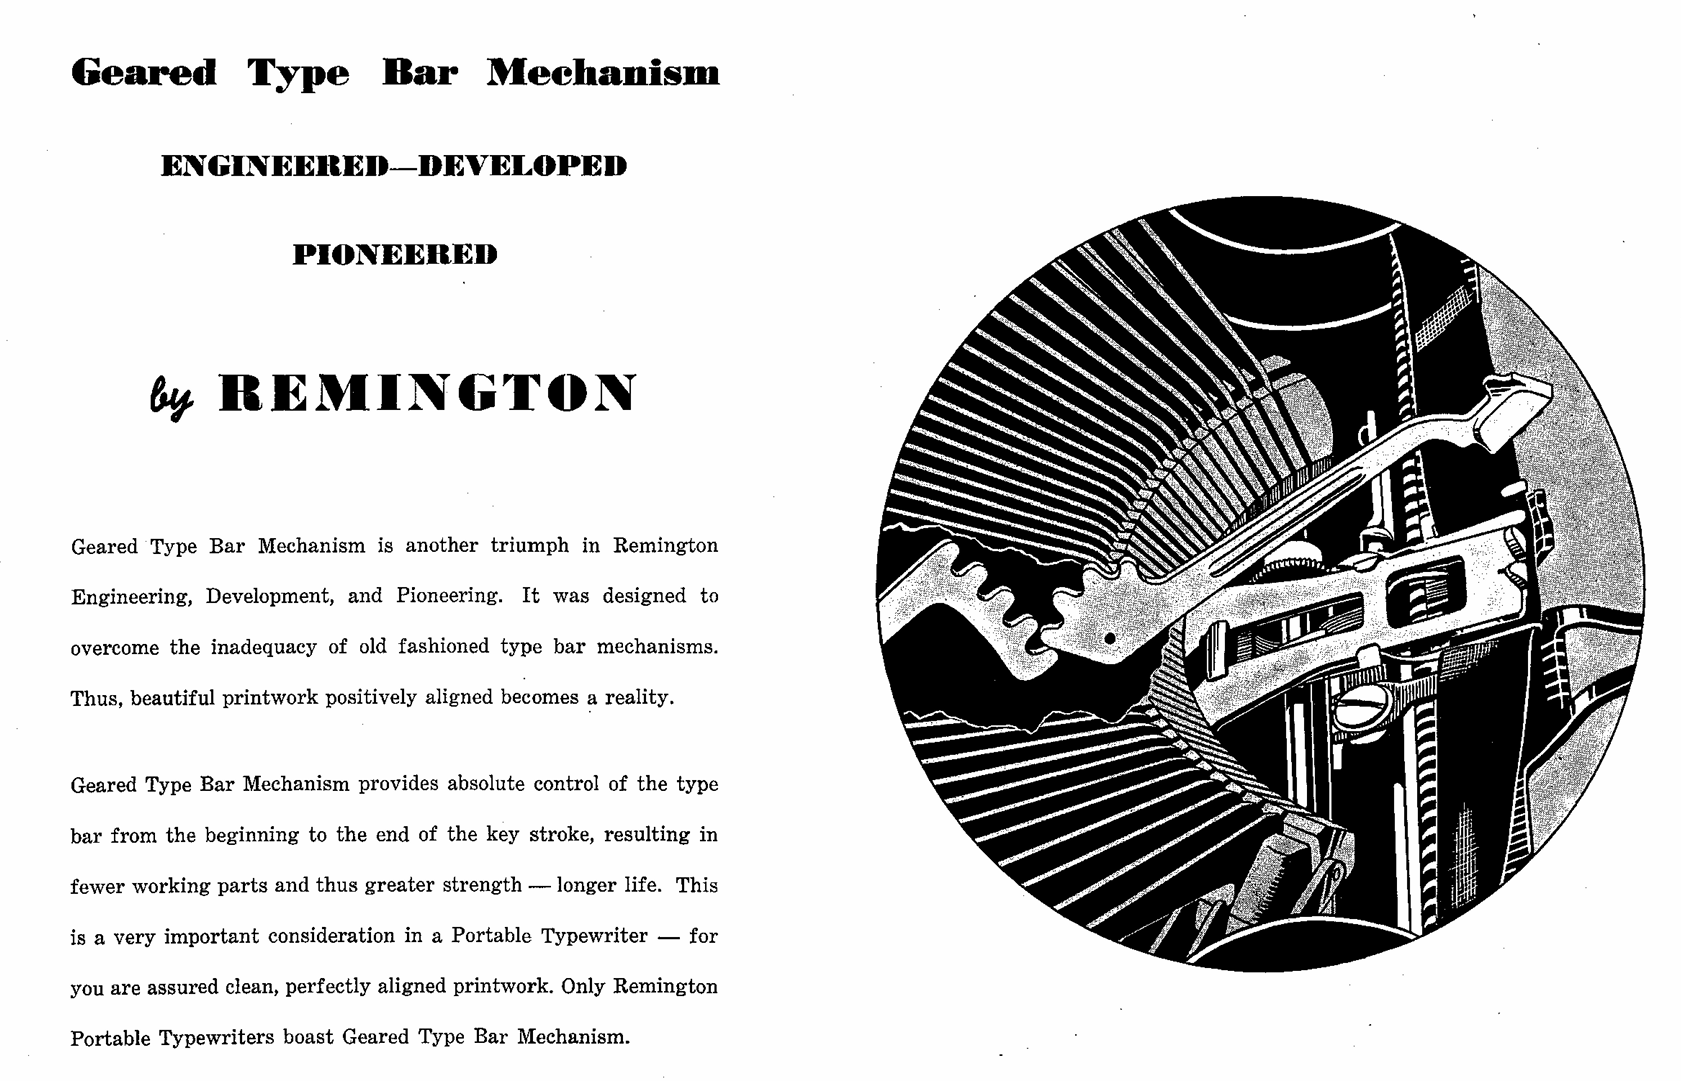
These little Remington portables are superb, easy typers. They look like they’d be so flimsy and rattly and awful, but they feel so good under the fingers. It may have something to do with their geared typebar mechanism. I can type nonsense on them, on and on and on, because they require very little effort.
Here is the Remington portables manual (1940) from Richard Polt’s manuals archive.
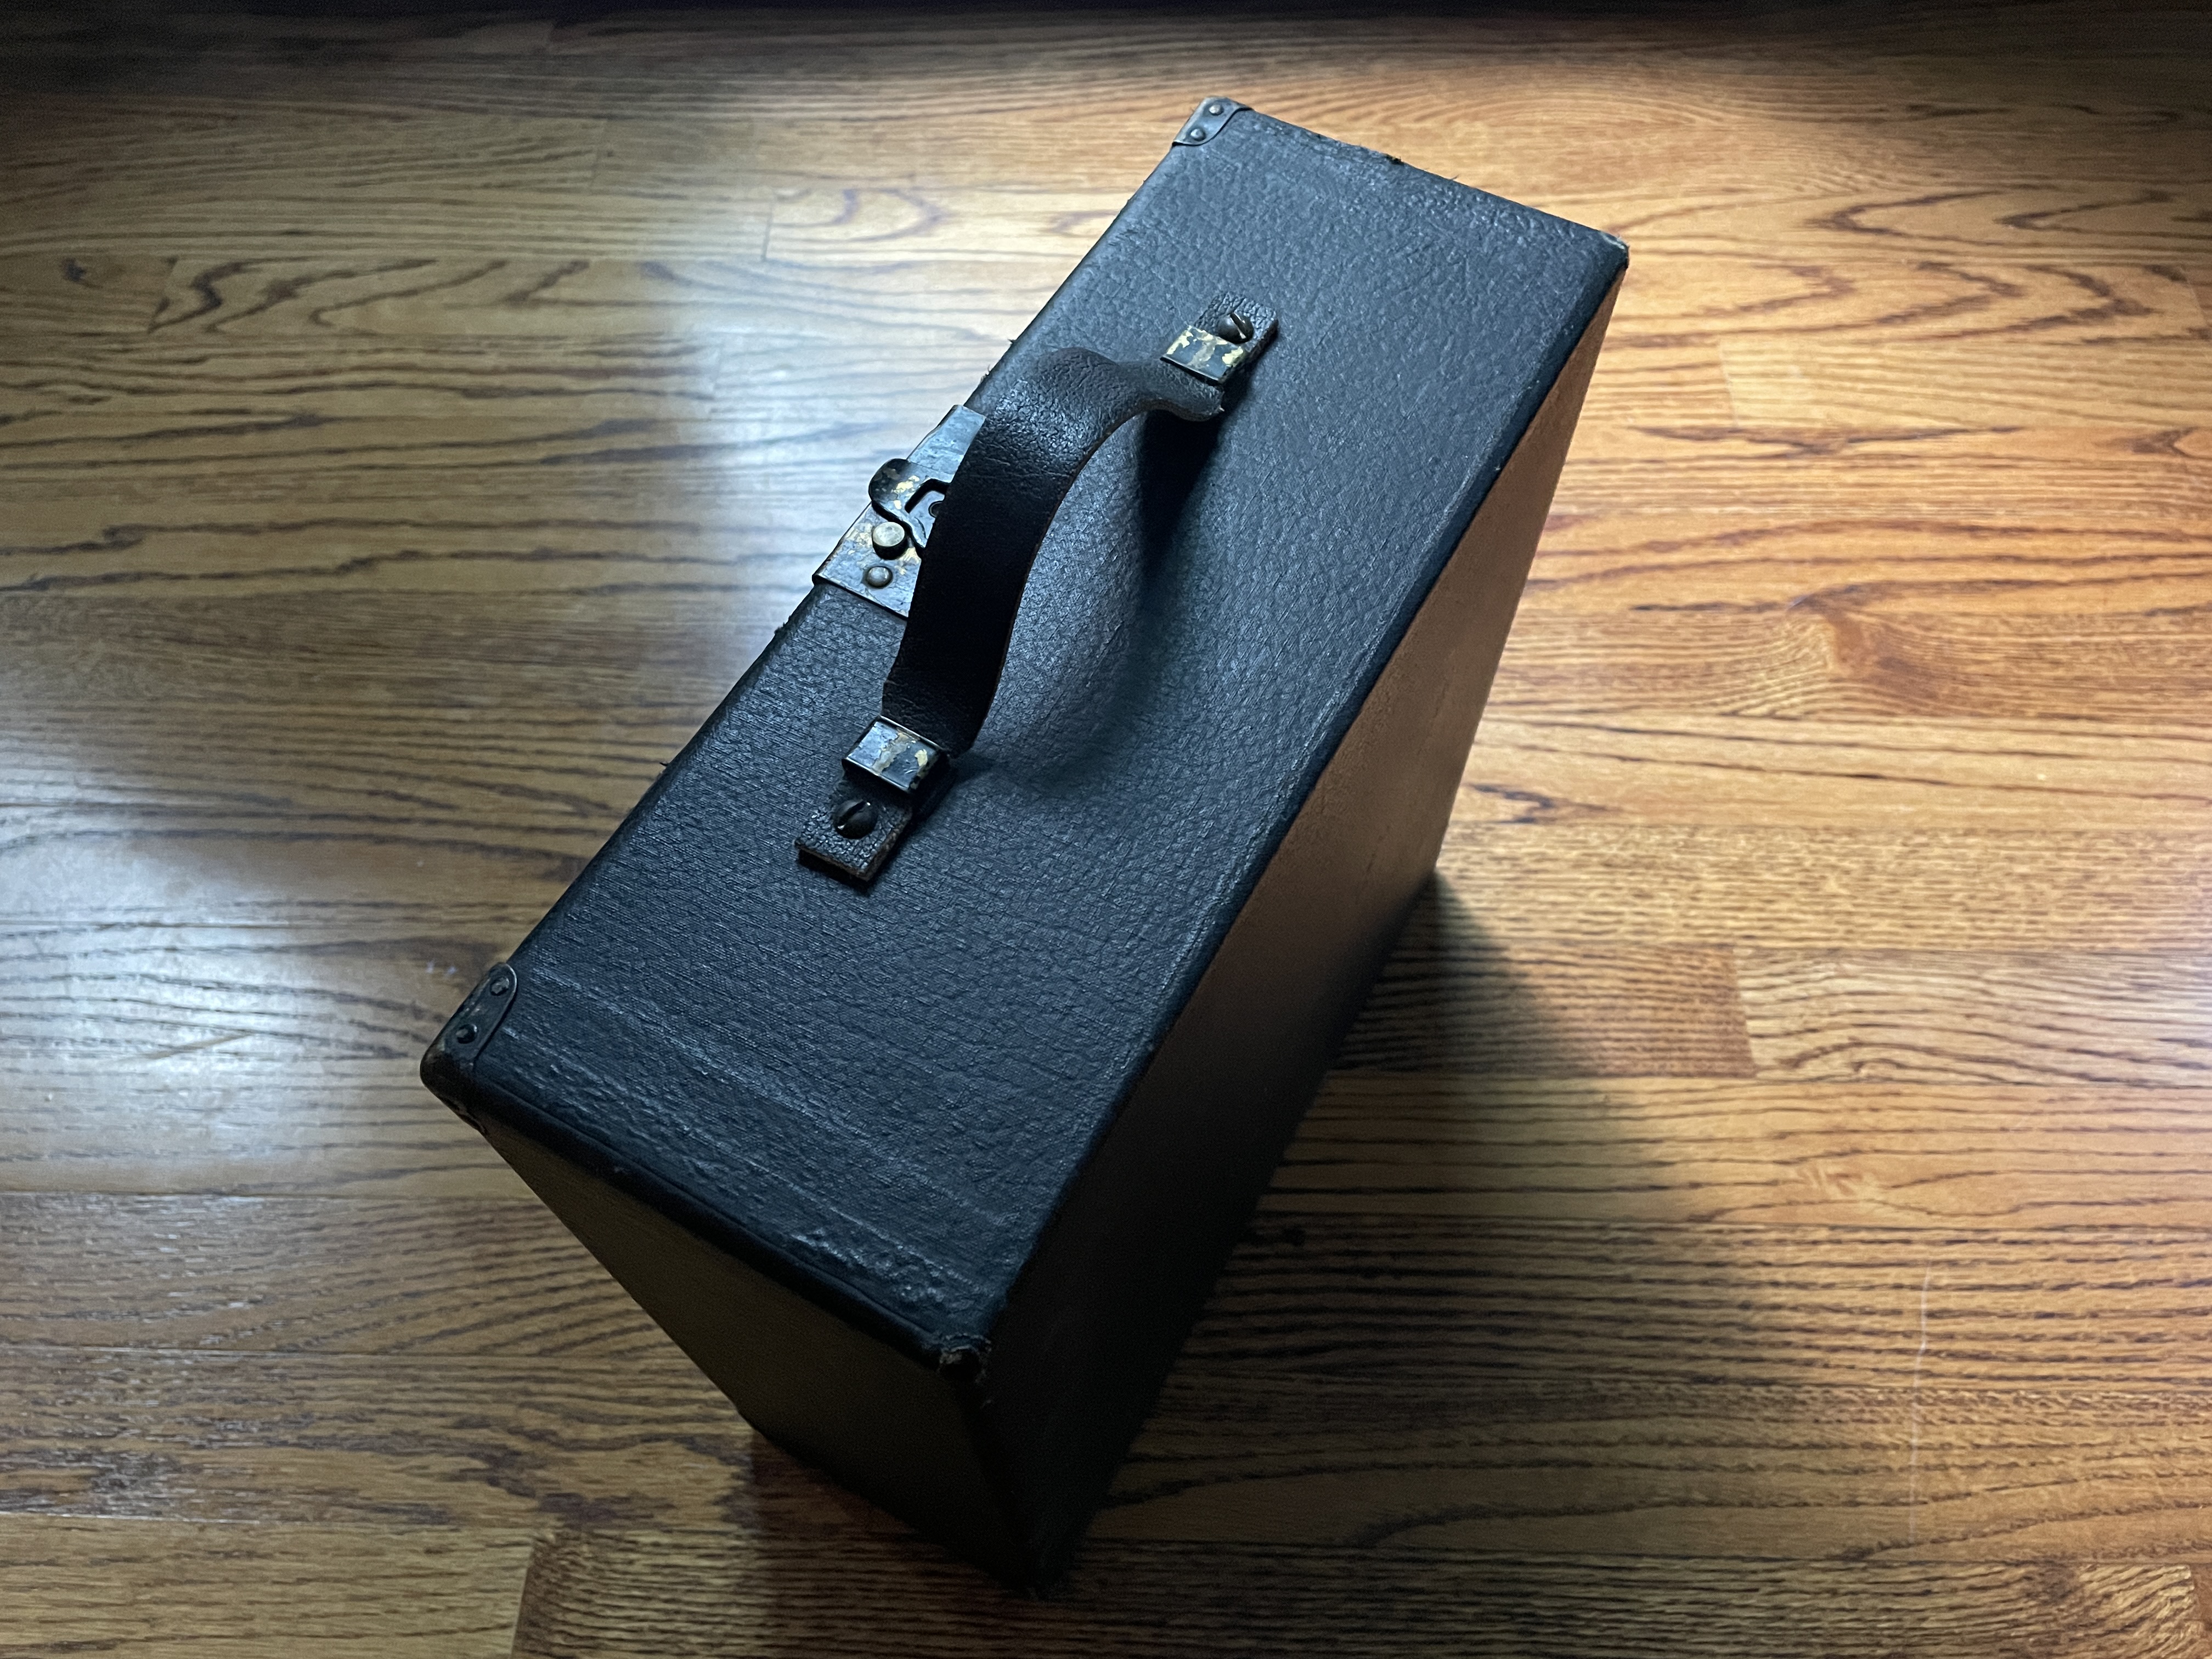
Monica and Stephen left the Remington with me, and I took a good look at it. Somebody had really loved this old thing and had fixed it up with endearing, homemade touches. Old typewriter cases of this era are often moldy and faded and falling apart, but this one looked tastefully refreshed (black shoe polish?). It had a nice new leather handle.
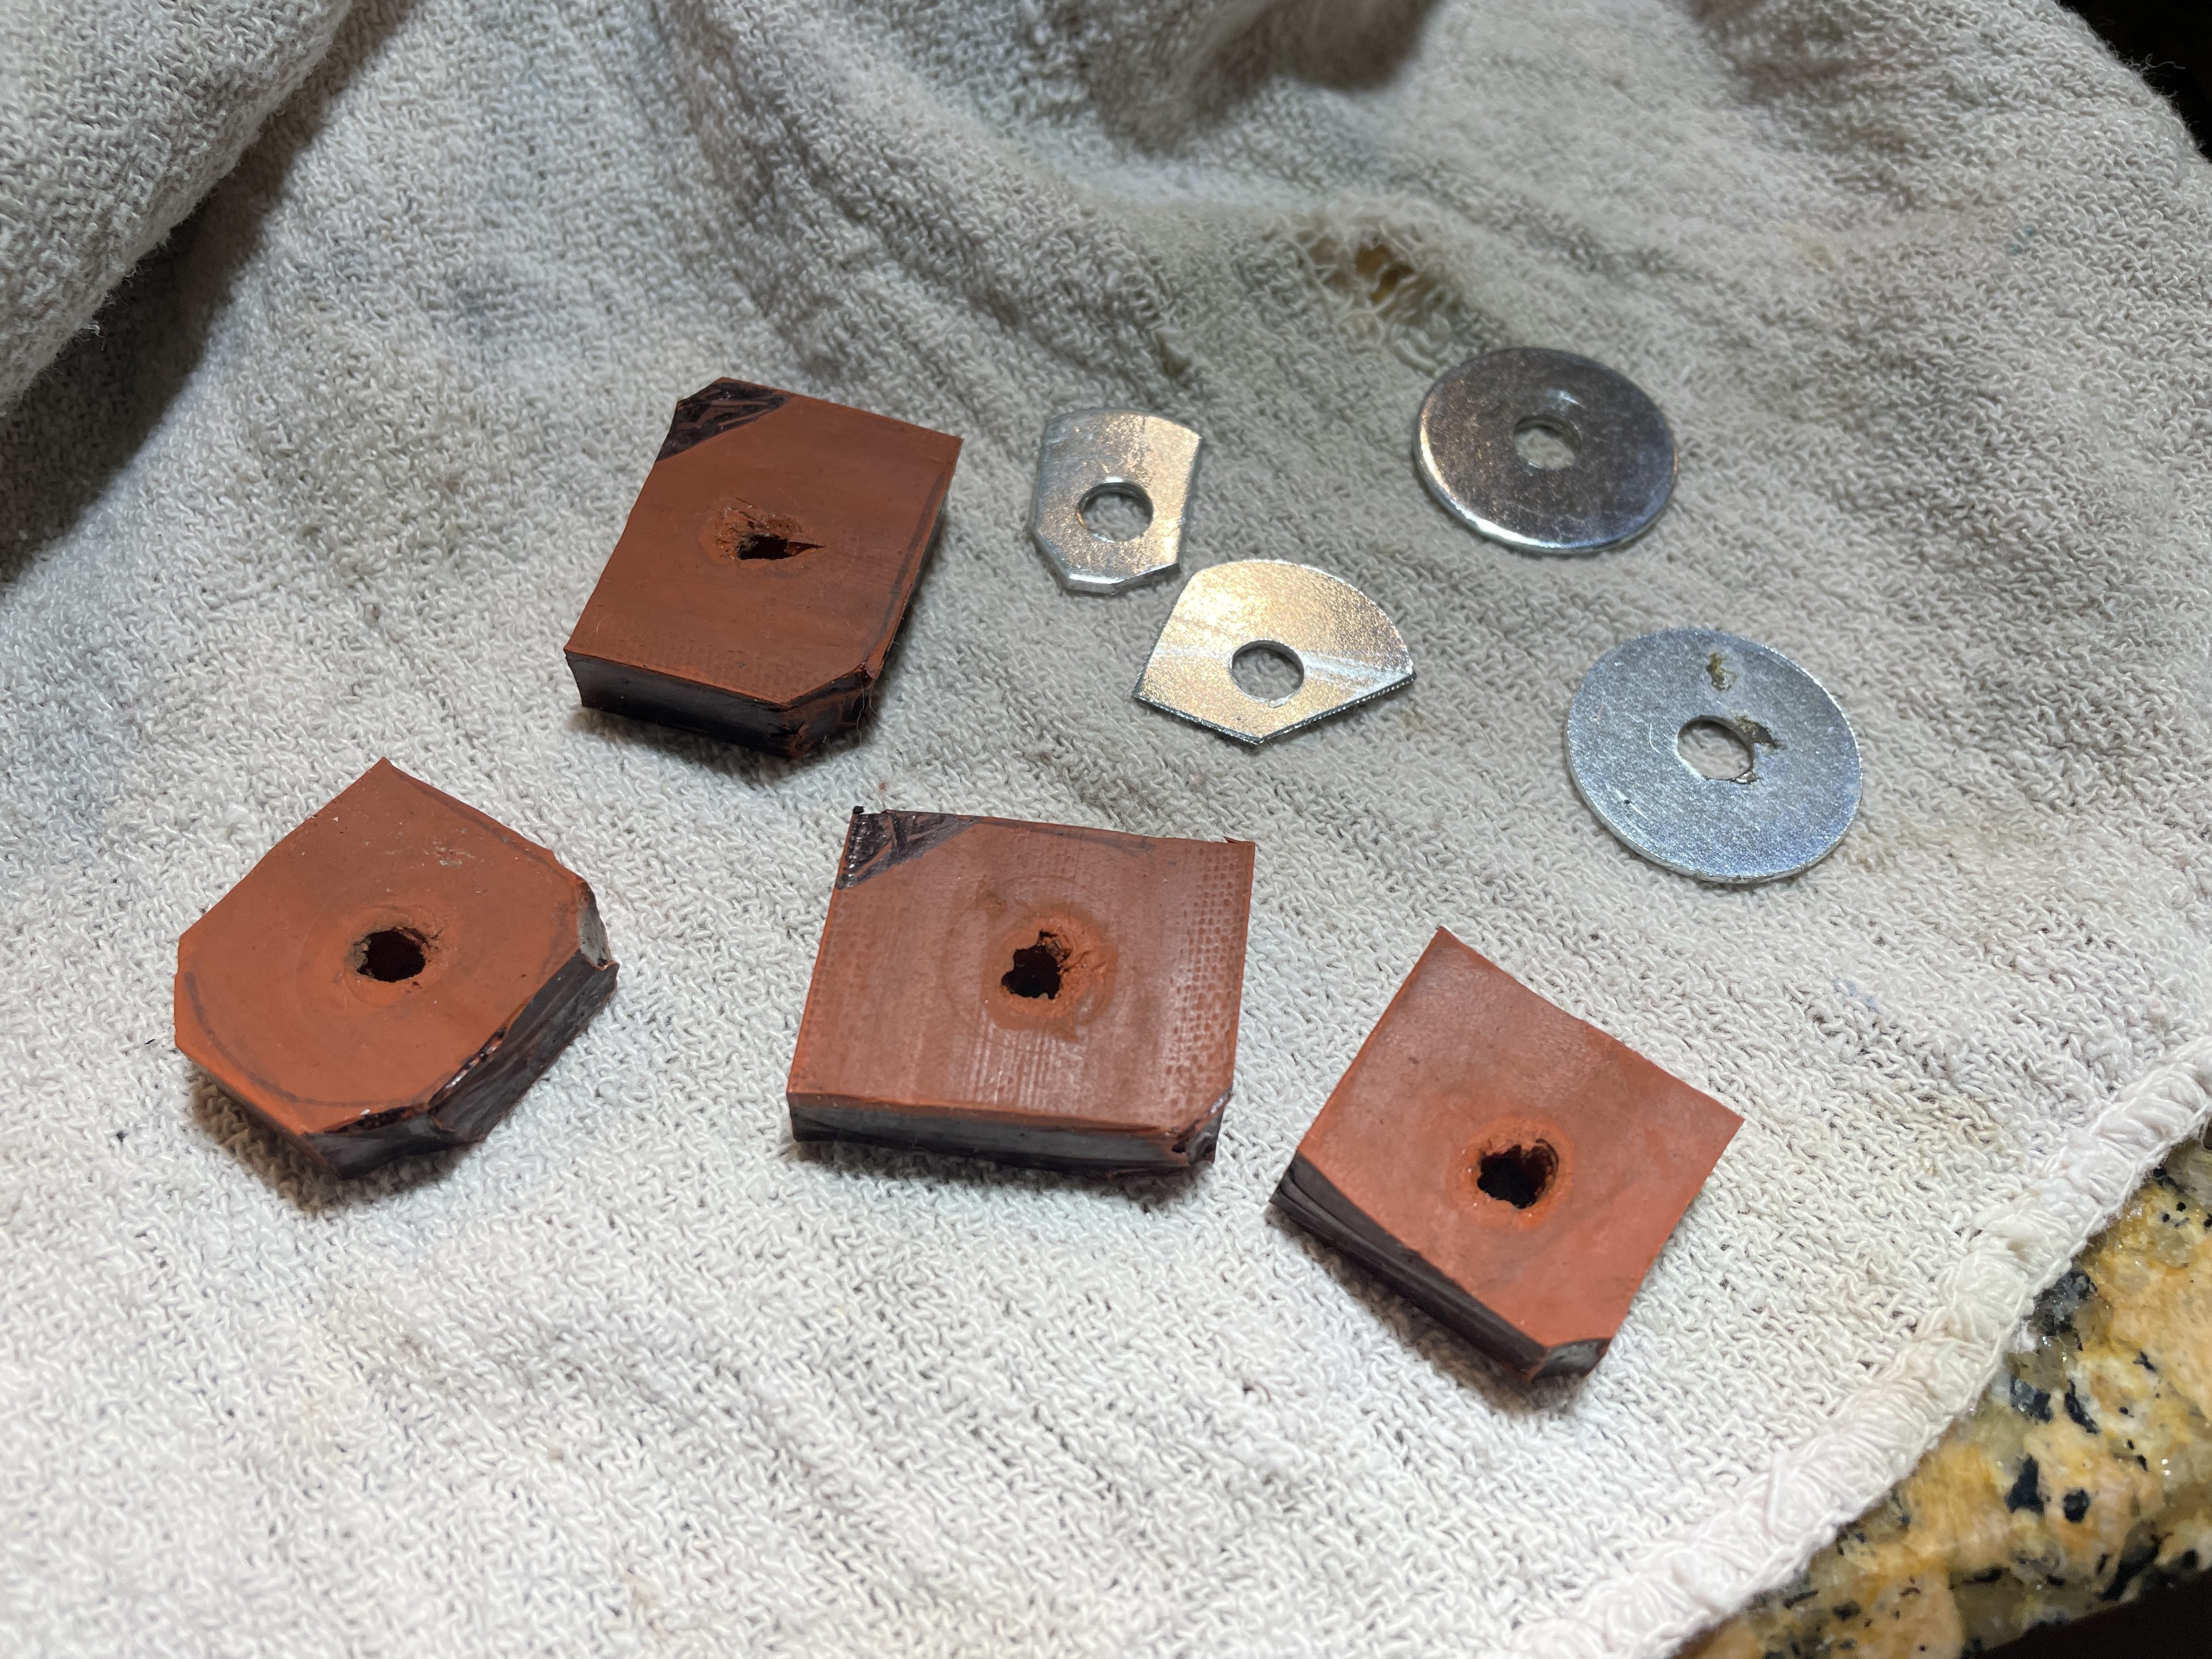
I’m guessing that same someone in this Remington’s past also made new feet for it out of erasers and customized washers:
They had strung a new drawstring on it made of kitchen twine and hardened the end with super glue.
The shift lock release rod (more on that later) had a Sharpie-painted plastic knob on the end that looked very good.
New feet for Remington portable with an angled backplate
I started to dismantle, and while I worked, I cooked up some new feet in my Easy Bake Oven.
Since my Model 5 has an angled backplate, it needs back feet that are stretched in the middle to allow for the extra metal in the backplate. Many thanks to Backspace does not erase for posting the Remington portable feet file to Thingiverse. I did a quick and dirty remix of the files and made them just a hair taller and wider for my Portable 5 since I had some low-hanging mechanics under the machine. I printed the new feet in Overture 95A TPU.
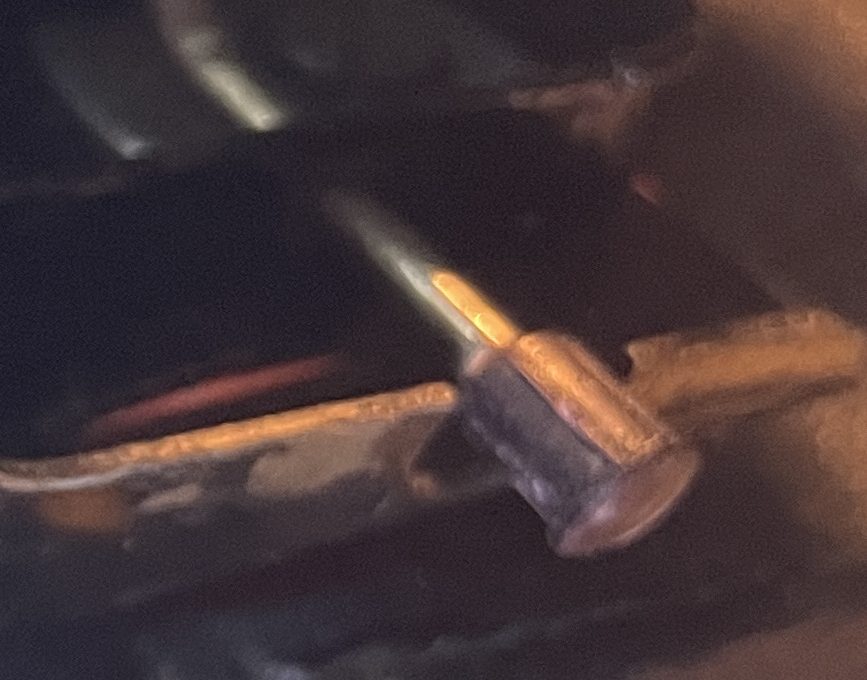
Uppercase shift lock release lever
That angled backplate is weird, but my guess is that it protects the uppercase shift lock release rod lever in back. I initially wasn’t sure what the rod in back was for because I didn’t see it mentioned in my quick scans of users manuals, so I did some digging and found this FB post in the Antique Typewriter Maintenance Group:
Gerren of HotRod Typewriter responded:

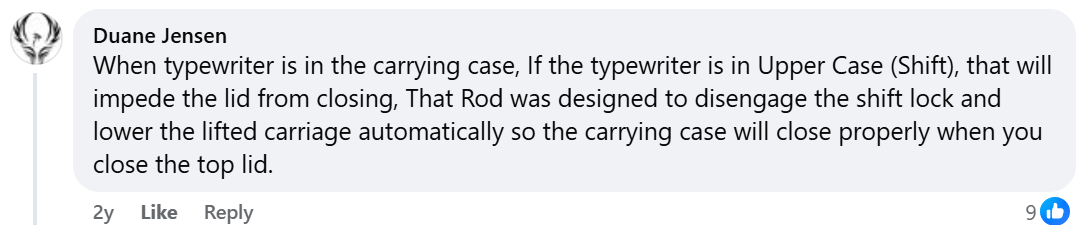
Or as Duane of Phoenix Typewriter put it in another post:
Anyhoo, the knob unscrews so you can remove the body plates from the typewriter. I managed to destroy the small plastic cap with vise grip pliers. I squeezed too hard and it crumbled. Though it wasn’t an original part, I felt chastened.
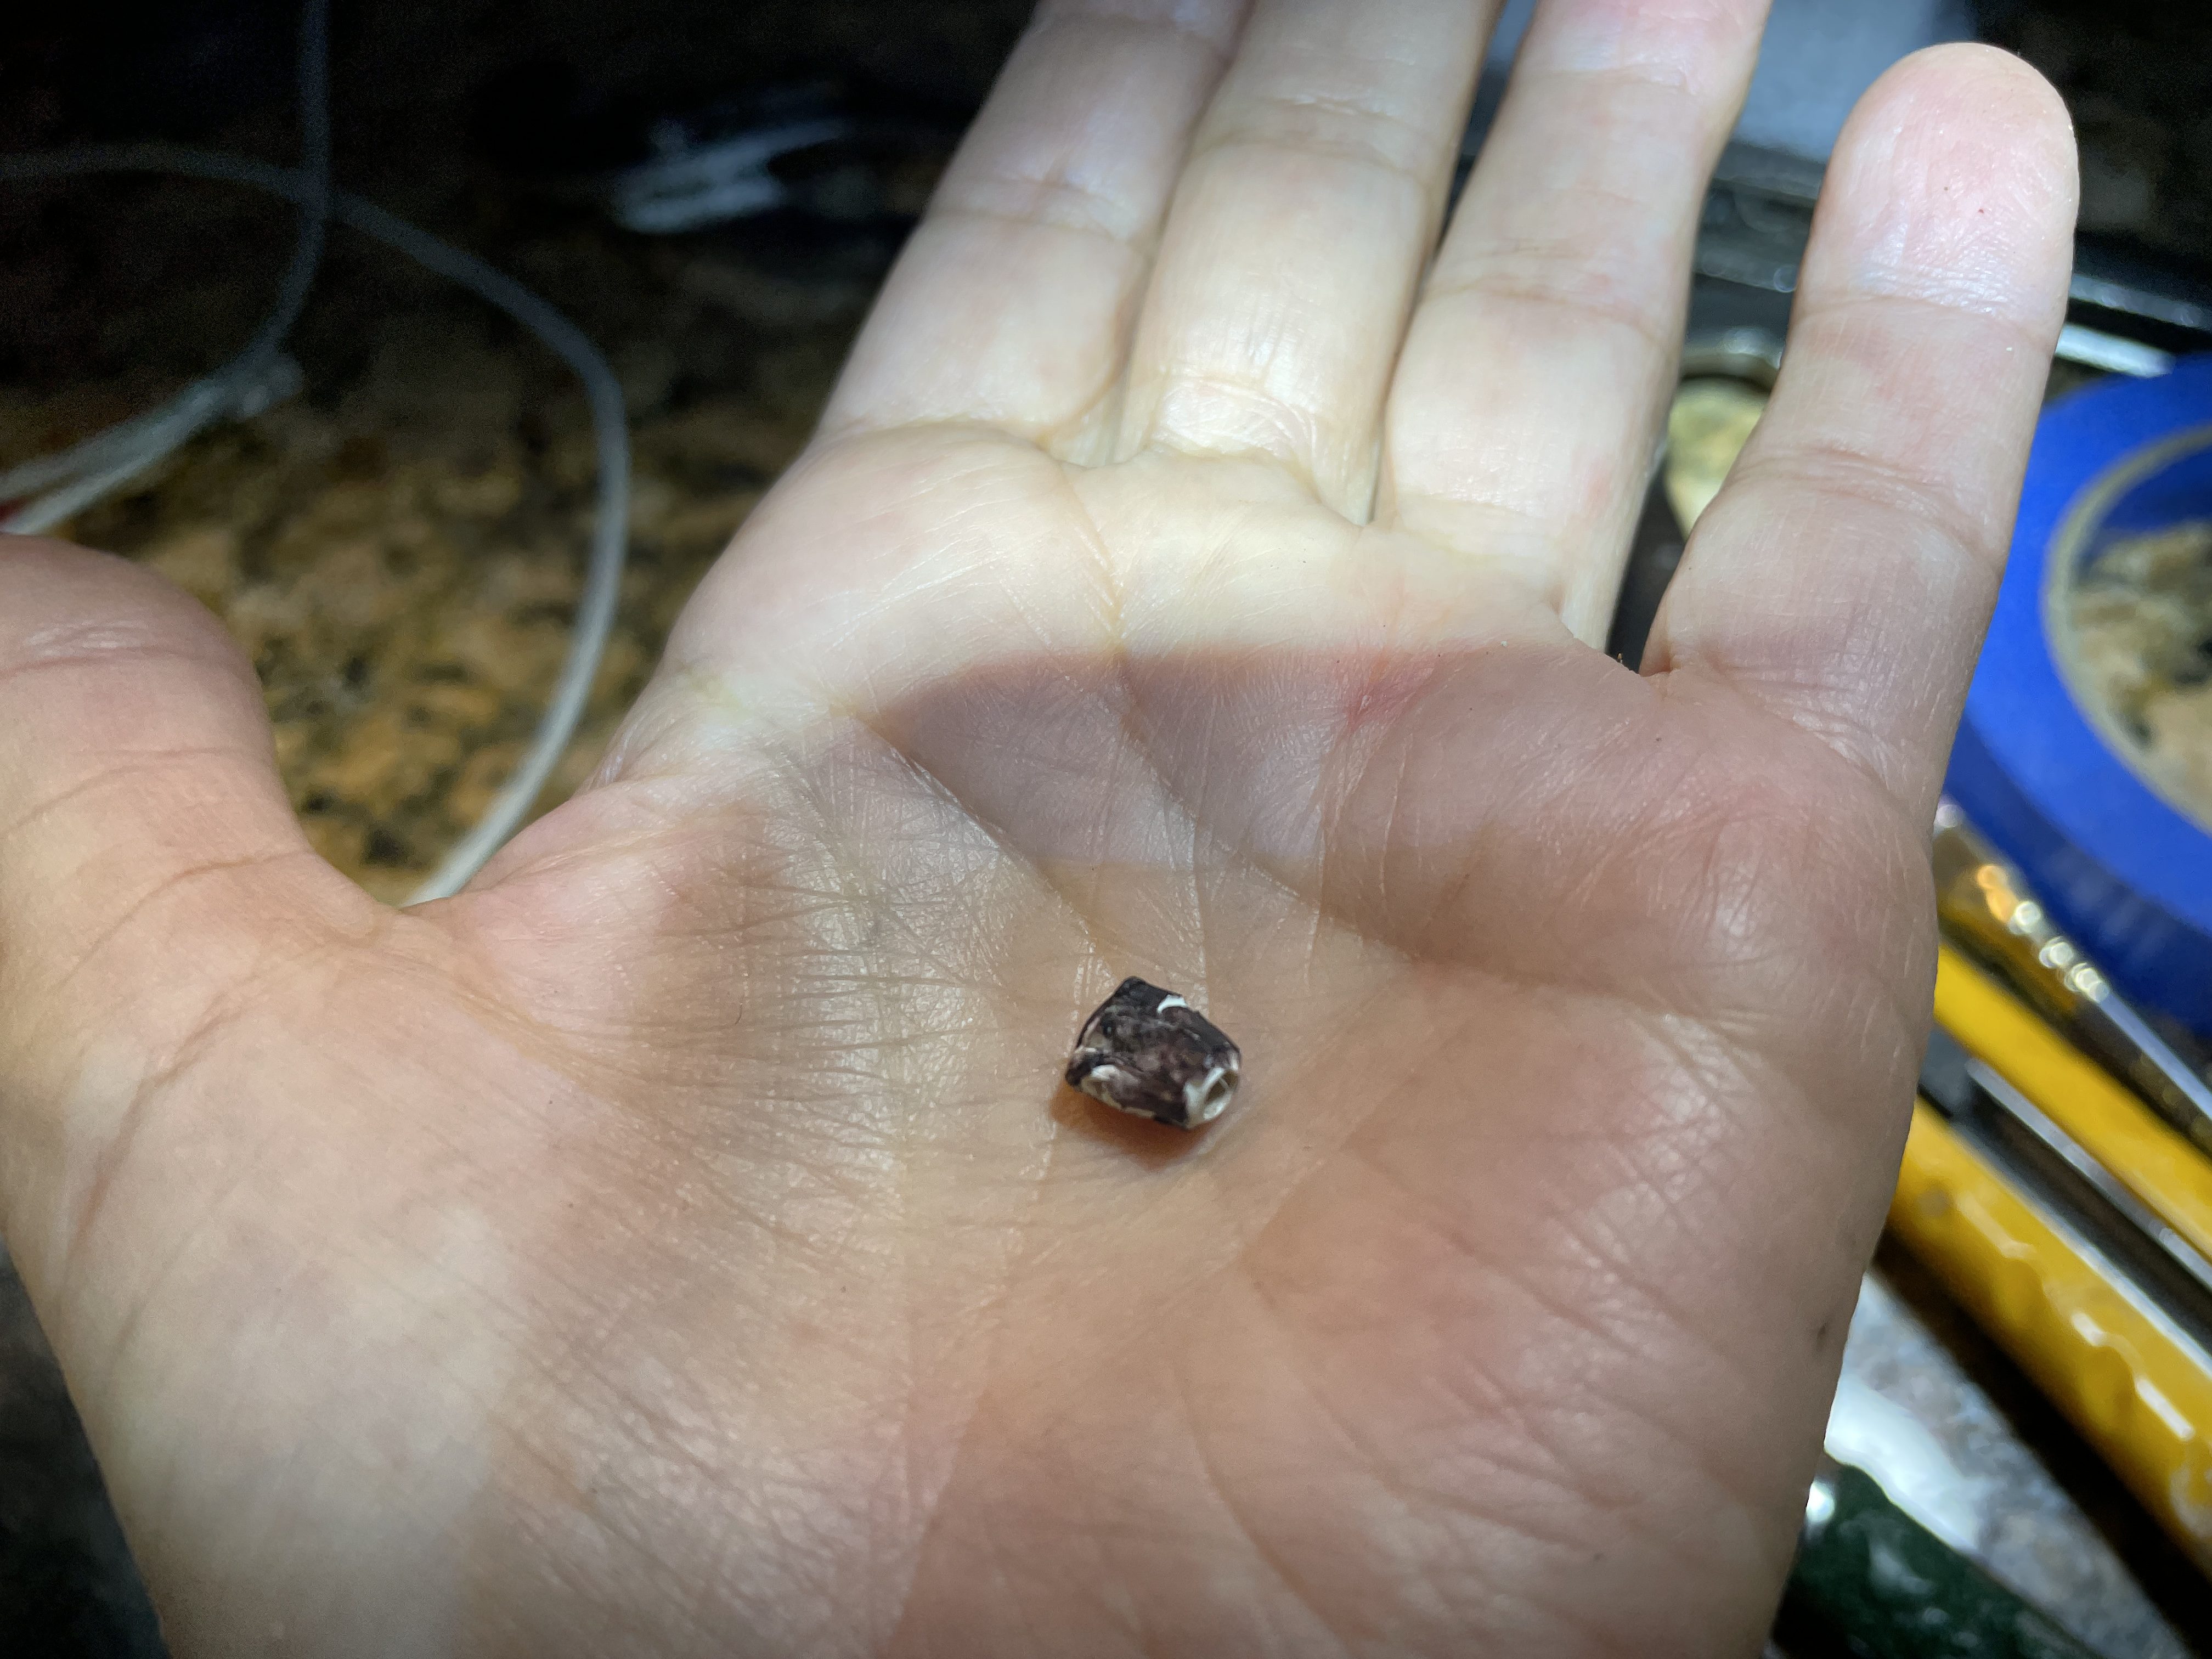
I replaced it with #4-40 barrel nut. Ideally I wanted a ridged cap nut #4-40, but that’s what I had in miscellaneous hardware, and I think it looks fine. The rod was all bent to hell and was colliding with the carriage.
I straightened the rod out, and it cleared the carriage. However there was binding on shift when the connecting rod was pushed all the way in.
I needed some kind of stop, so it didn’t go too far in and foul the shifting. I added a segment of rubber tubing as a stop.
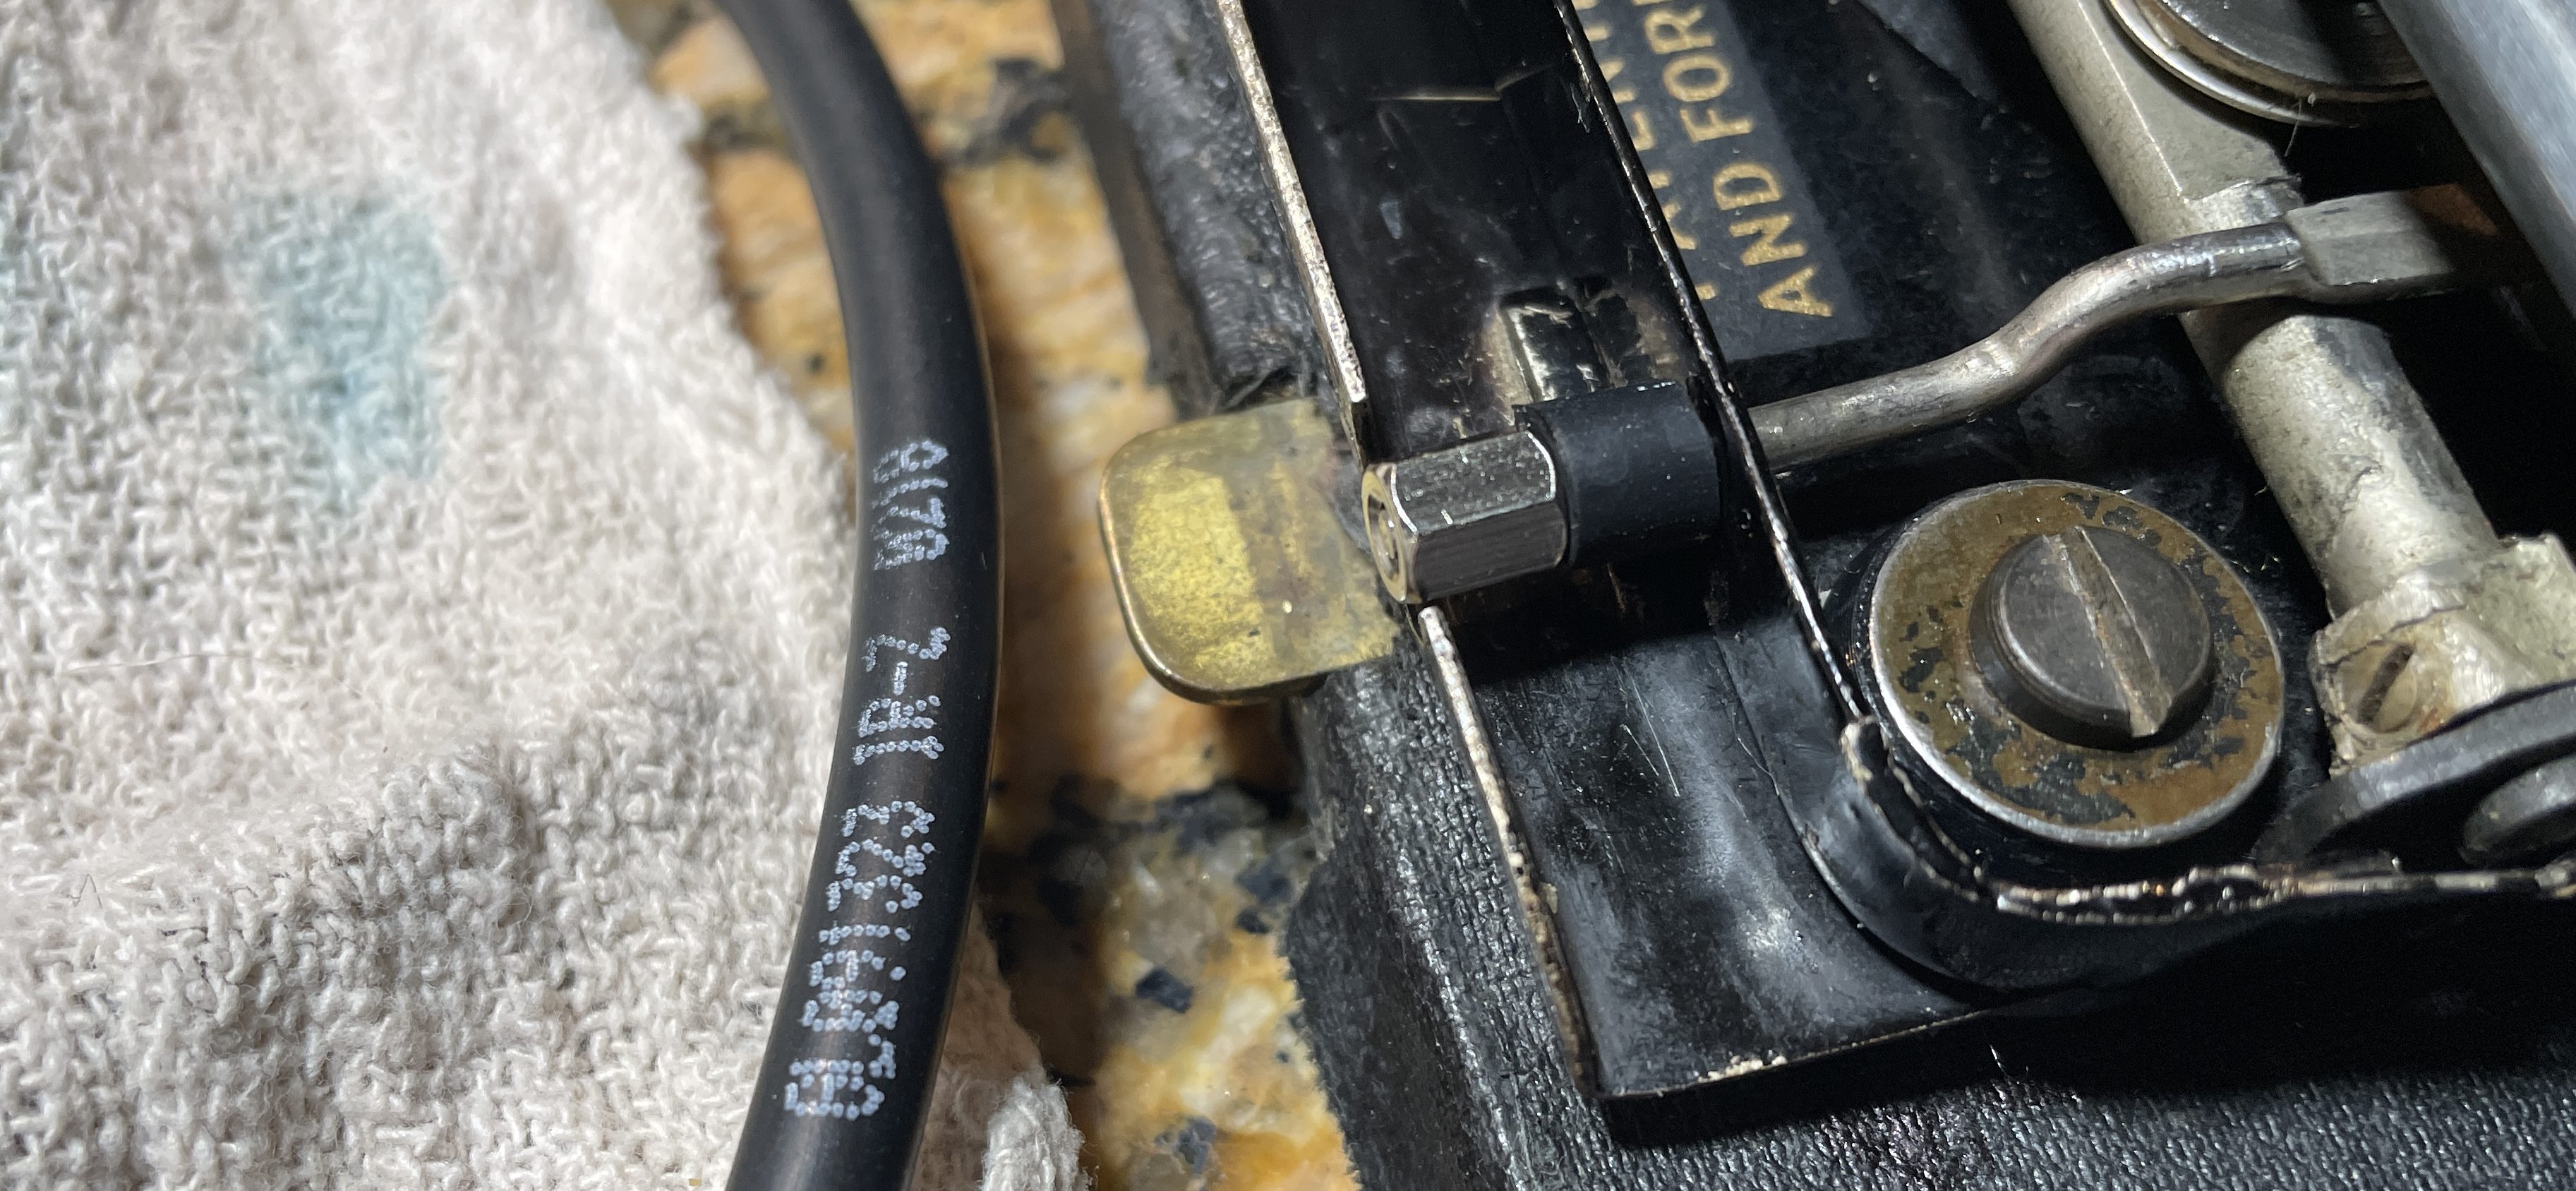
It’s a kluge, but I don’t want to pull out my Dremel and shorten the connecting rod (or pull it out altogether) because I think it’s kind of cool how it works. Once you shift or shift lock, the knob migrates on its own outside the body shell. When it’s time to put the typewriter in its carrier case, you push the knob in, and it disengages shift lock. Nifty!
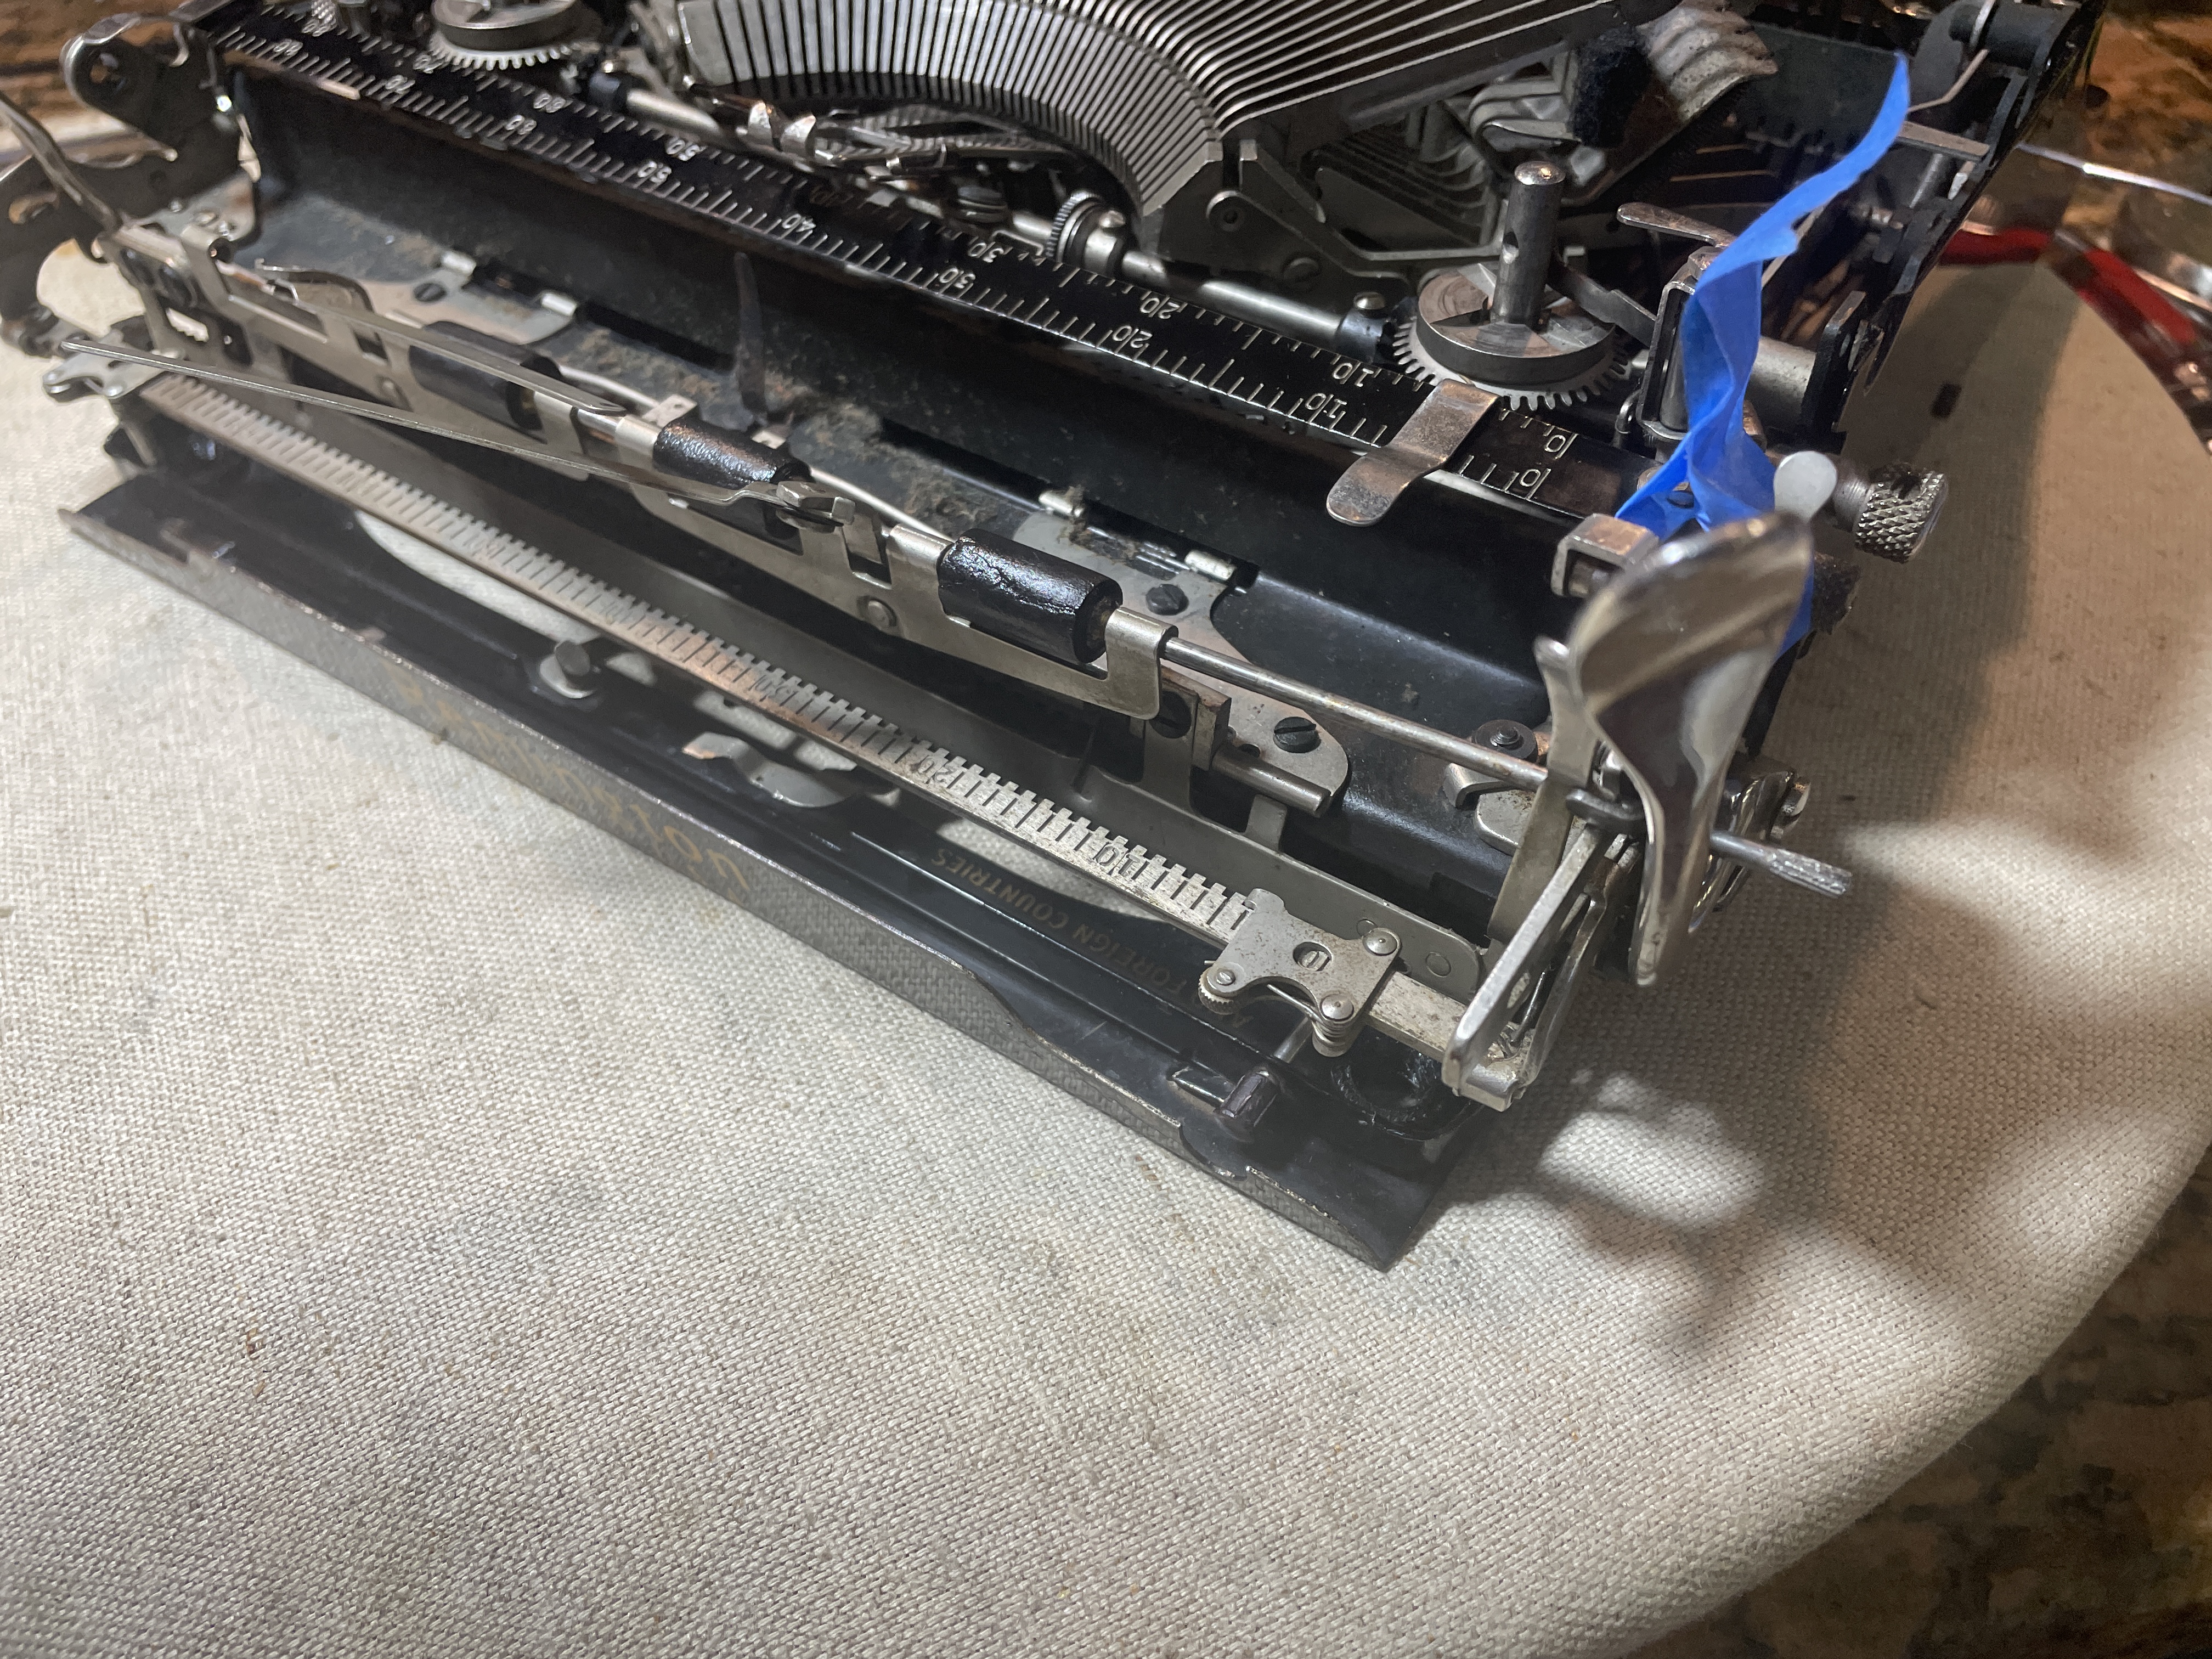
Feed roller replacement
The crumbly old feed rollers needed to be replaced. The very best option is to get them recovered by J.J. Short. I understand that they do great work on platens and feed rollers.
You can also use automotive tubing. Here’s Duane from Phoenix Typewriters rebuilding feed rollers with rubber hose.
You don’t need to pull out the platen to replace the feed rollers, but it is easier with the platen out. I wanted to clean thoroughly under the paper tray, so I decided to pull out the platen. This platen is a candidate for J.J. Short. It’s rock hard.
Here is Typewriter Justice showing how to pull the platen out of a Remington 5:
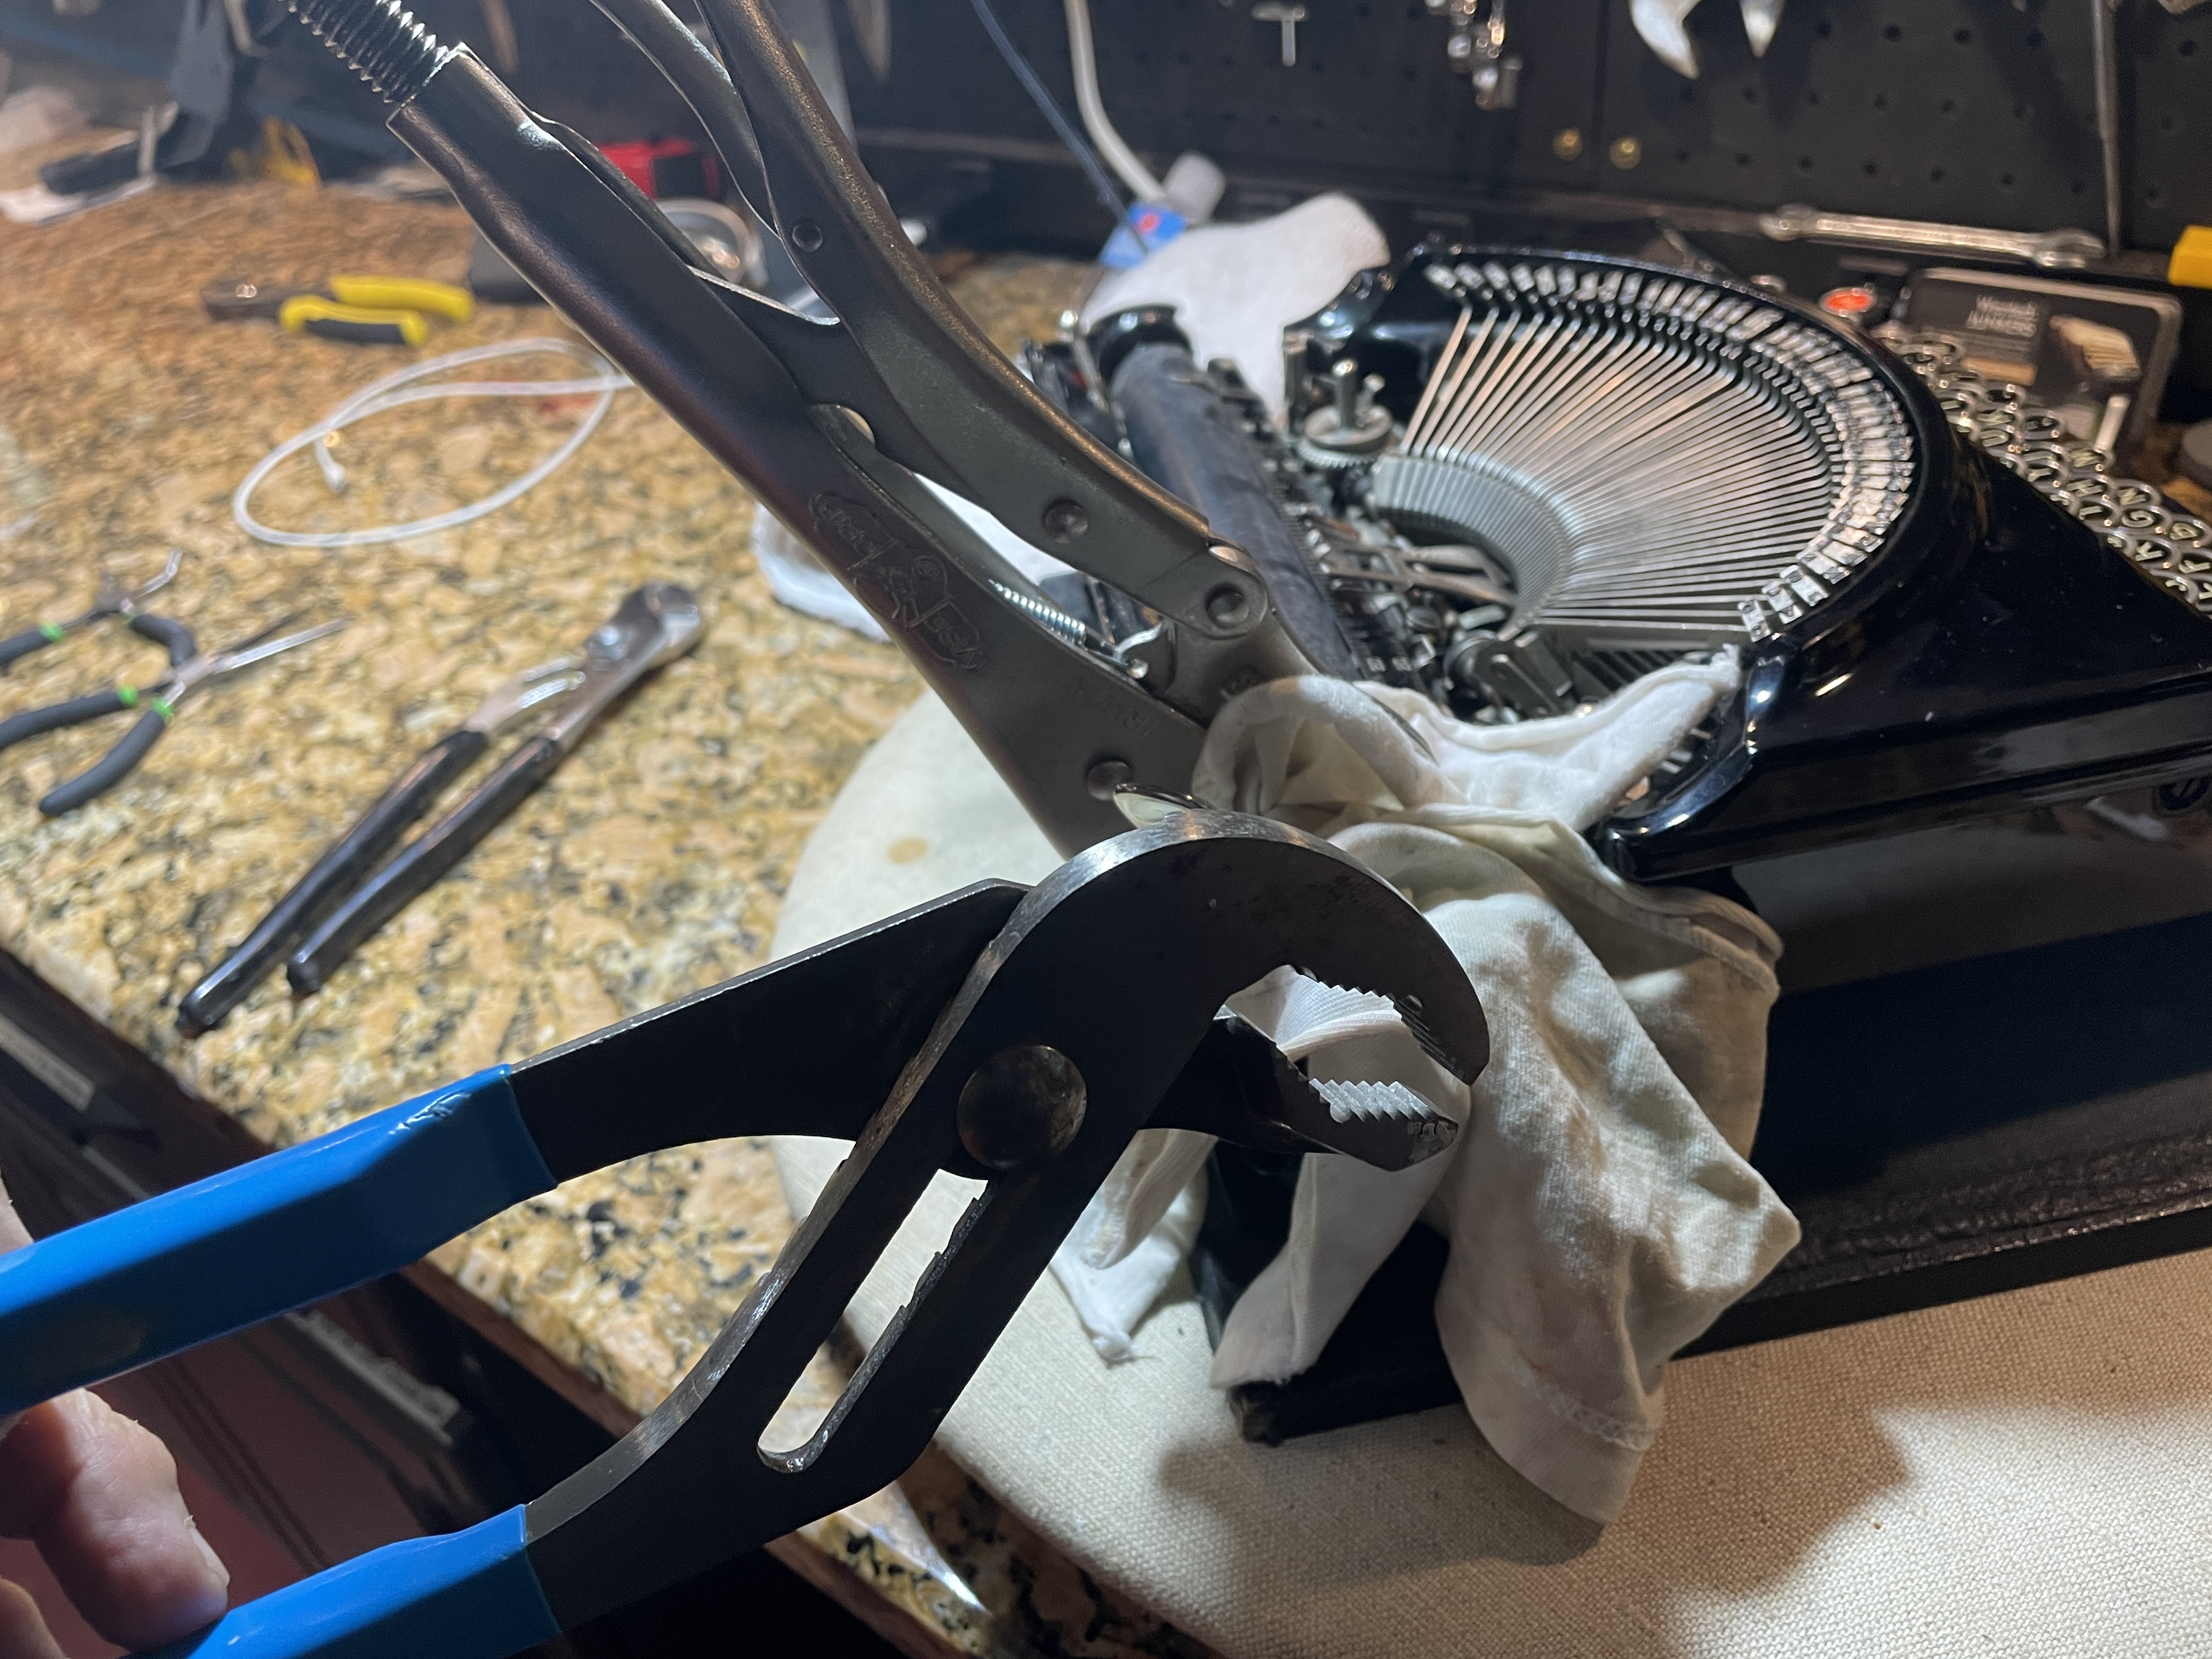
I used two sets of pliers on this typewriter to get the platen unstuck. Channel lock pliers on the platen knob and vise grips on the platen for the win. Note: I was very careful with the vise grips because I didn’t want to damage the old platen. Next time, I would use the vise grips on the metal collar on the other end of the platen to avoid damaging the rubber.
Once your platen is out, take pictures and tape up your indexing mechanism because all those pieces are loose.
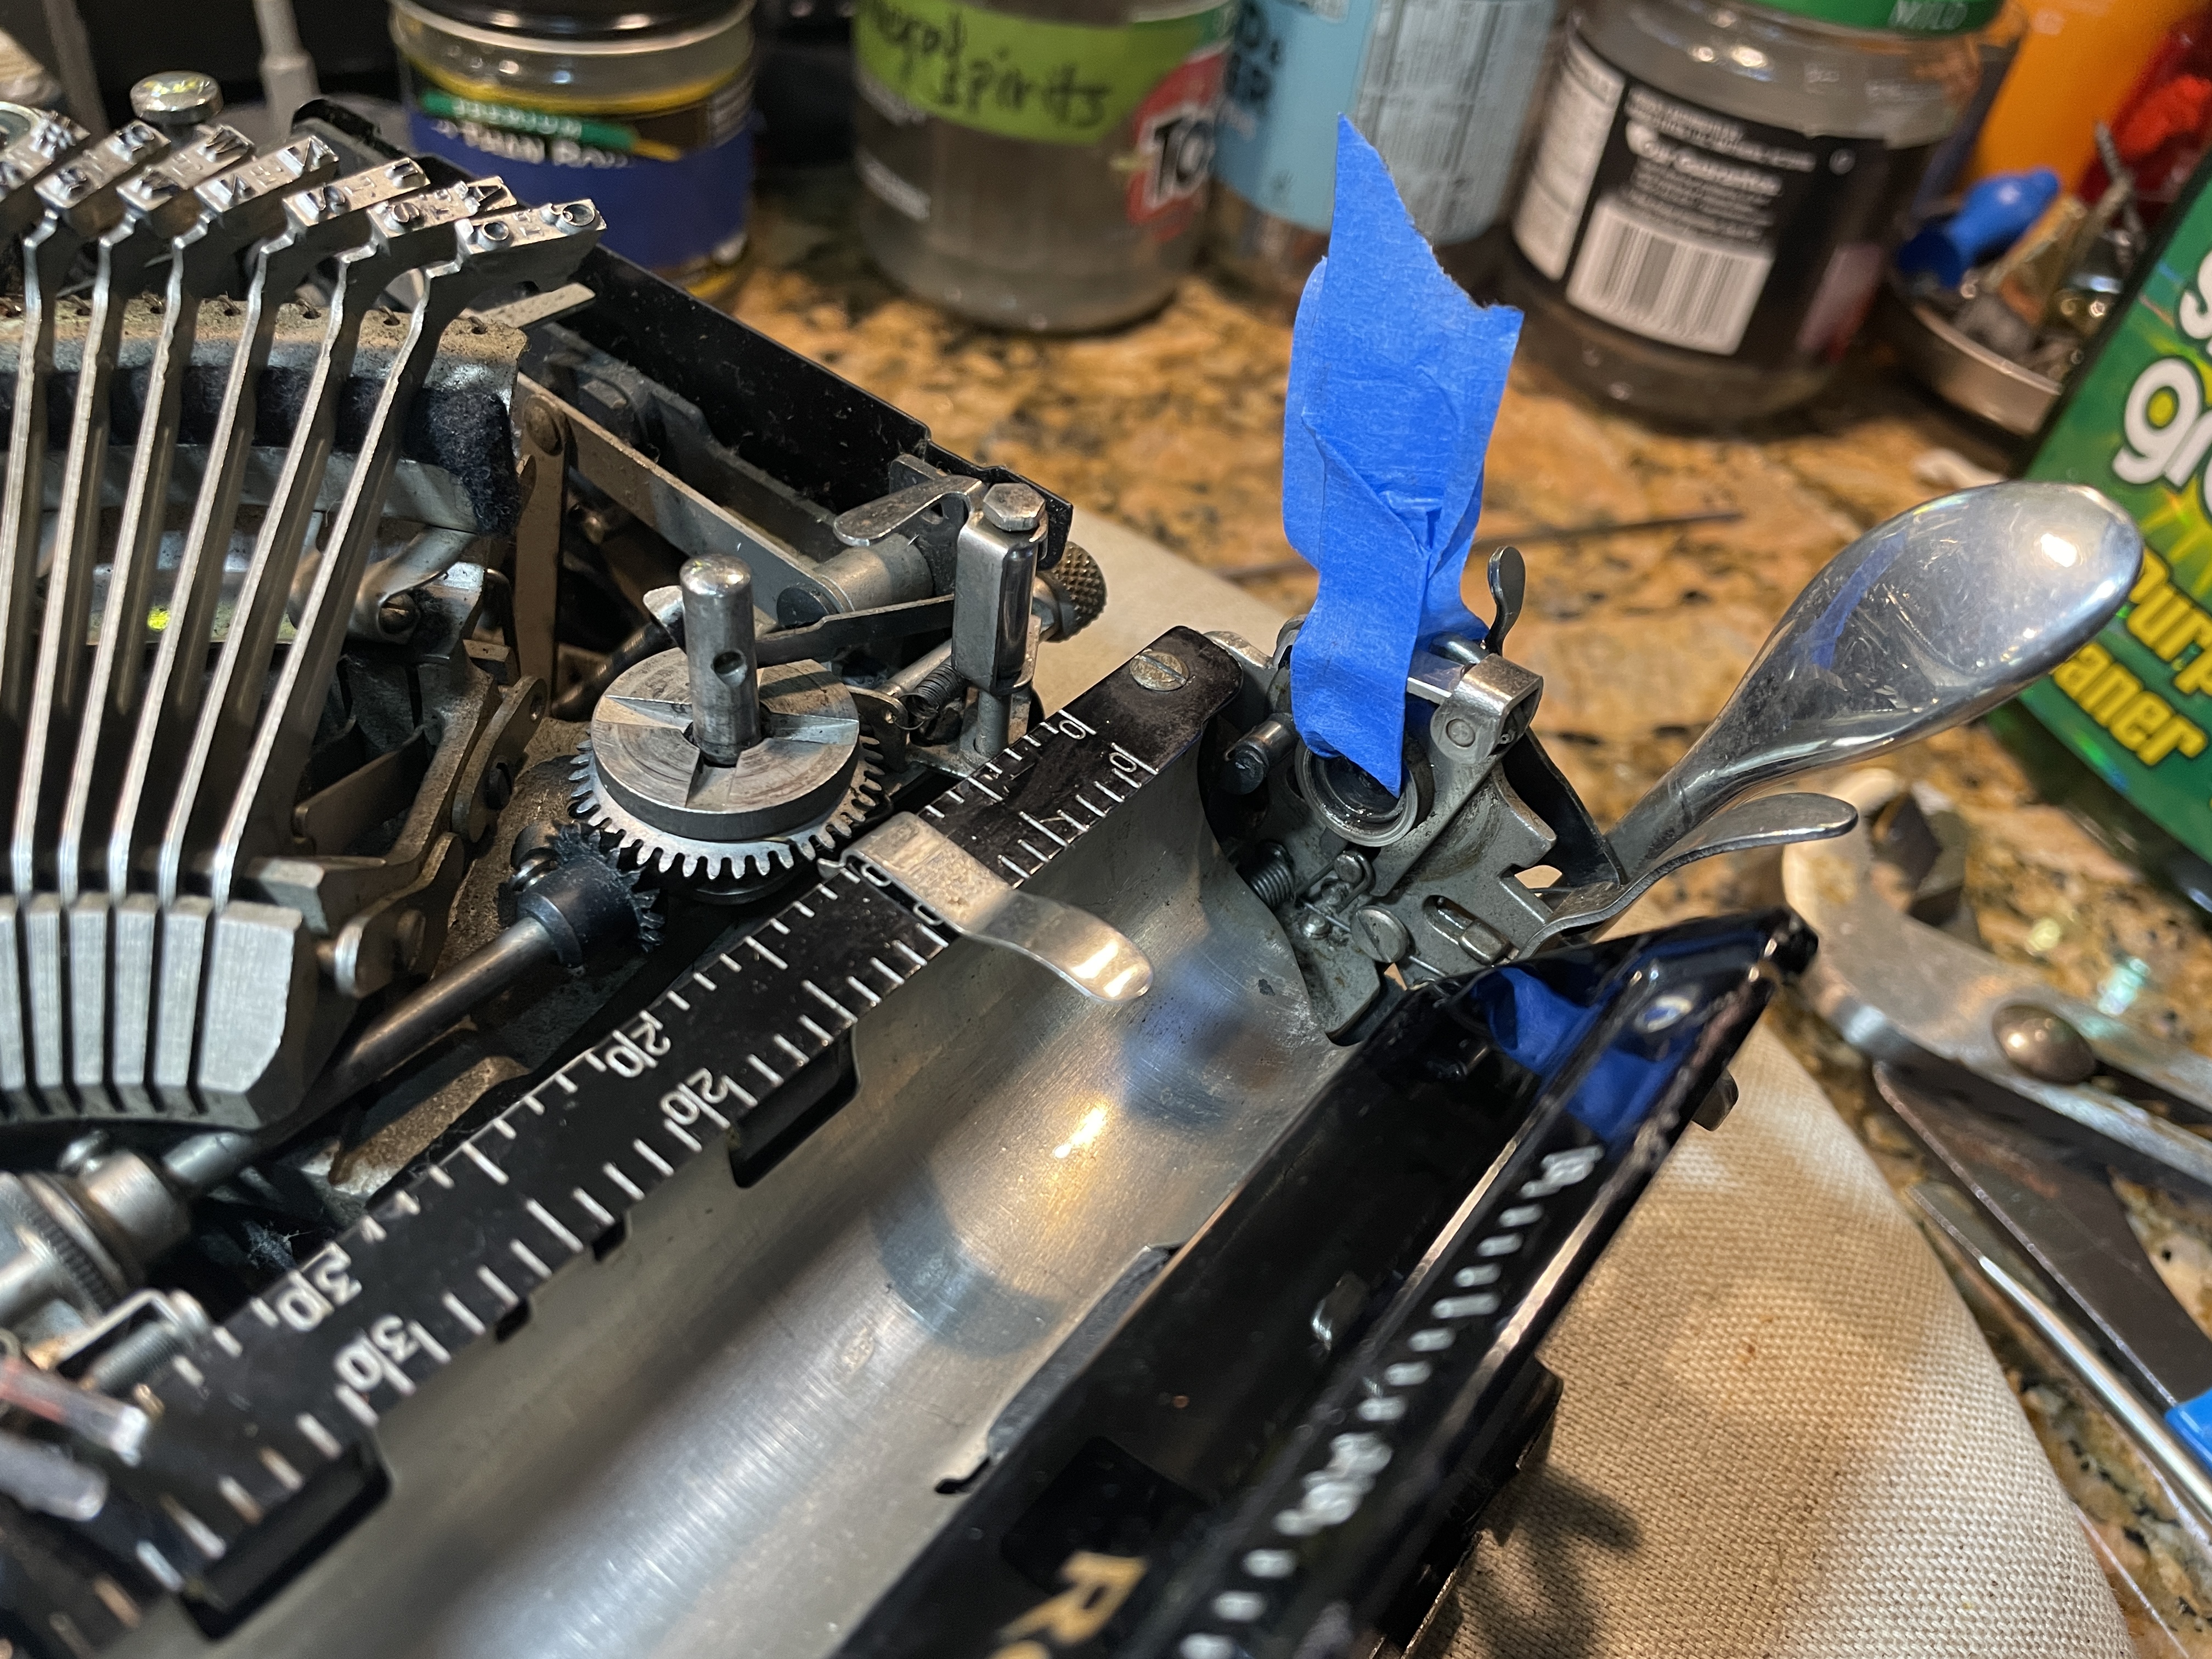
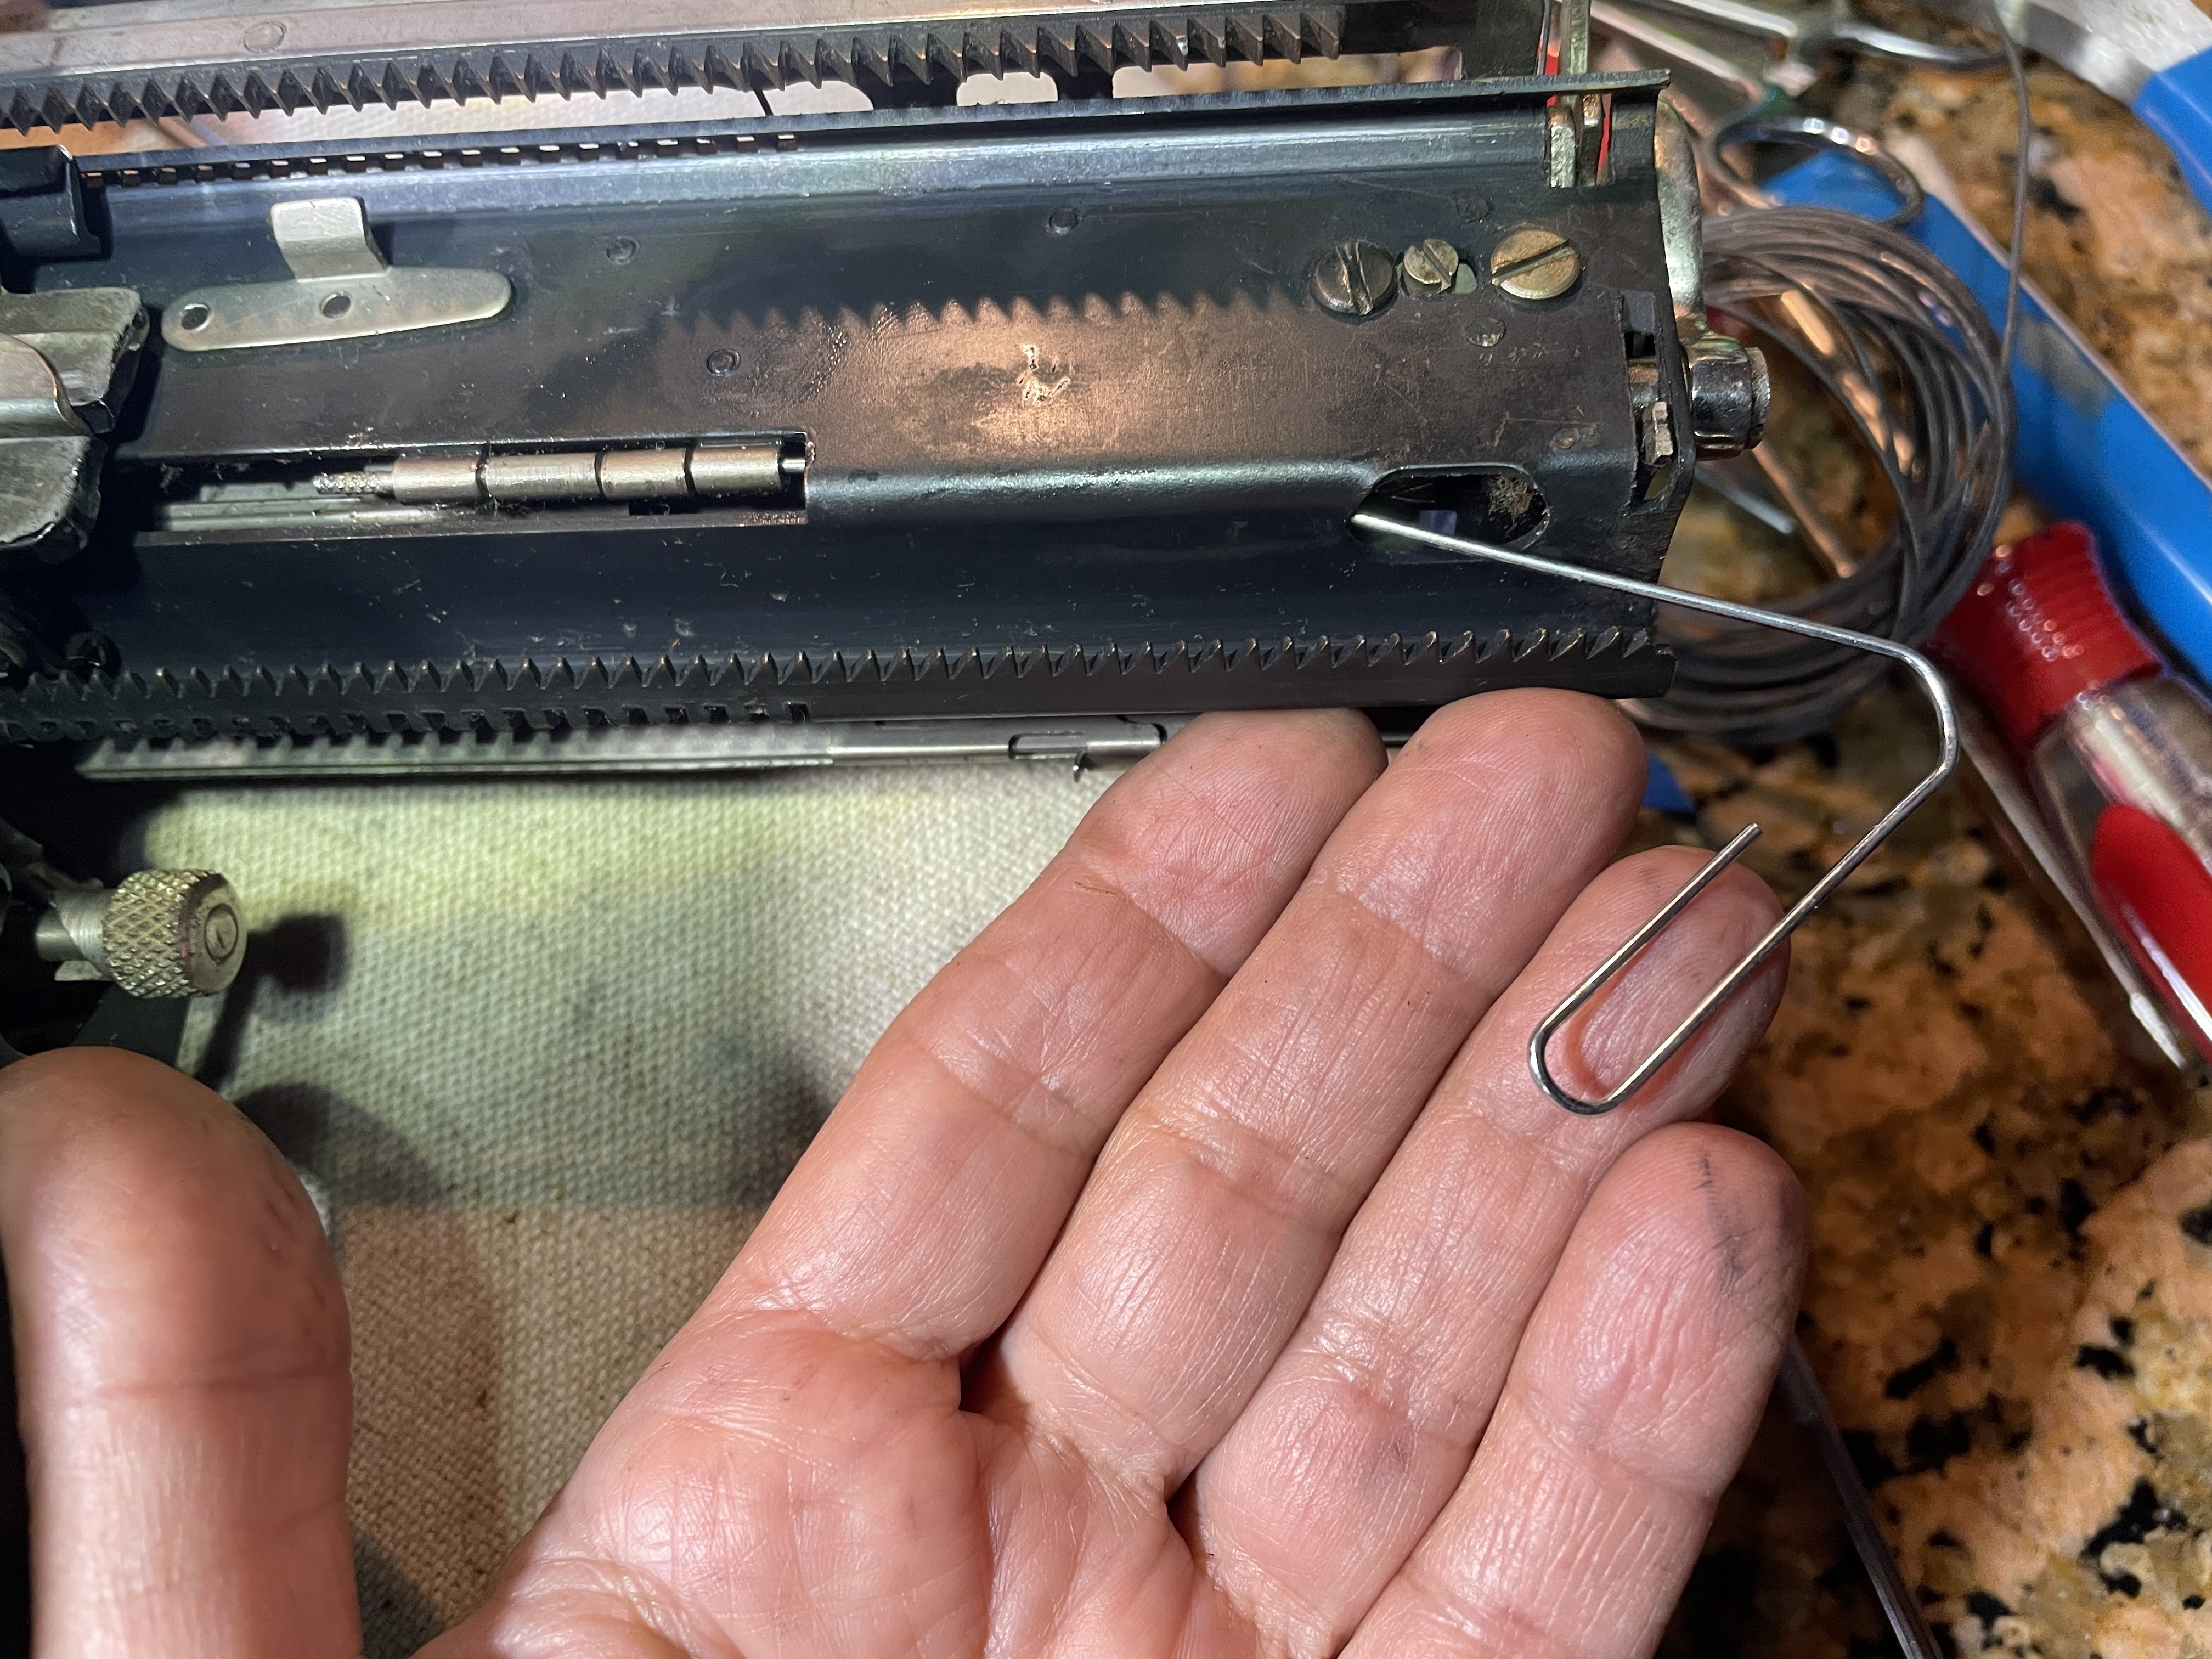
You can get the paper tray out by removing the little pins with the knurled ends. Despite lubrication, those things were STUCK.
Just My Typewriter has a good video on feed roller replacement and her suggestion to use a paper clip to get the pins started was spot on:
A paper clip did the trick. It was stiff enough to chase that crusty little pin out:
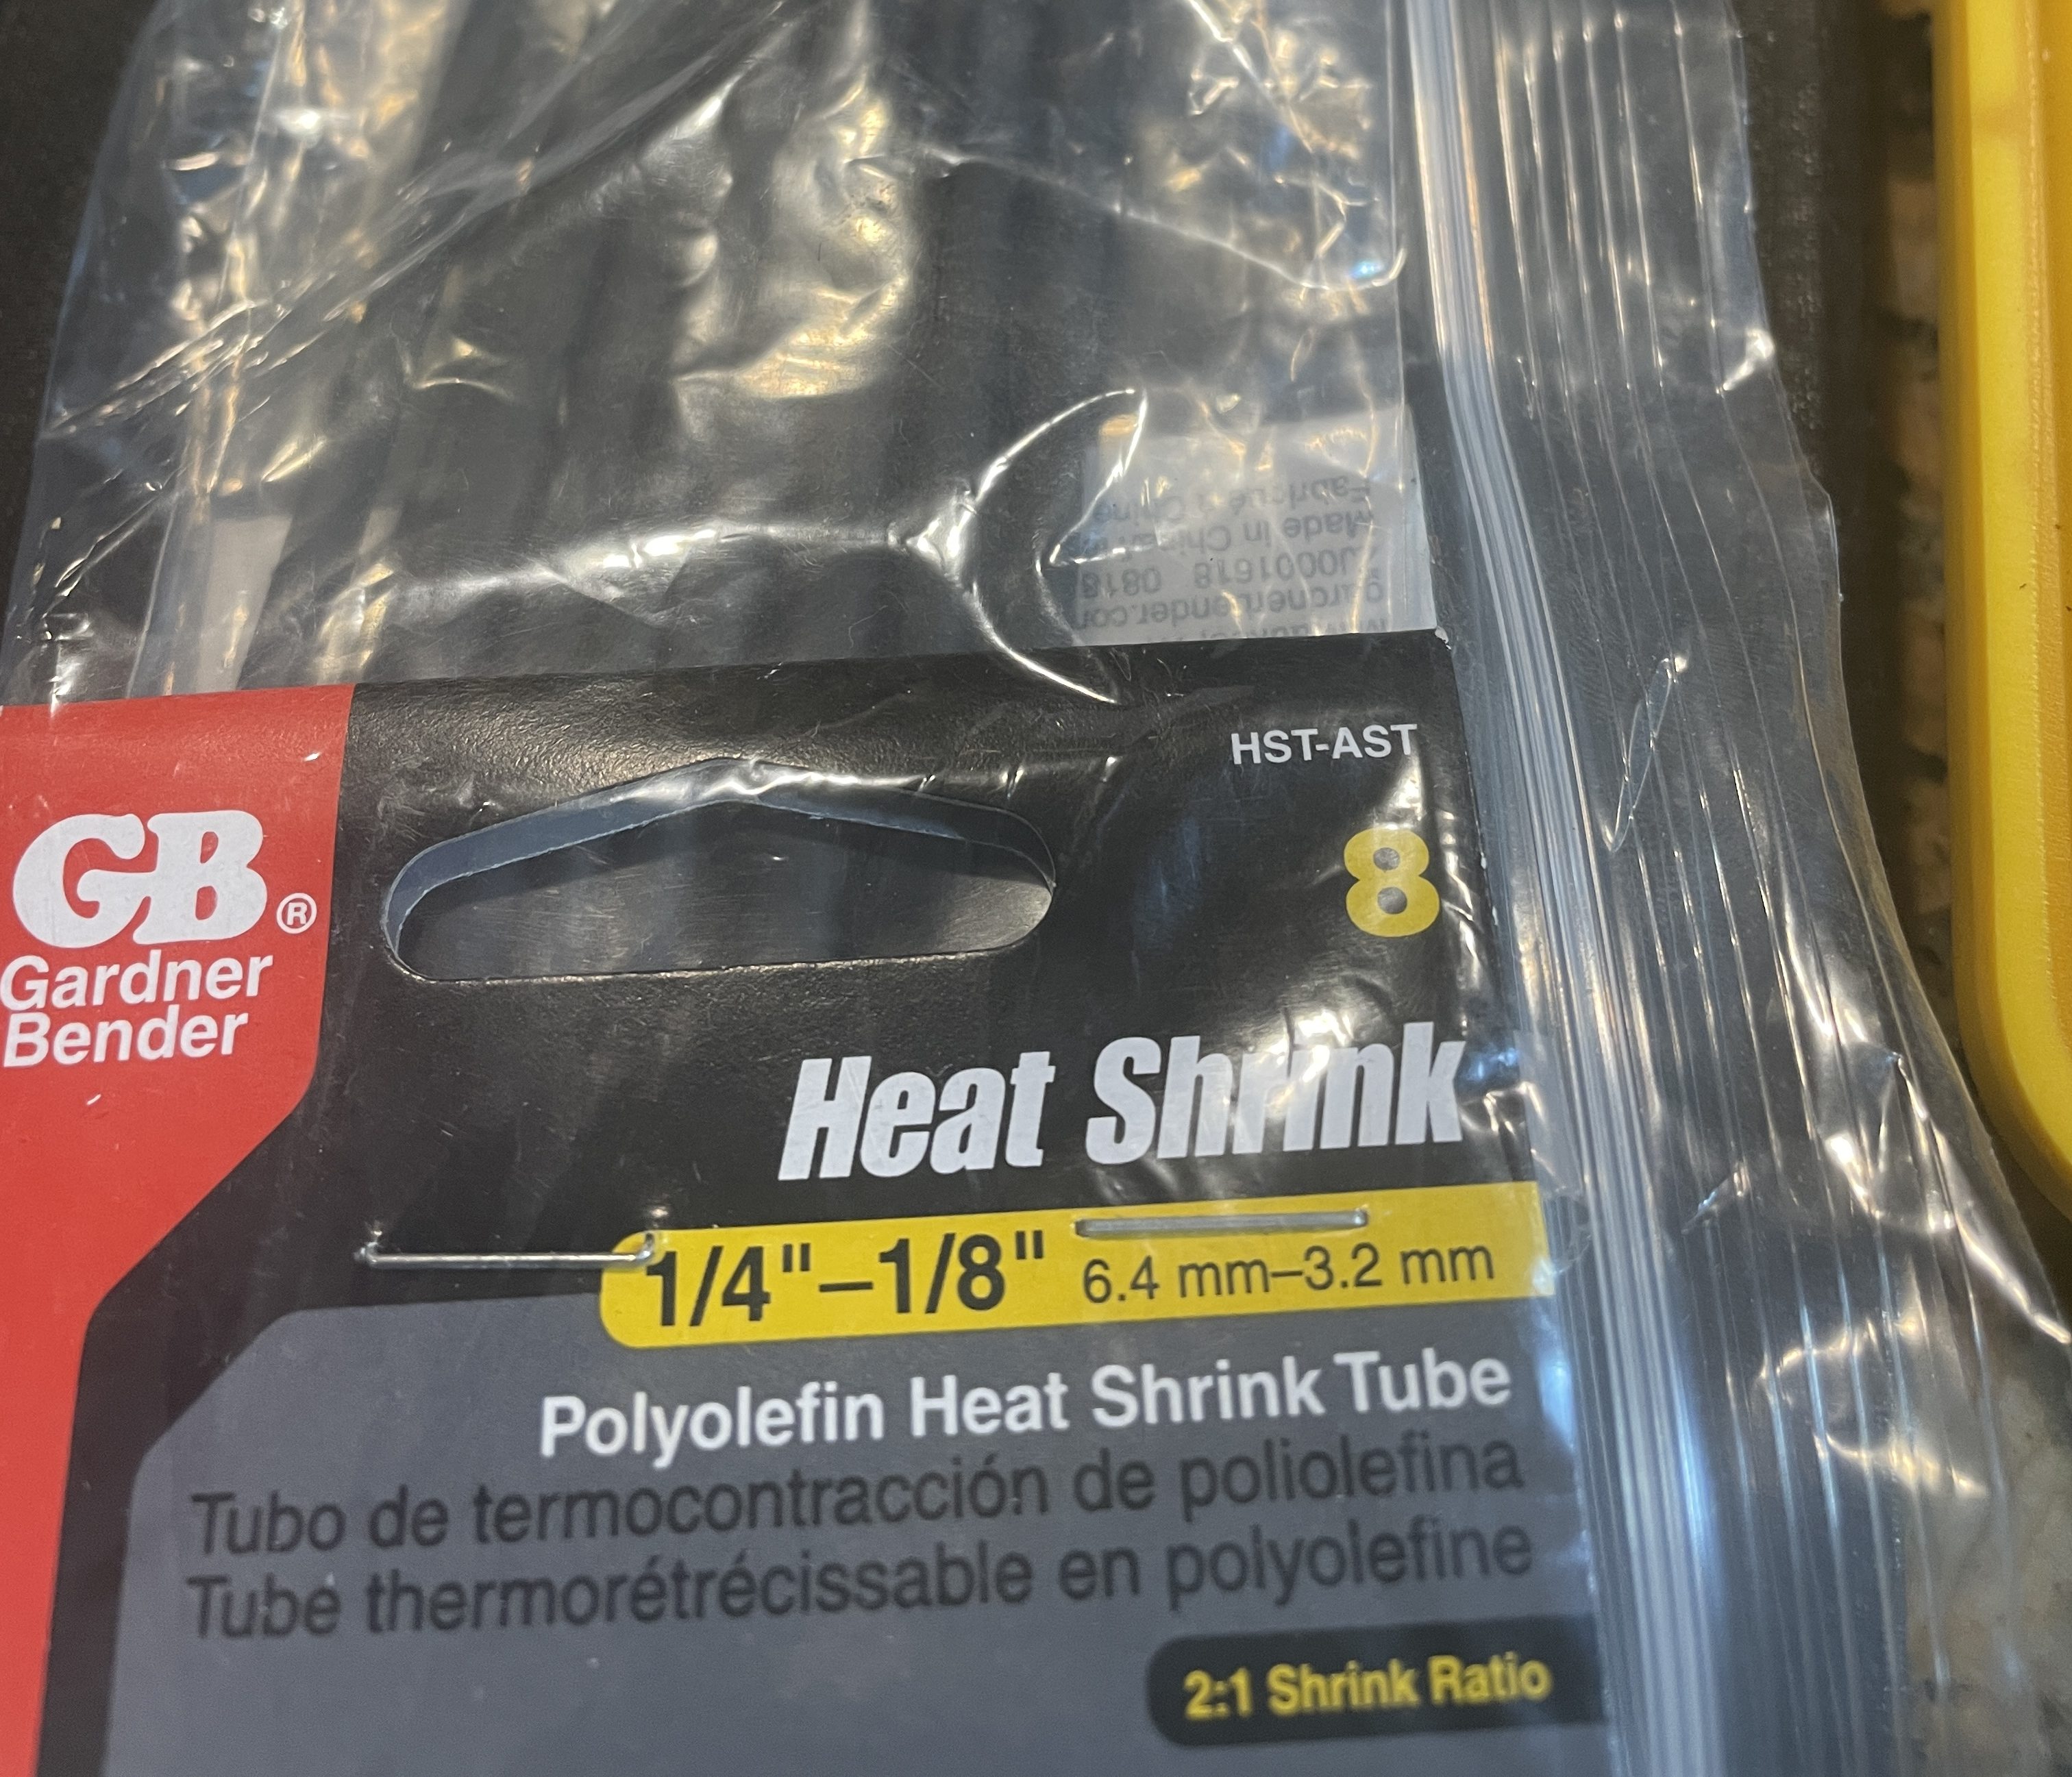
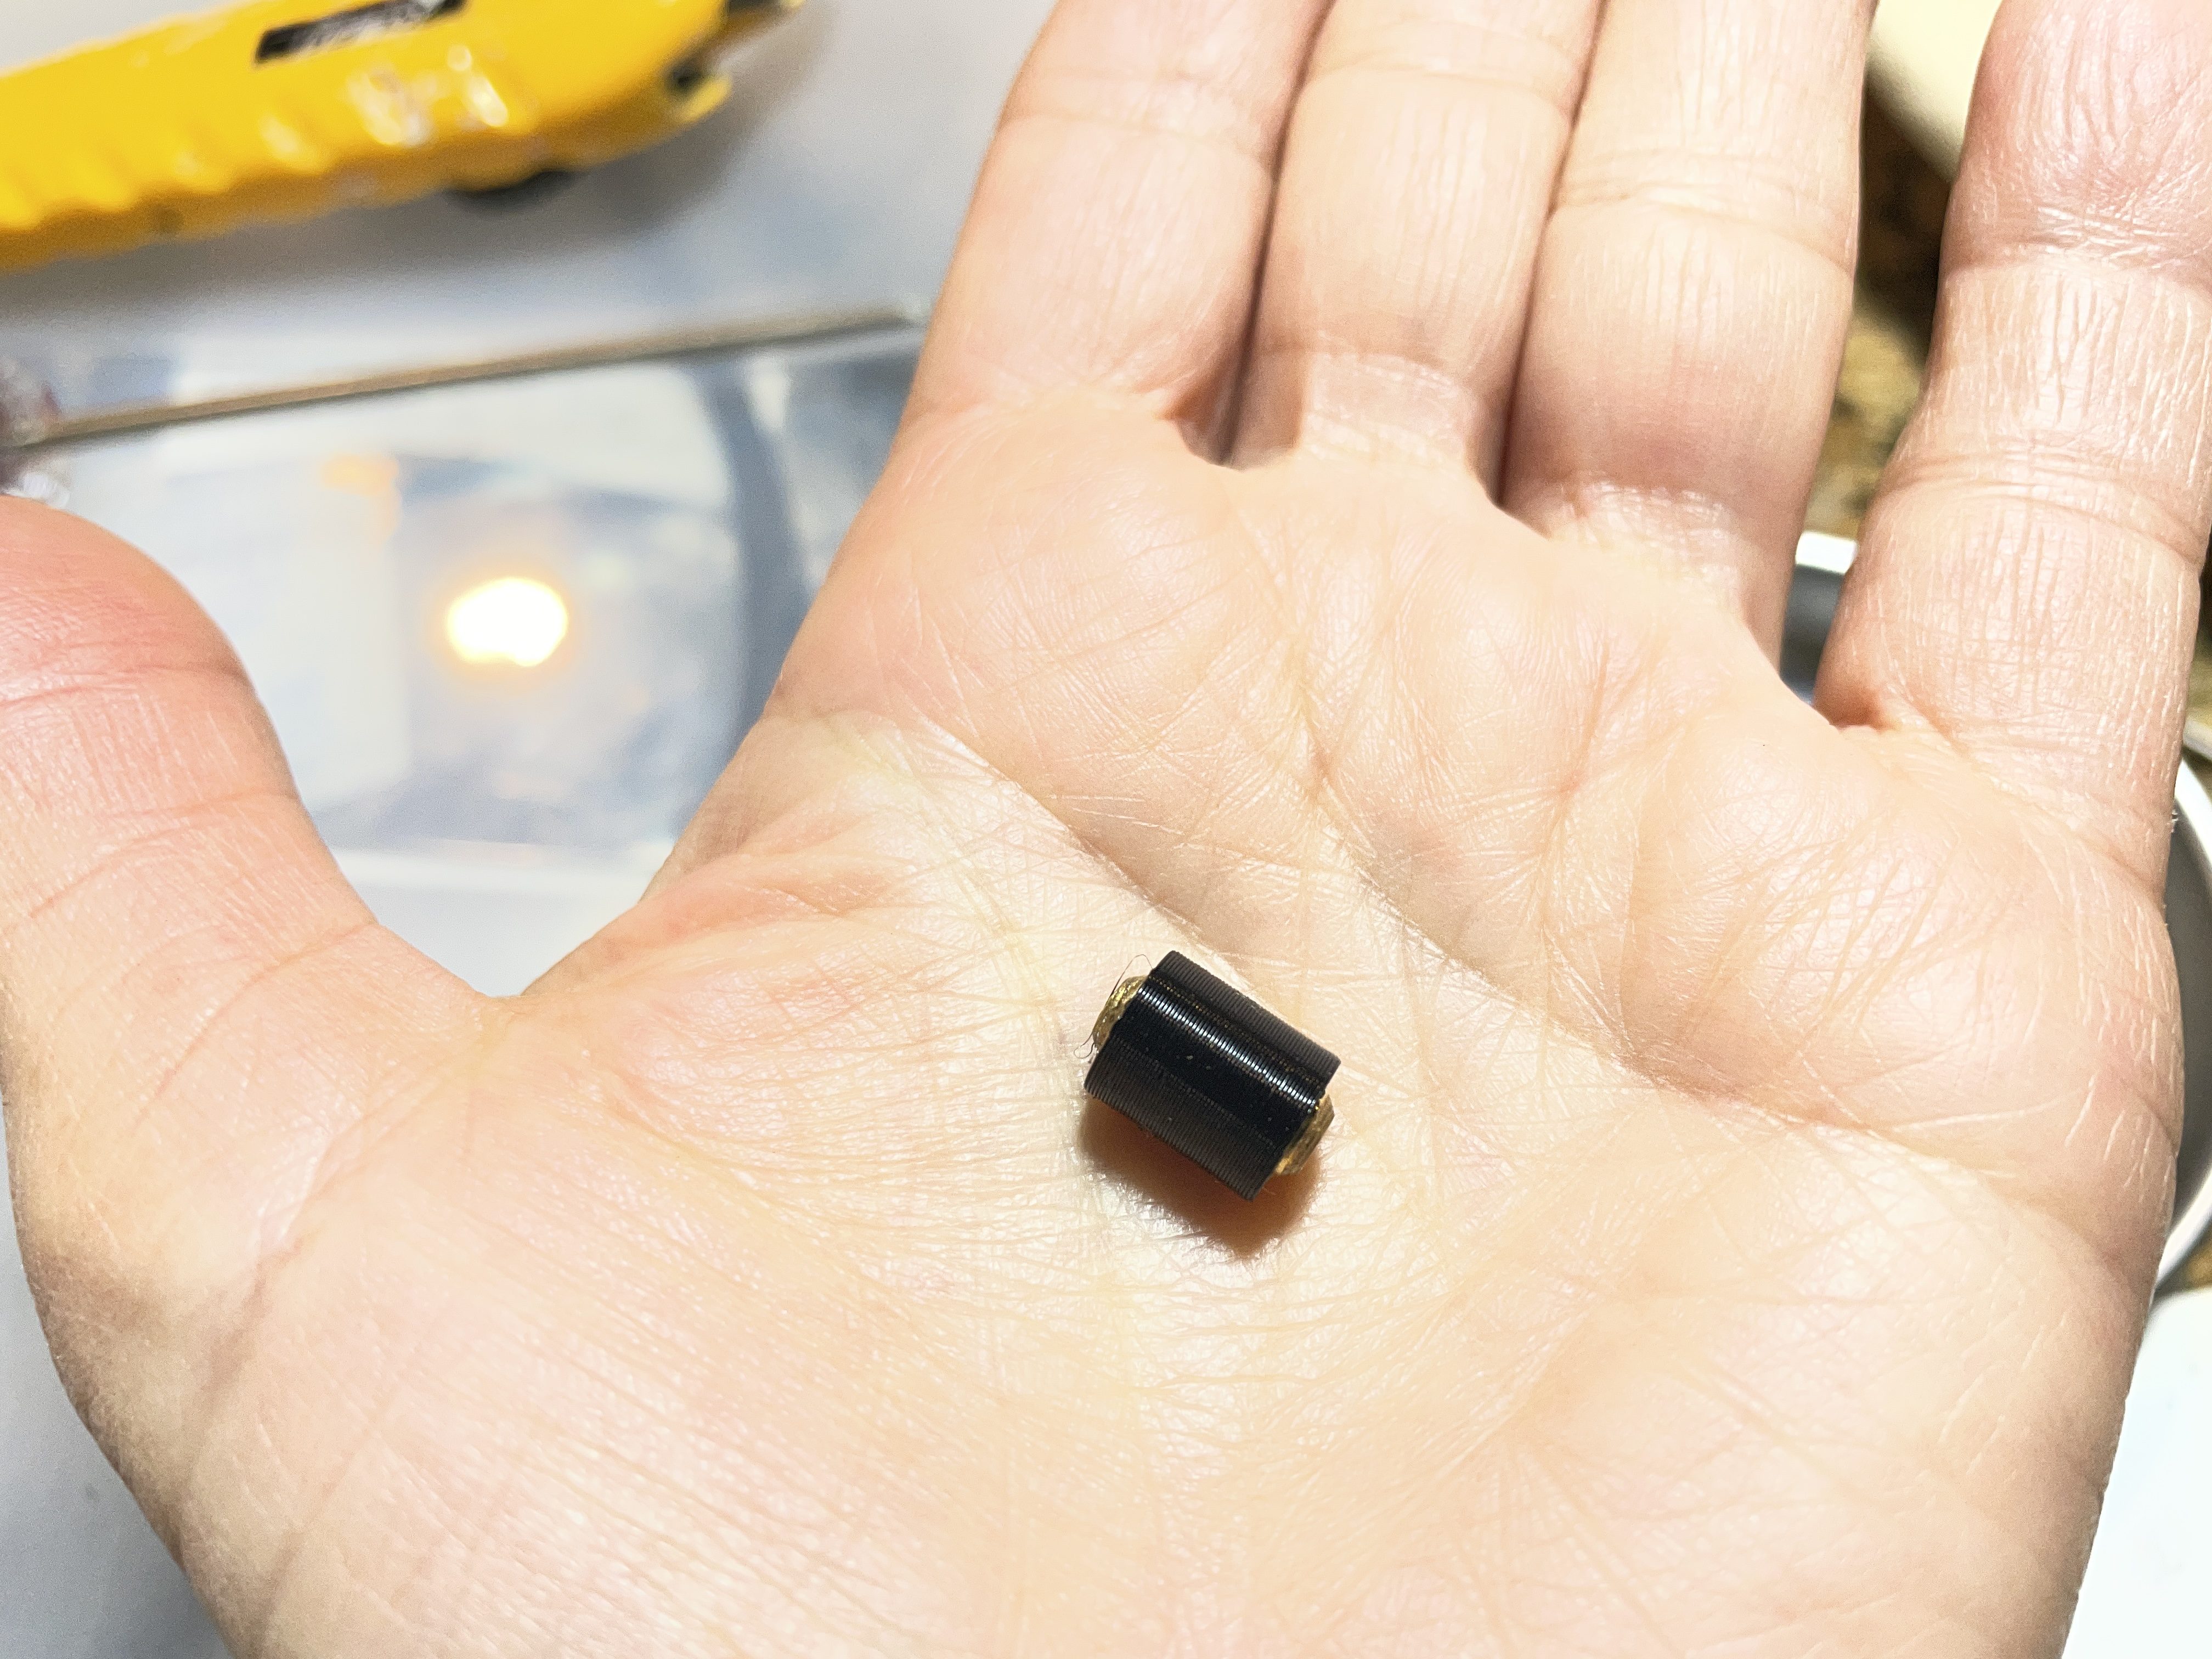
After the paper pan was removed, the front feed roller assembly lifted out. The pins were stubborn, so I used a little lubricant. I used my calipers and got an approximate size. I decided to scrape off the old rubber and replace with layers of heat shrink since finding appropriately-sized tubing that small was hard. I put three layers of heat shrink over the original brass cores for the front feed rollers.
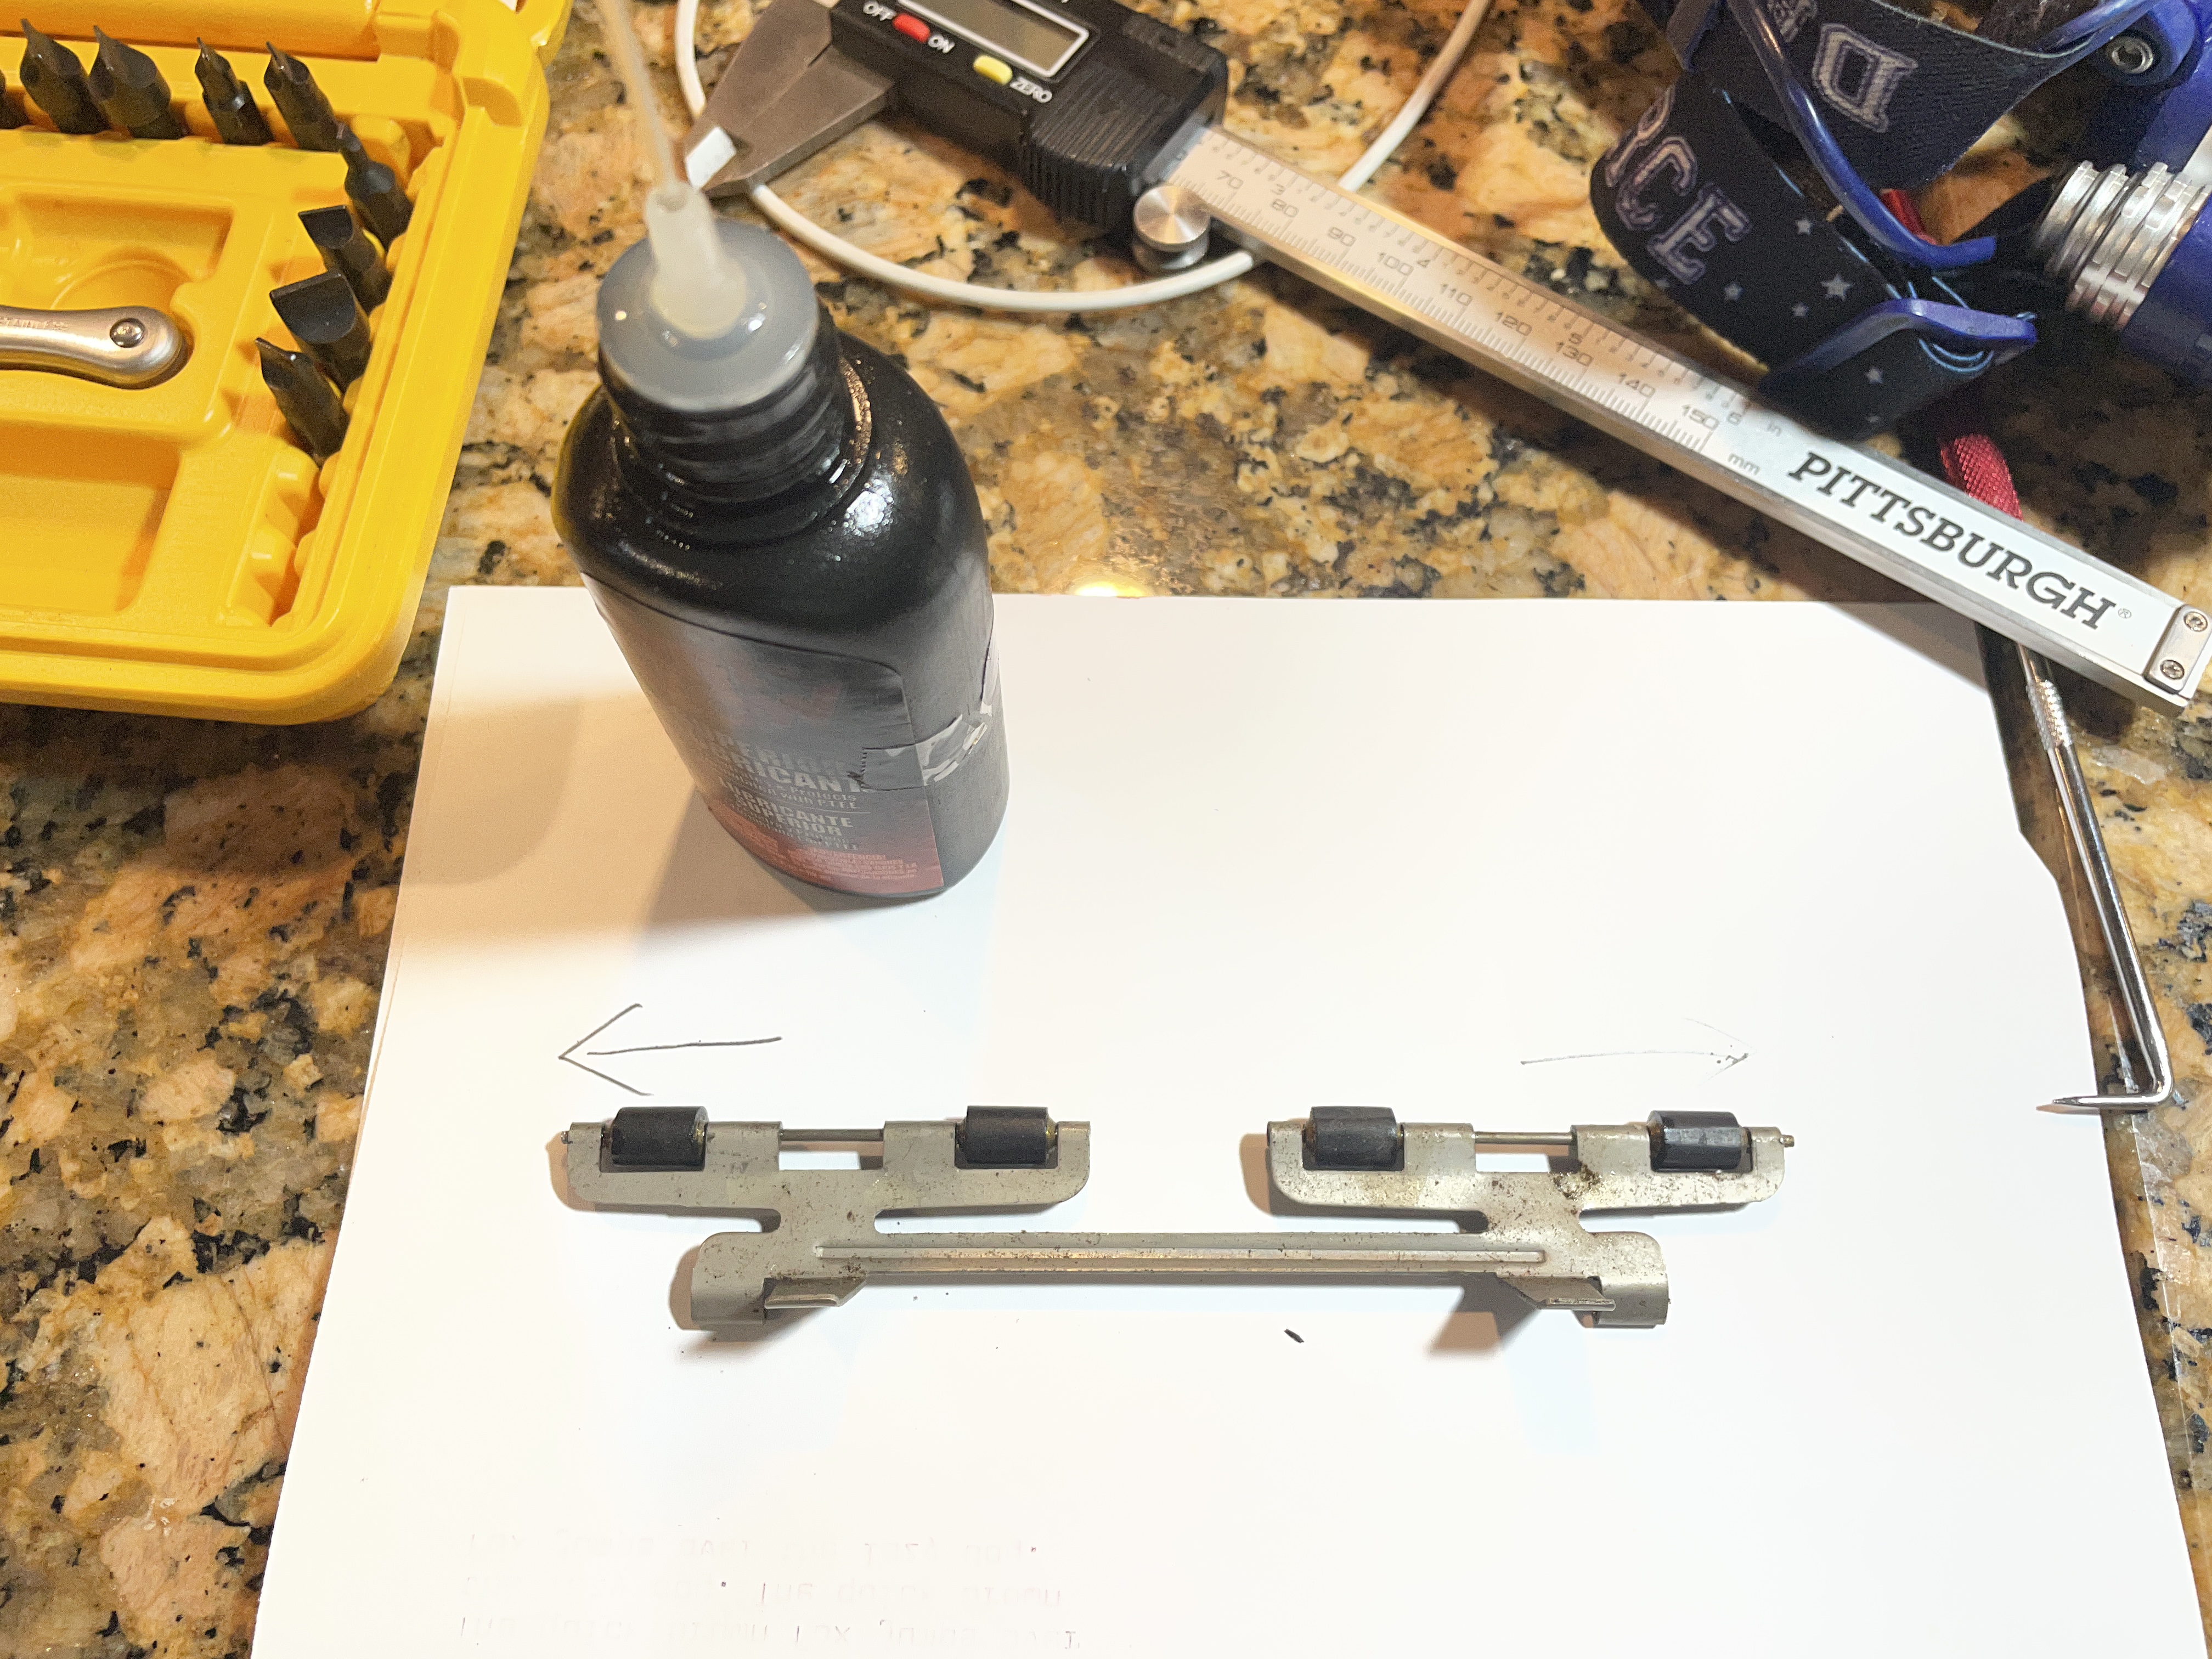

Front feed rollers with outer diameter with original rubber .28″; inner diameter of brass core: .19″
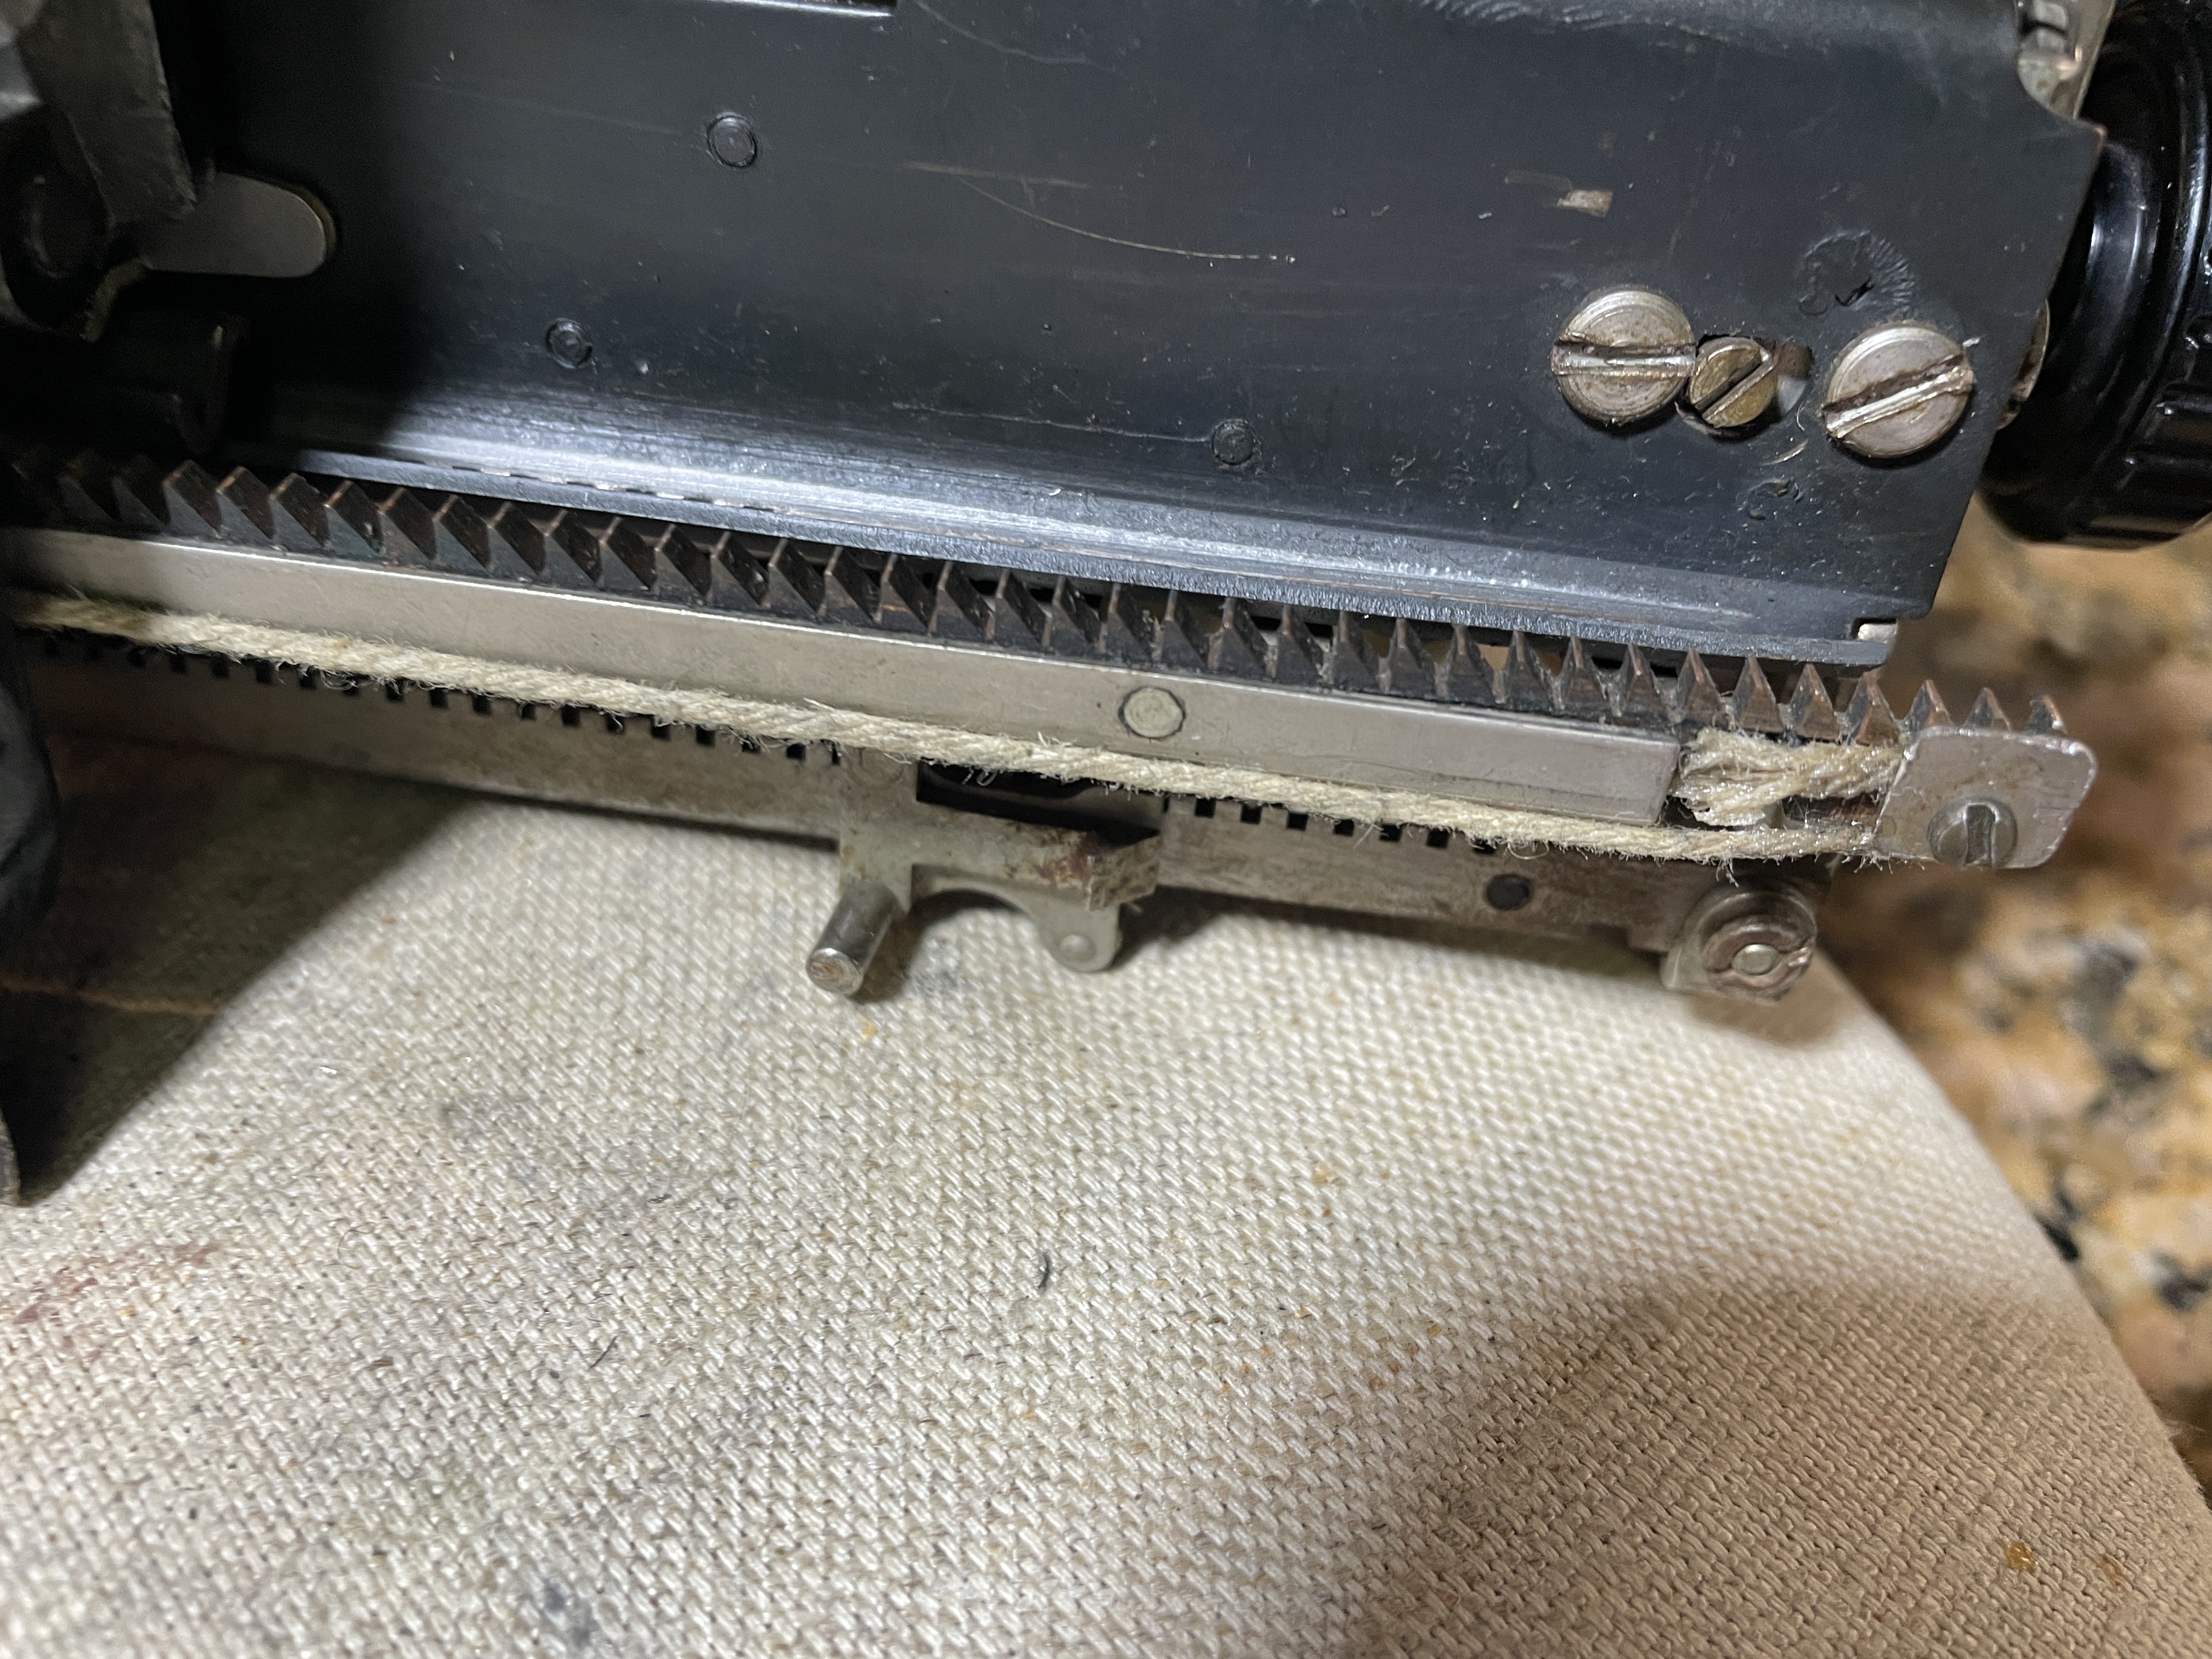
There were more pins and springs holding the back feed roller assembly. I decided to replace the back feed roller with the assembly in place on the carriage.
There’s a single long rod that runs through all four back feed rollers. You can remove it if you put the carriage lock on and thread it through the tiny hole in the carriage:
I dug around in my rubber box and didn’t see what I needed. I’ve replaced rear feed rollers on a Remington Portable 1 with automotive tubing, and they fed well. Good dimensions for the rear feed rollers would be tubing with I.D. 7/32″ and O.D. 11/32″ or O.D. 3/8″. I checked at one auto parts store, and they had nothing suitable in stock, so I used several layers of heat shrink again for the back rollers.
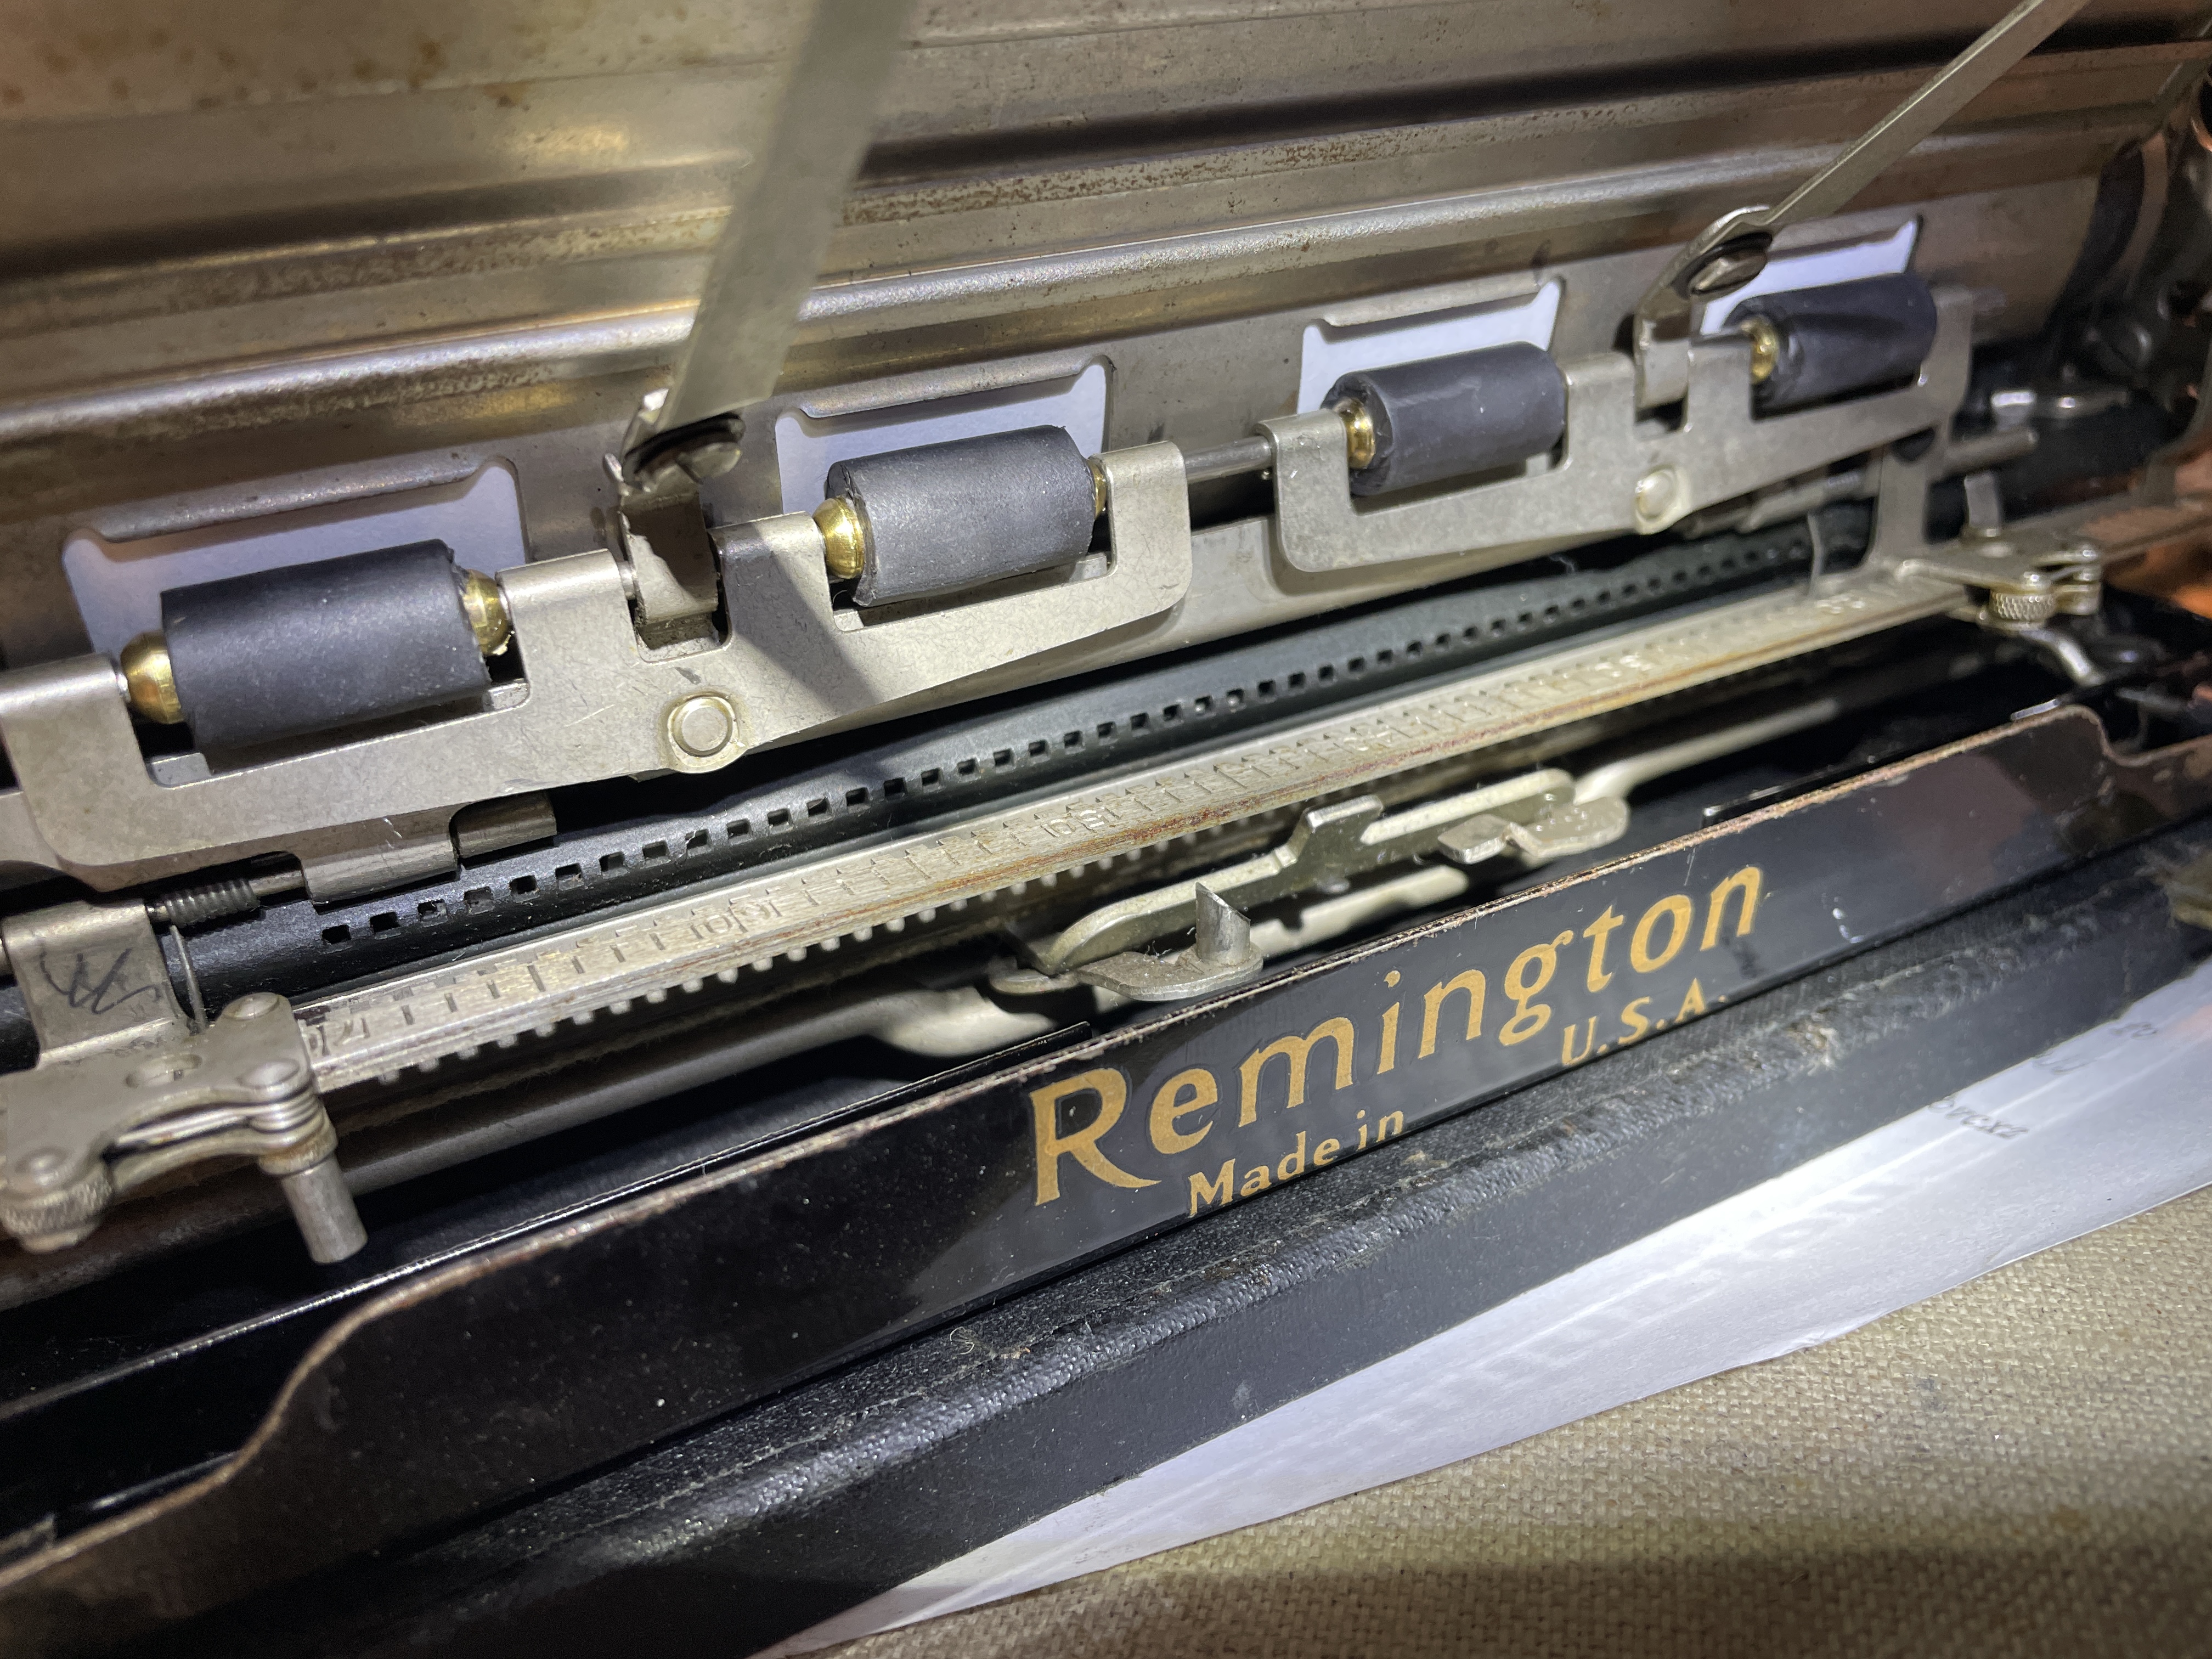
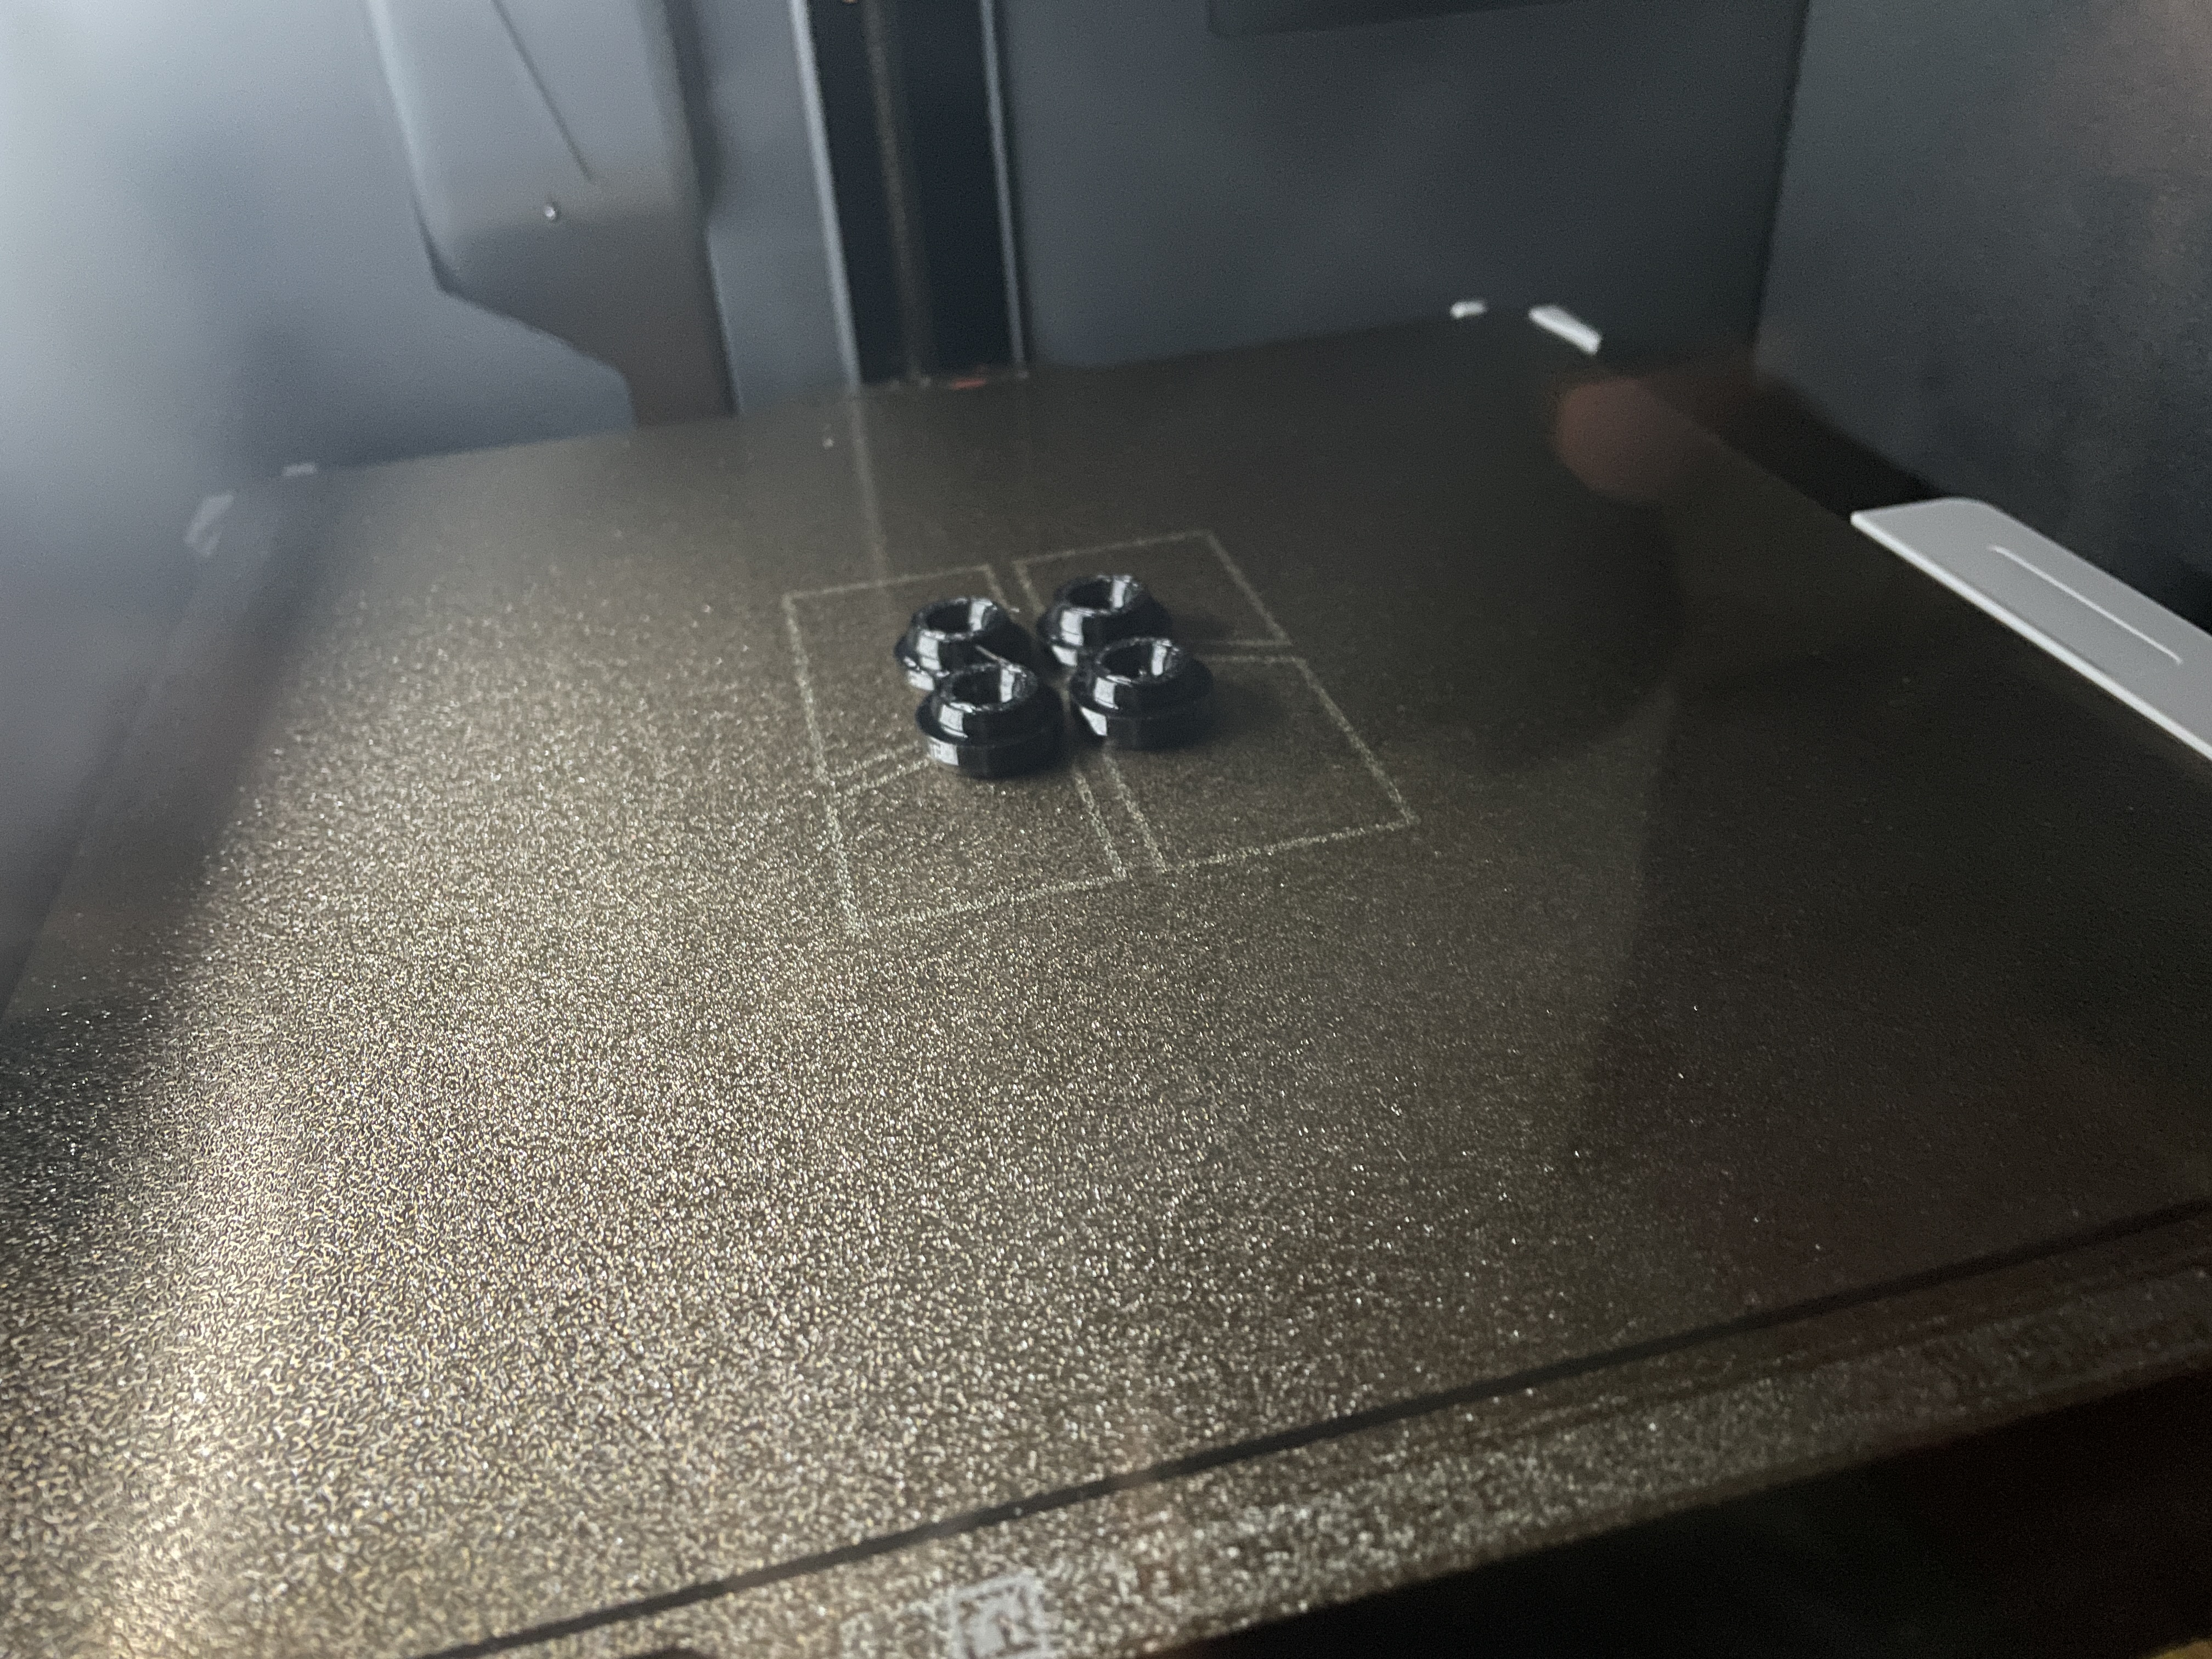
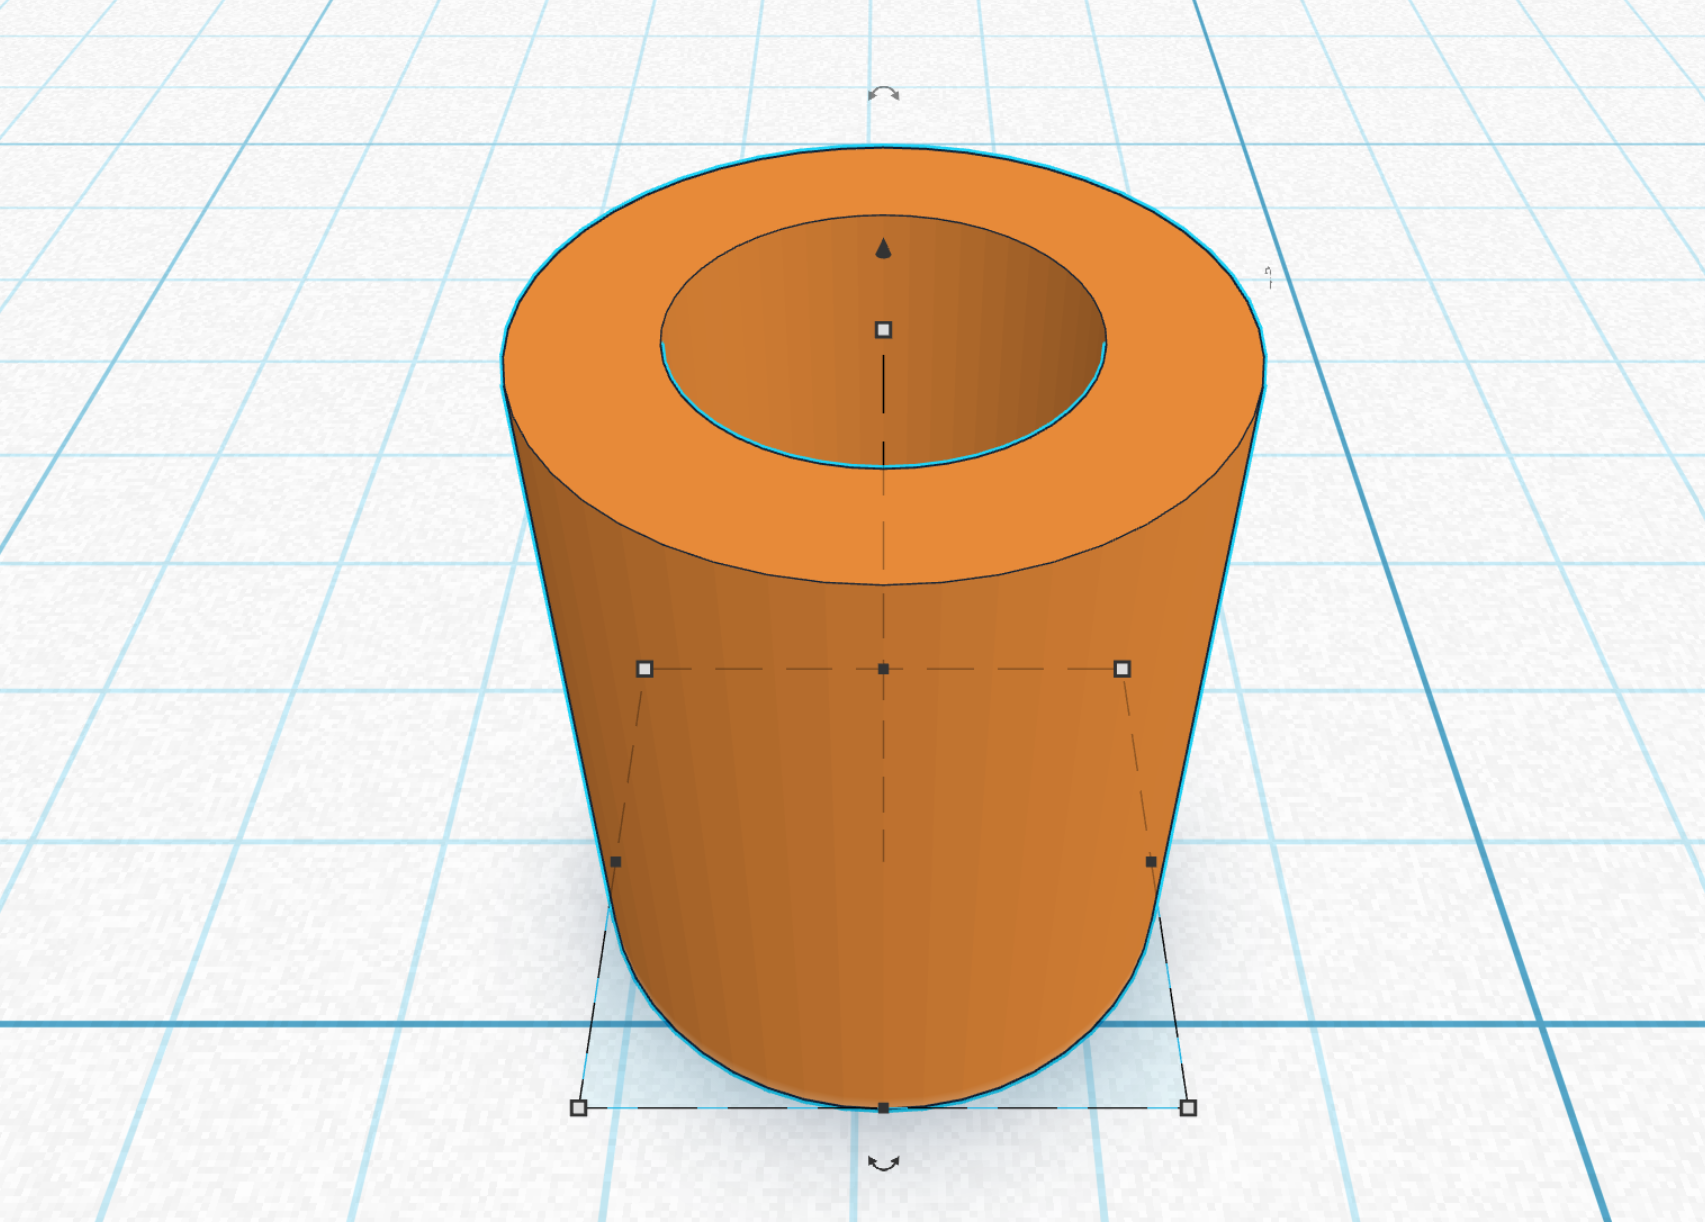
Once I had everything re-assembled with the platen, I checked fit and function. It was feeding paper fine, but I noticed one of the front feed rollers wasn’t spinning. I decided against adding another layer of heat shrink (I was running out) and instead 3D printed all four front feed rollers. I modeled a feed roller sleeve that was .375″ long with an internal diameter of .19″ and an outer diameter of .32″ and printed in 95A TPU.
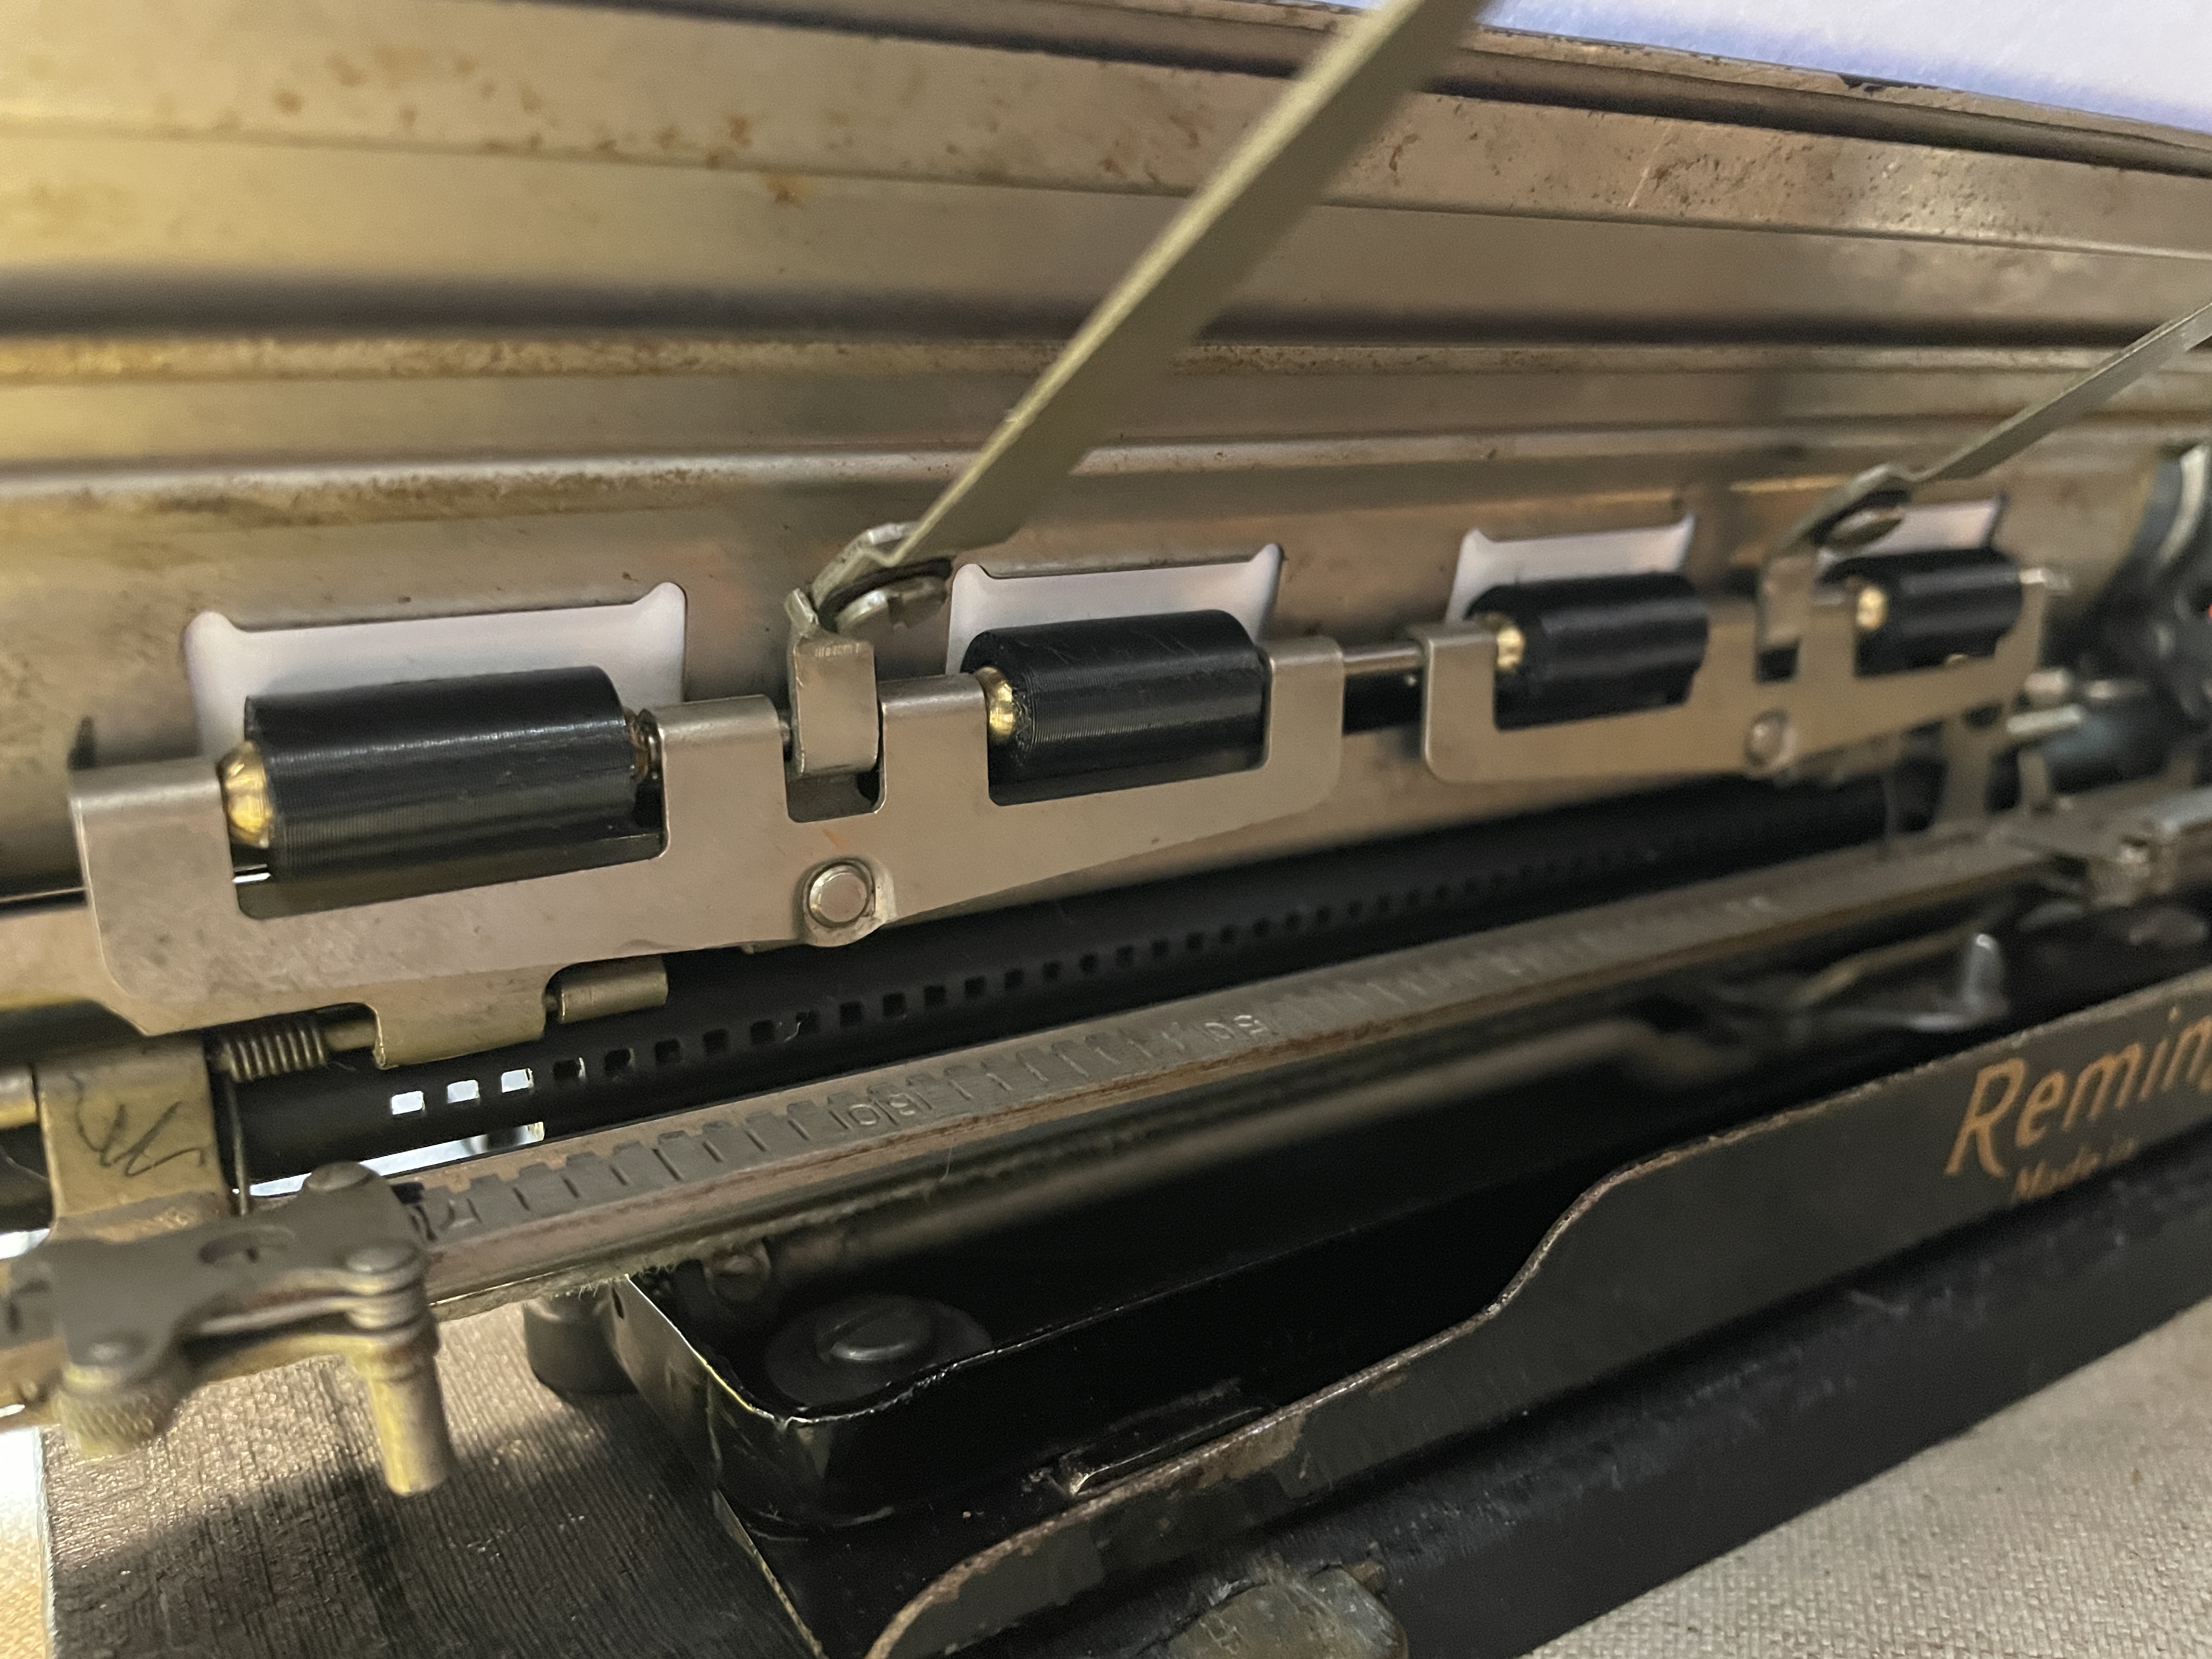
The 3D-printed feed rollers look nice and they work great.
I had one back feed roller that was rolling inconsistently, so I ended up replacing all the rear feed rollers with 3D-printed ones I made in 95A TPU. They are .70″ long with I.D. of .22″ and O.D. of .39″.
Verdict: heat shrink works fine, but my preference would be correctly-sized rubber automotive tubing (or J.J. Short). The 3D-printed replacements of 95A TPU are amazing because of customized sizing. I need to research long-term durability of TPU.
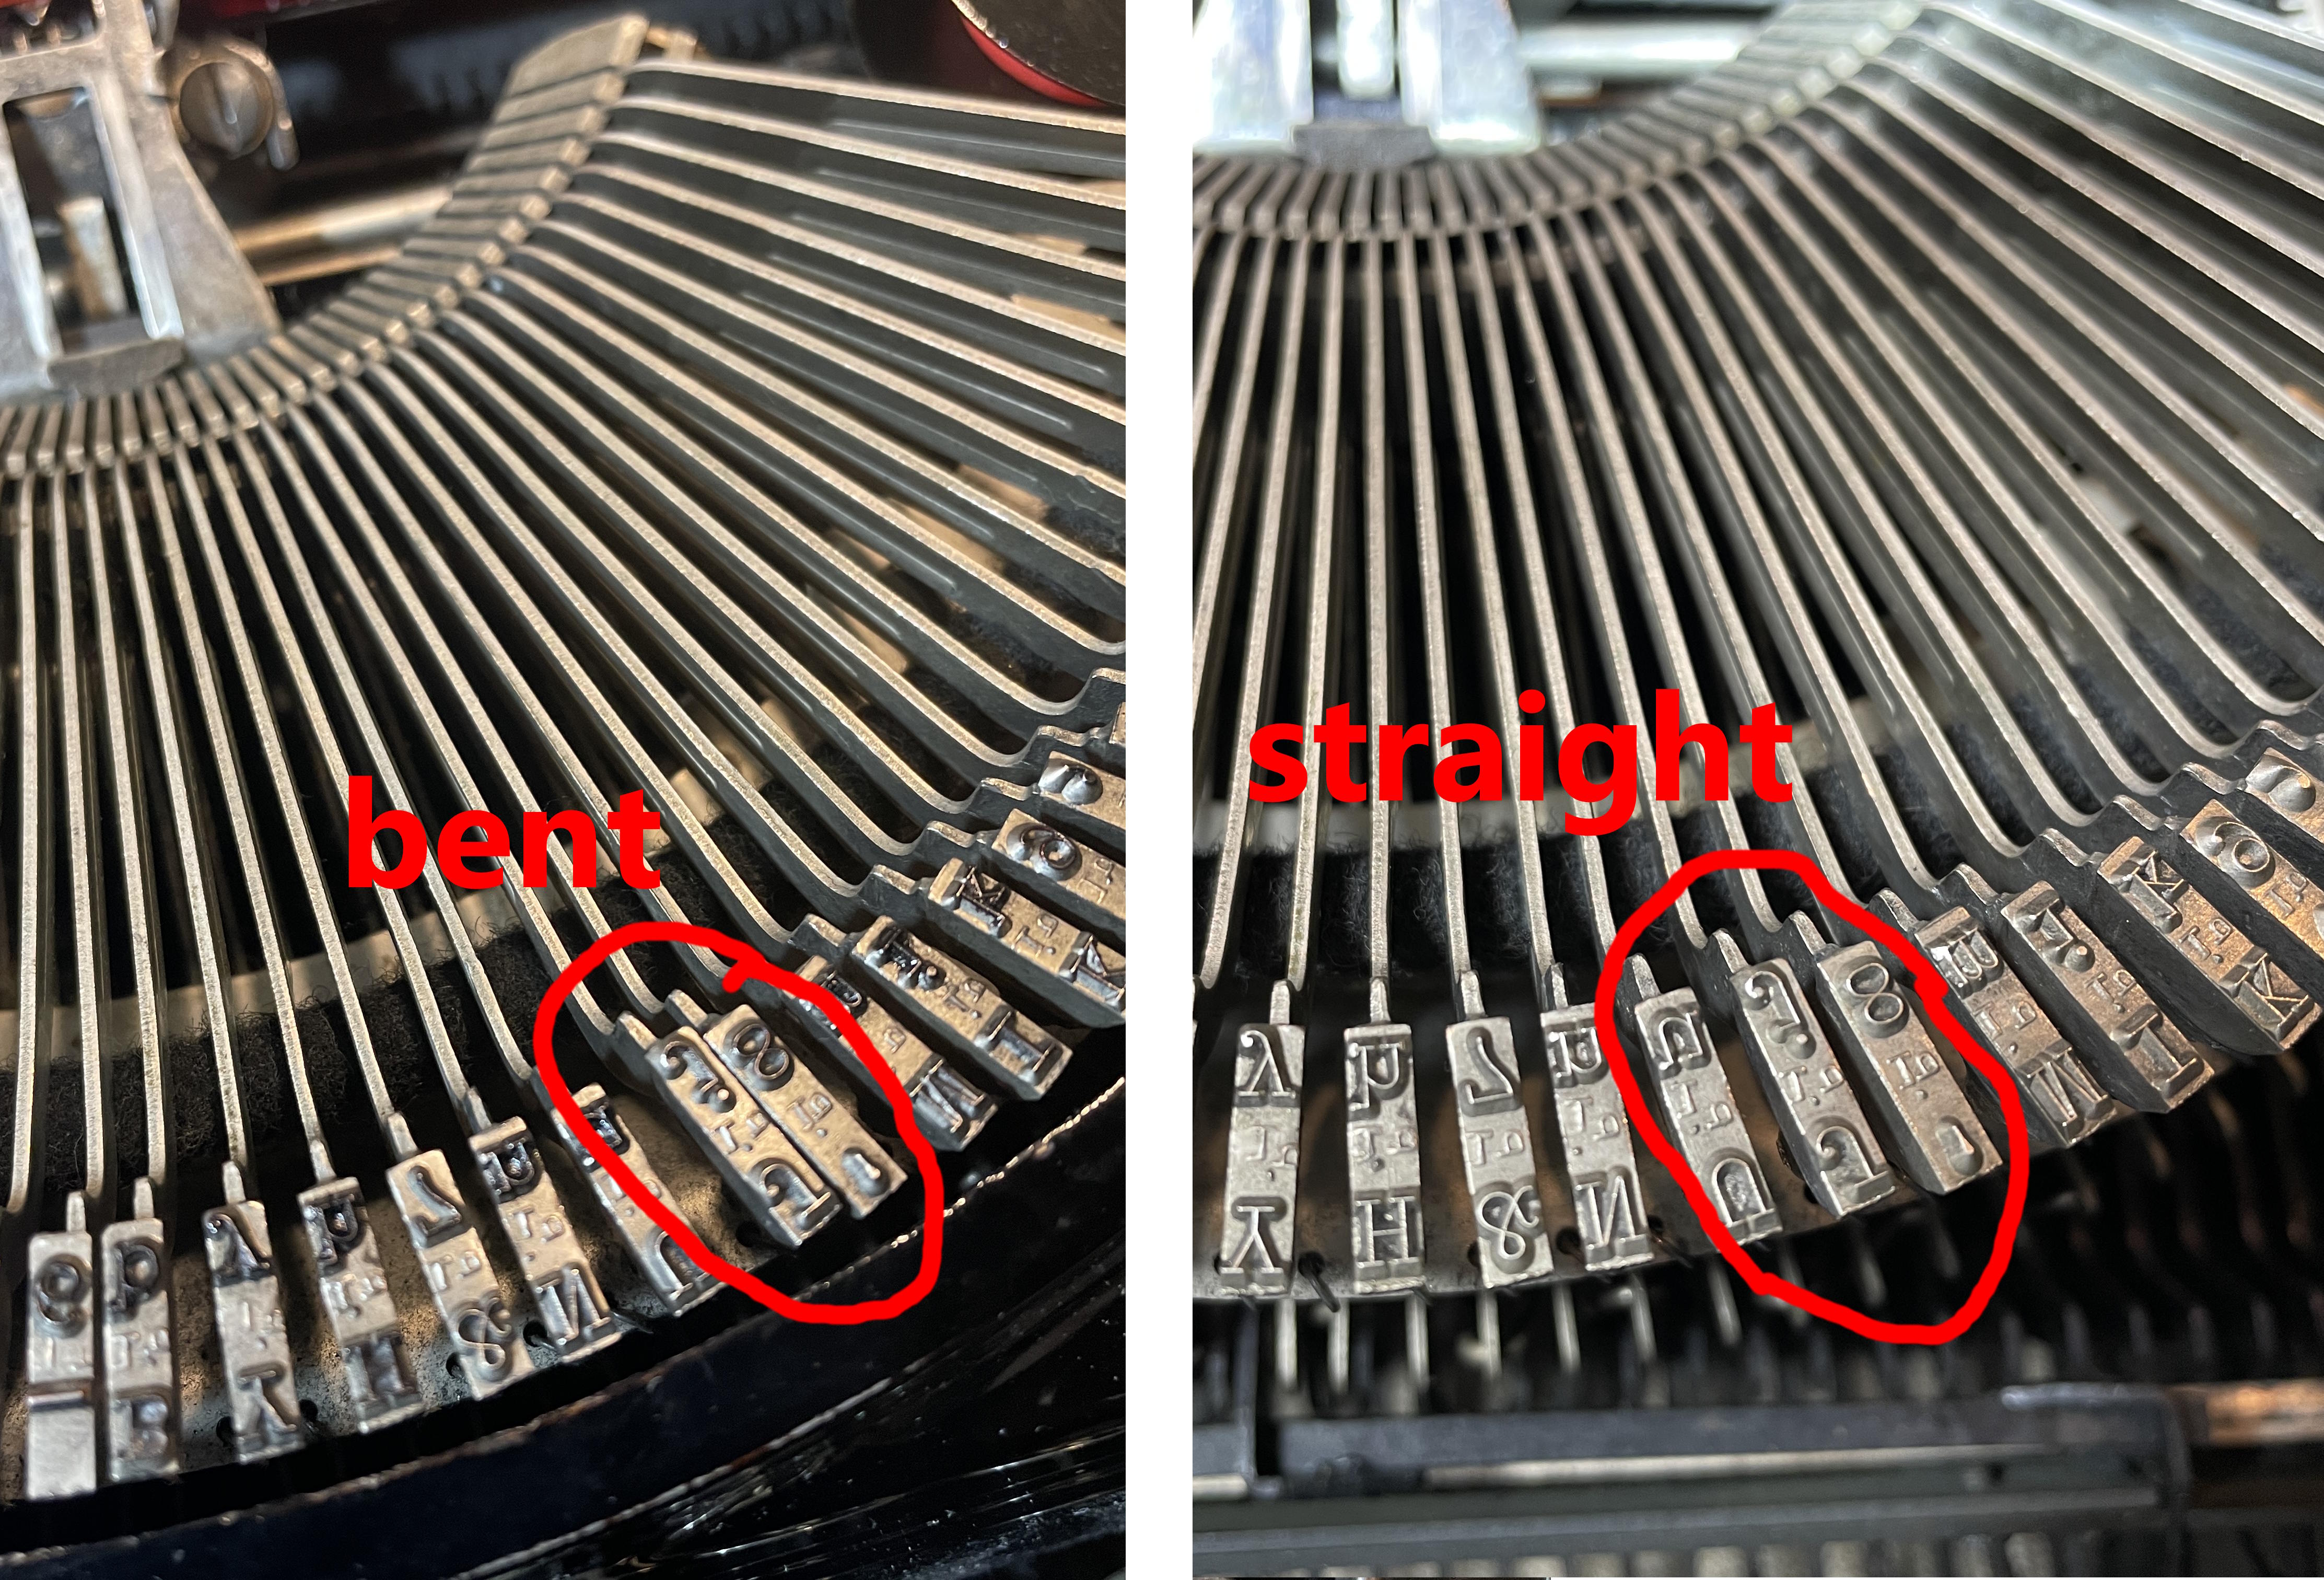
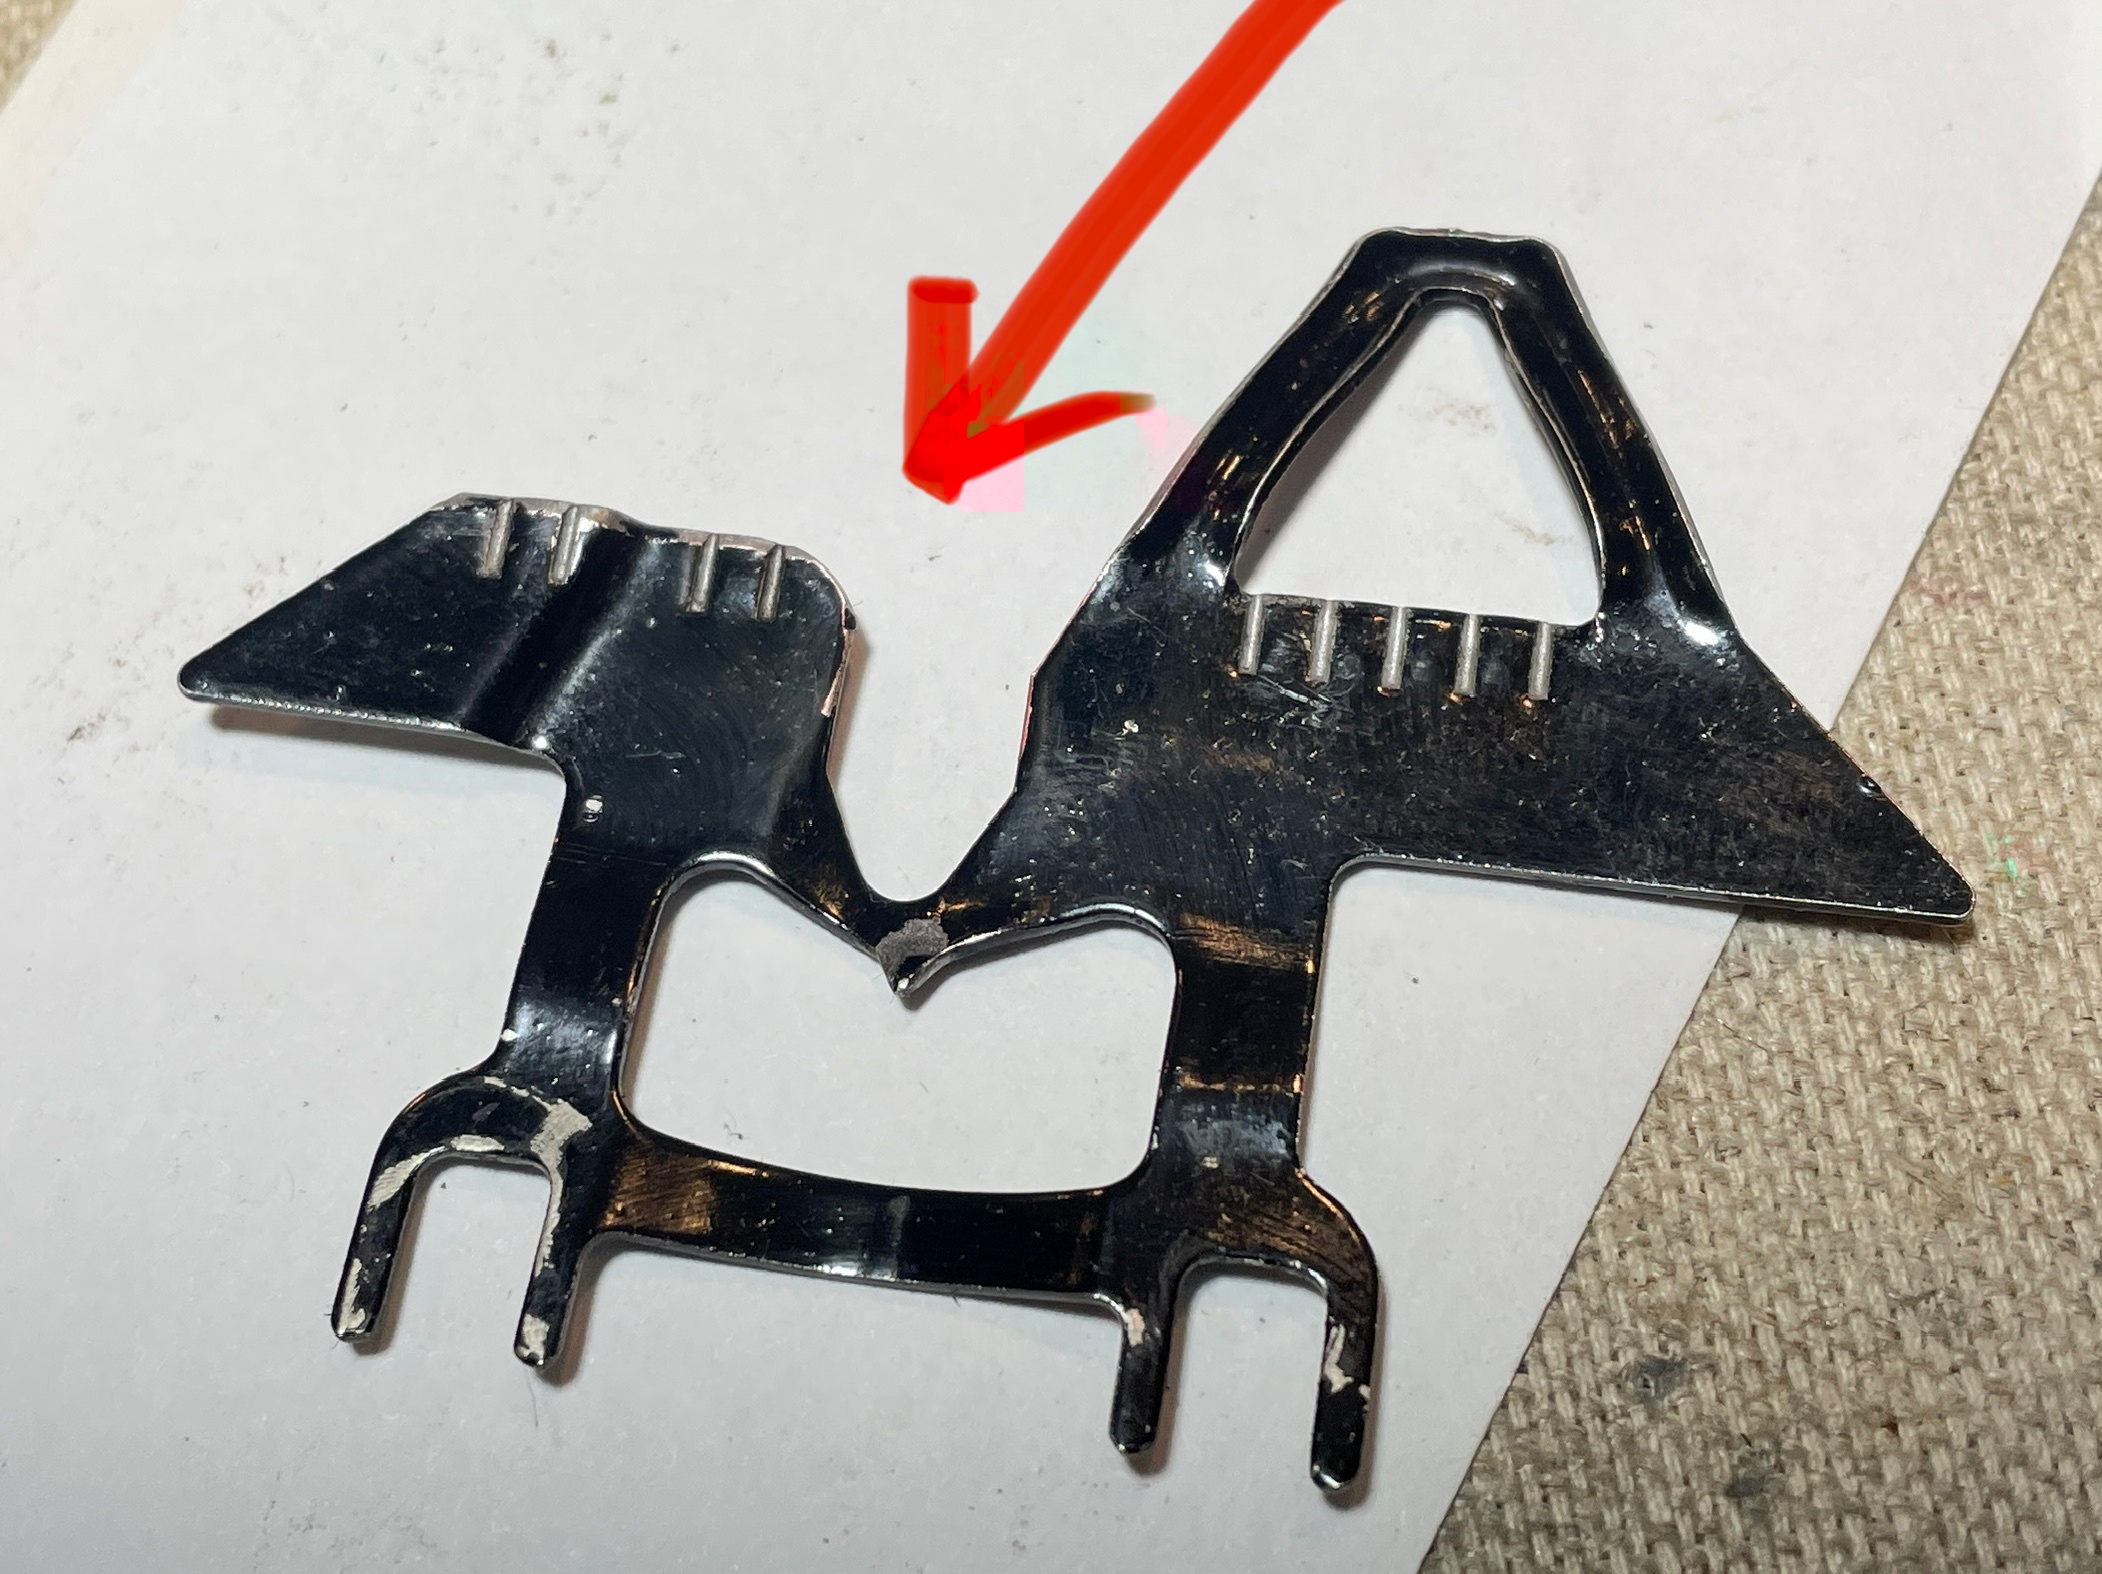
Bent typebar
I very gently bent the “J/j” typebar back into proper position so that there was more room between it and its neighbor. No more sticking in the type guide since it was now striking straight on.
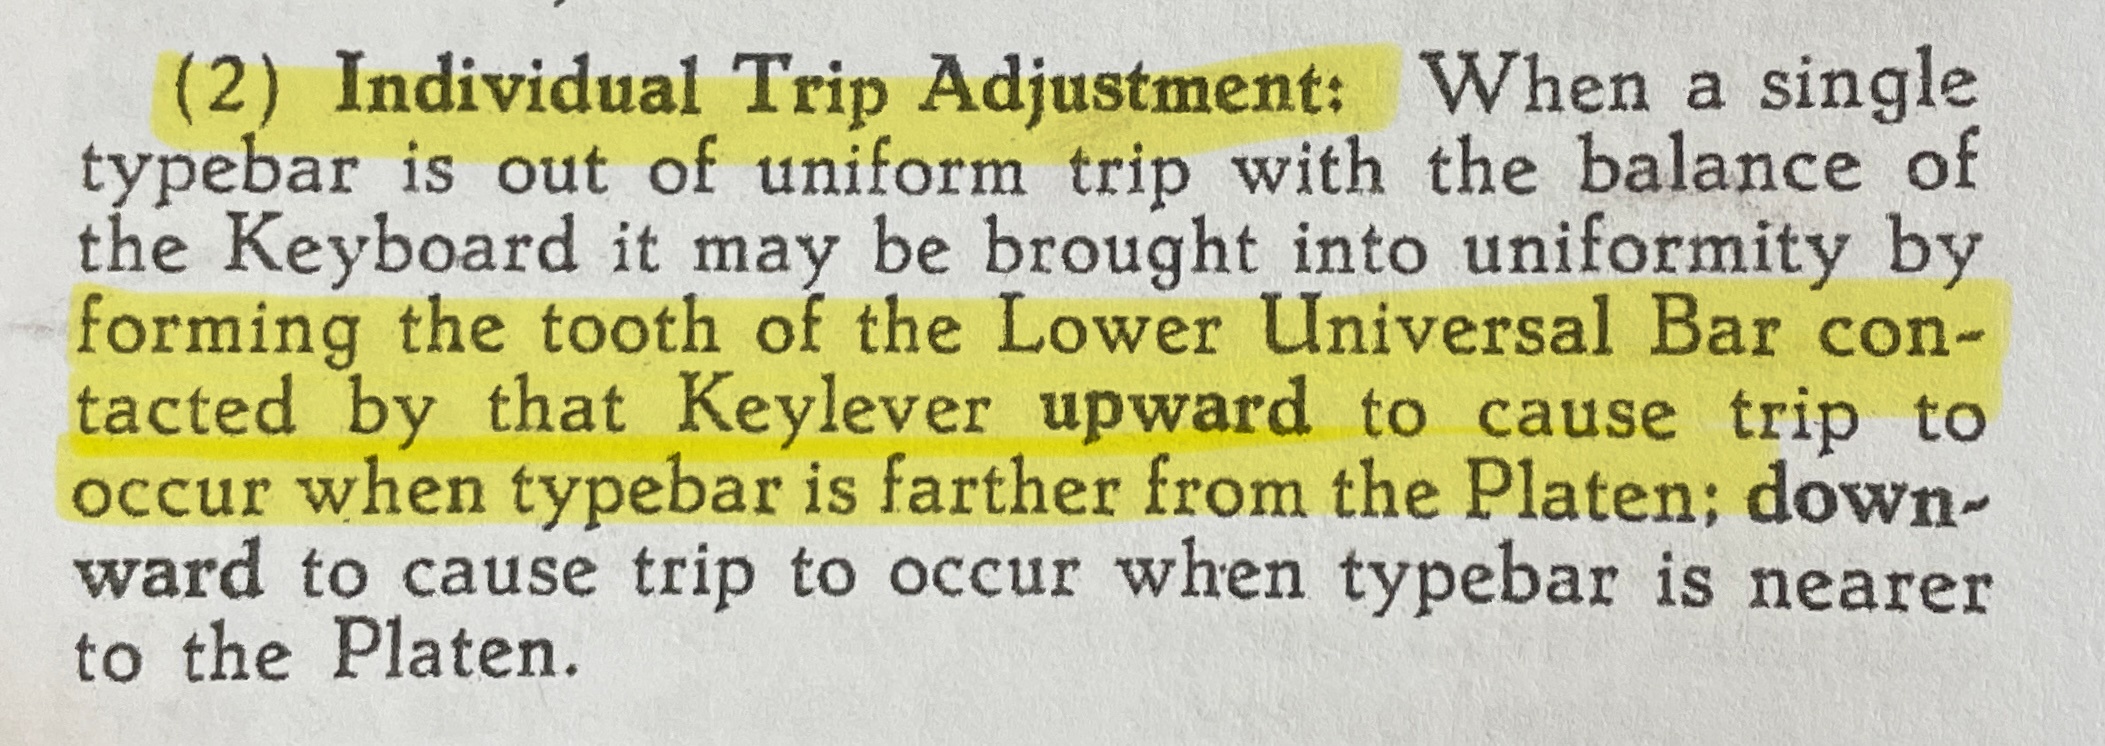
Letter piling and individual trip adjustment
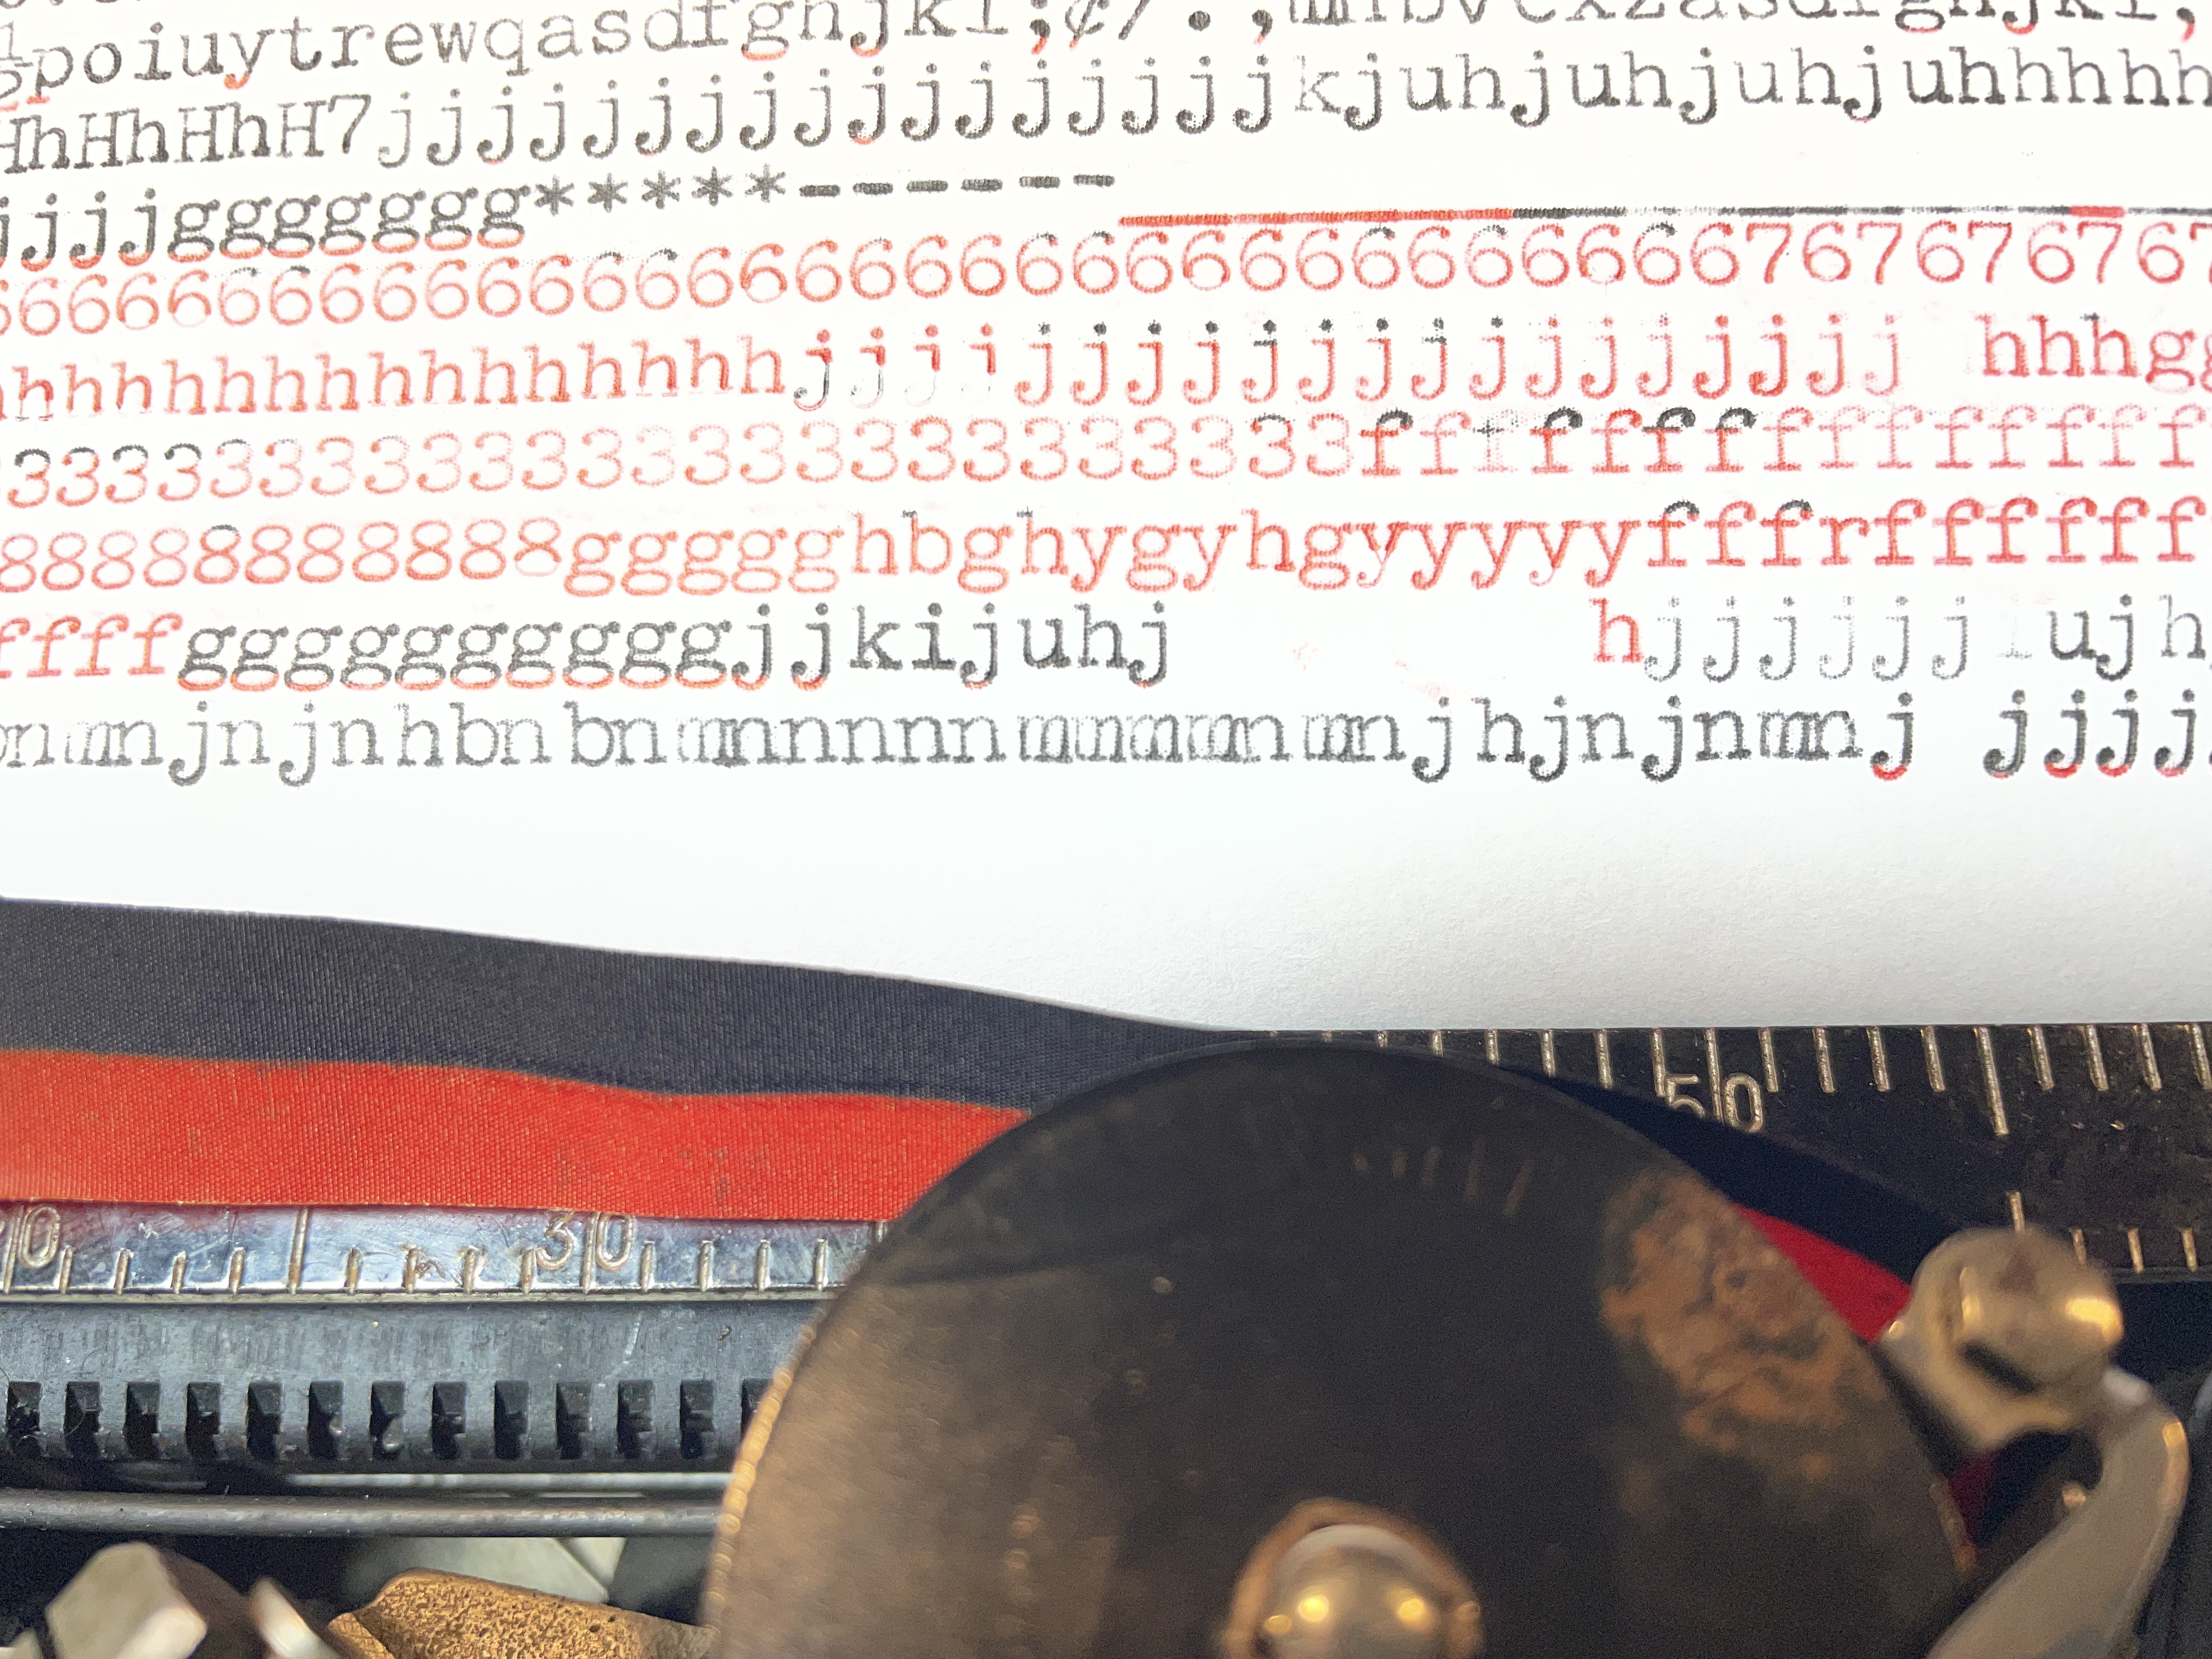
I did some test typing and noticed that there were specific letters that were piling. They were tripping at or well into the platen.

I decided to adjust the trip on those letters. I couldn’t find the exact Remington specs, but I like the feel of a trip to be 1/4″-3/8″ away from the platen.
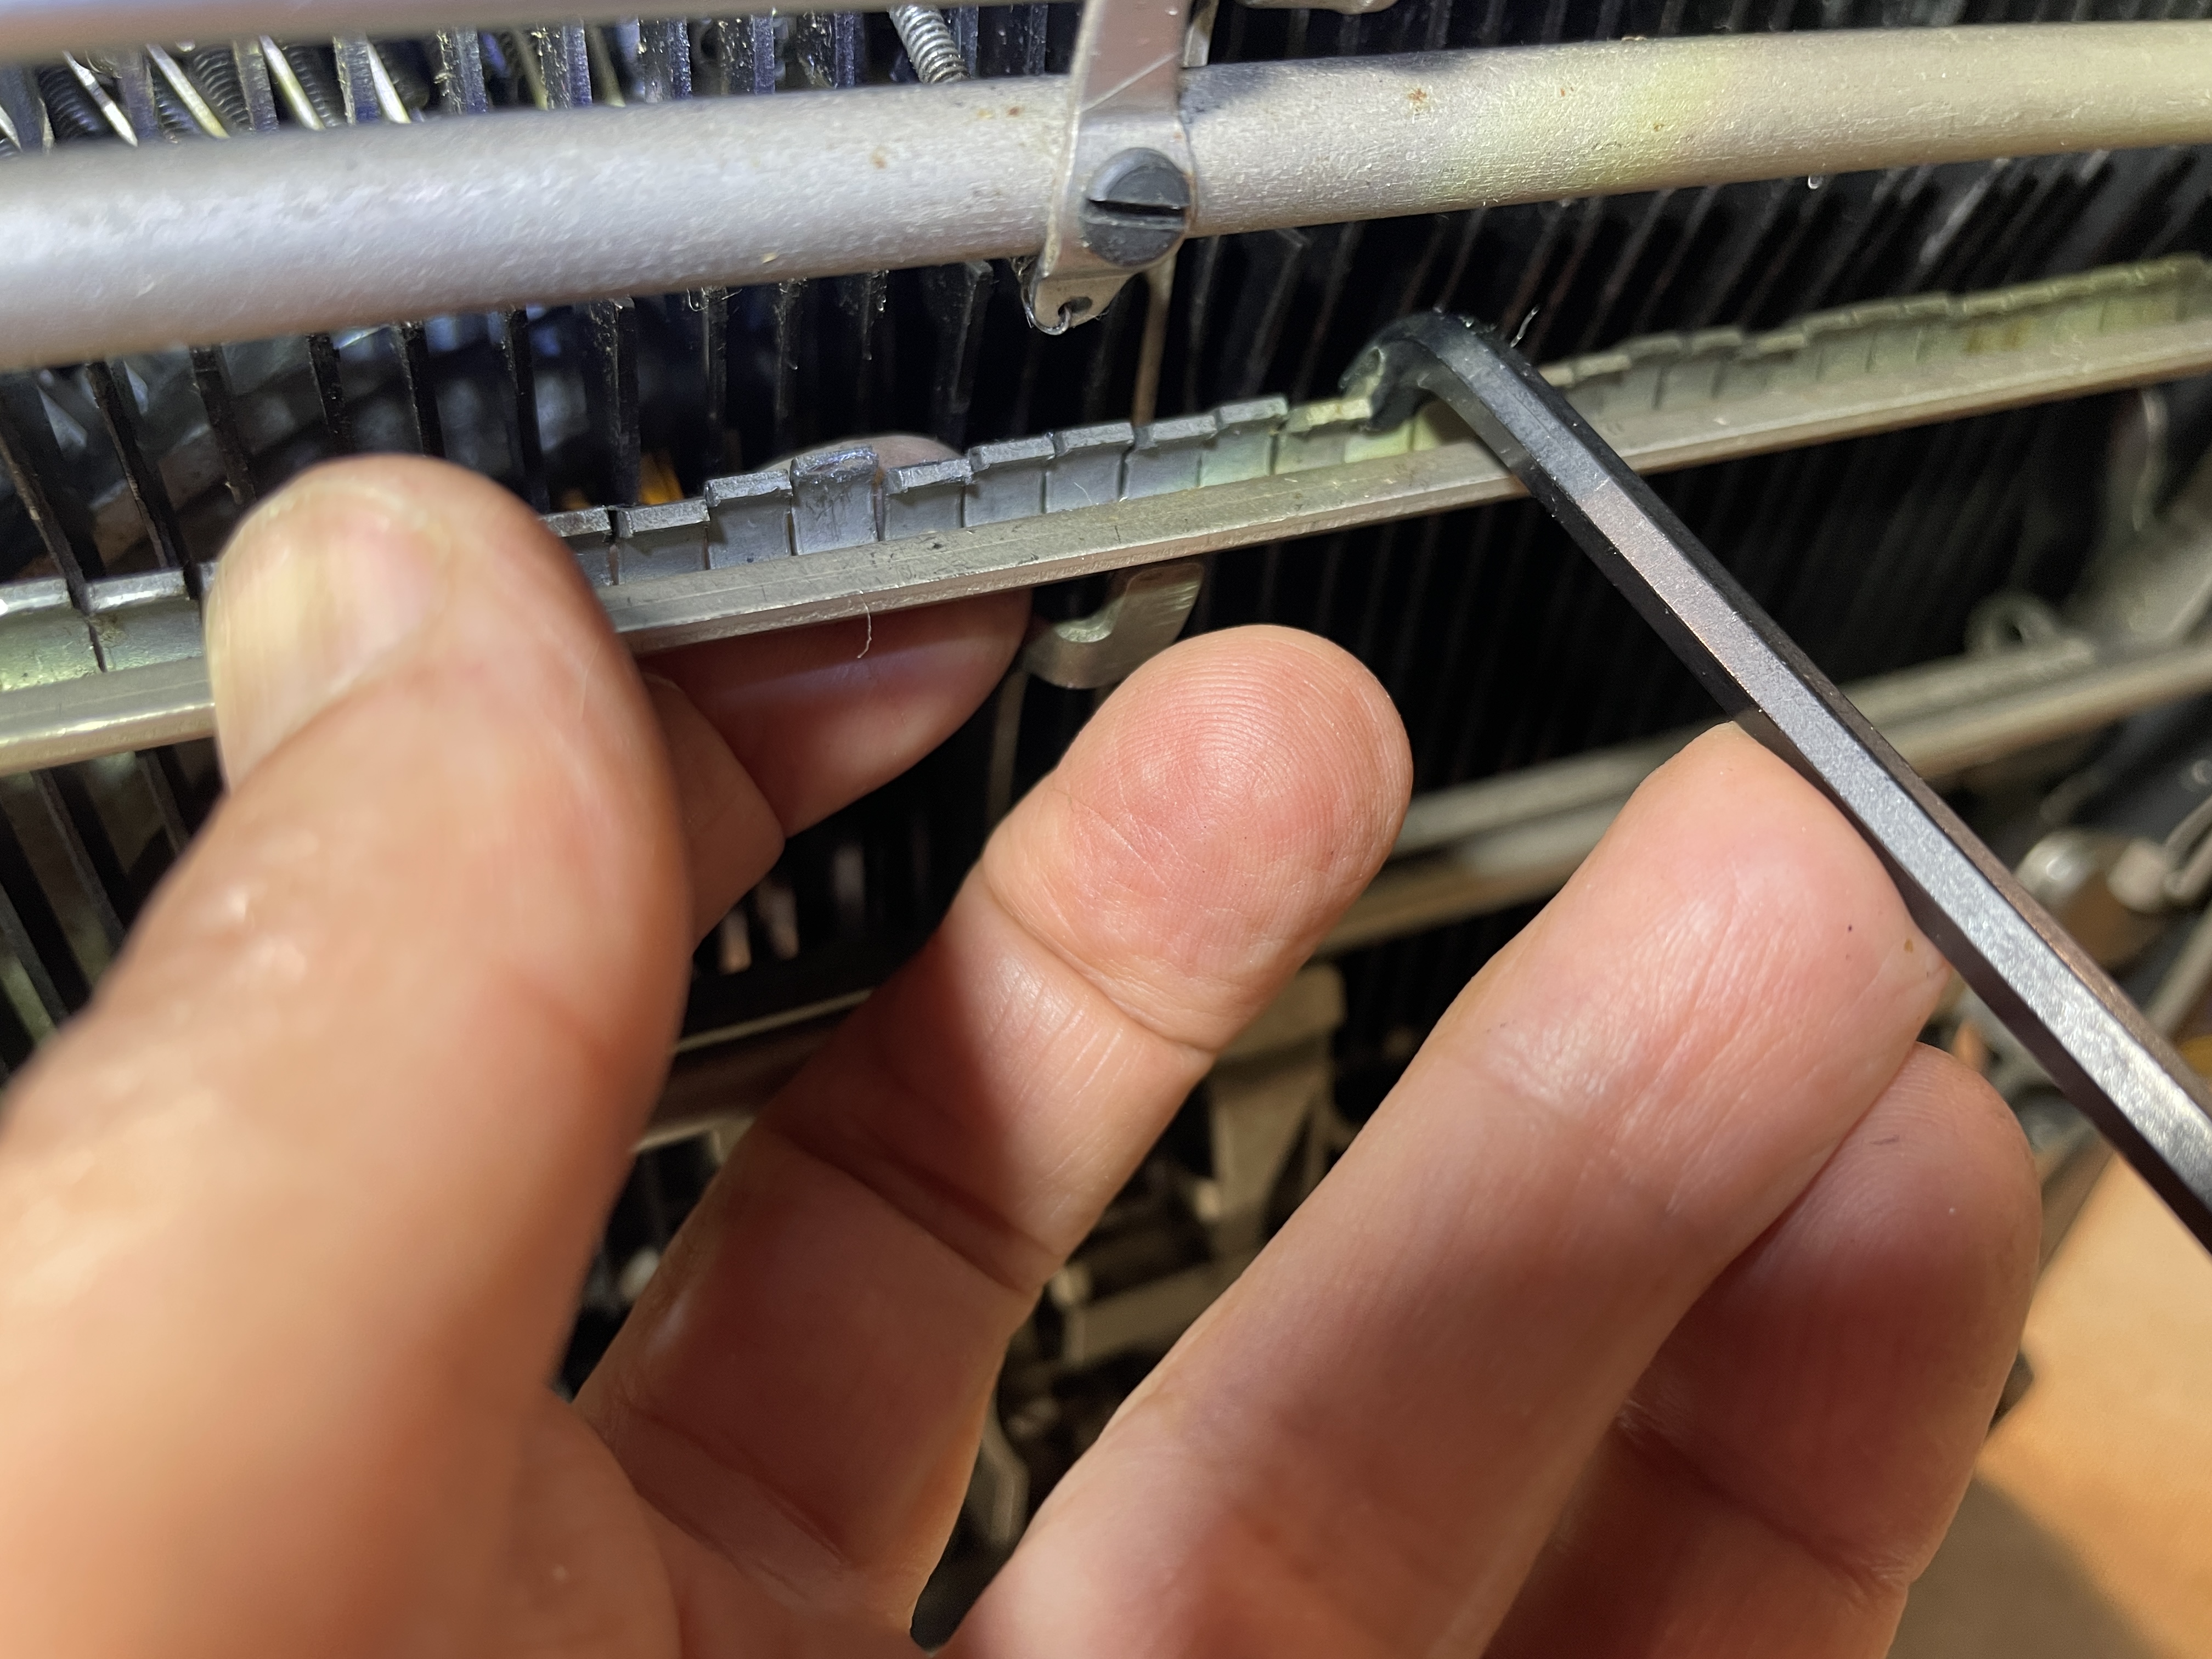
On a Remington Portable, you can adjust individual trip points.
And here are the little teeth that correspond to each key:
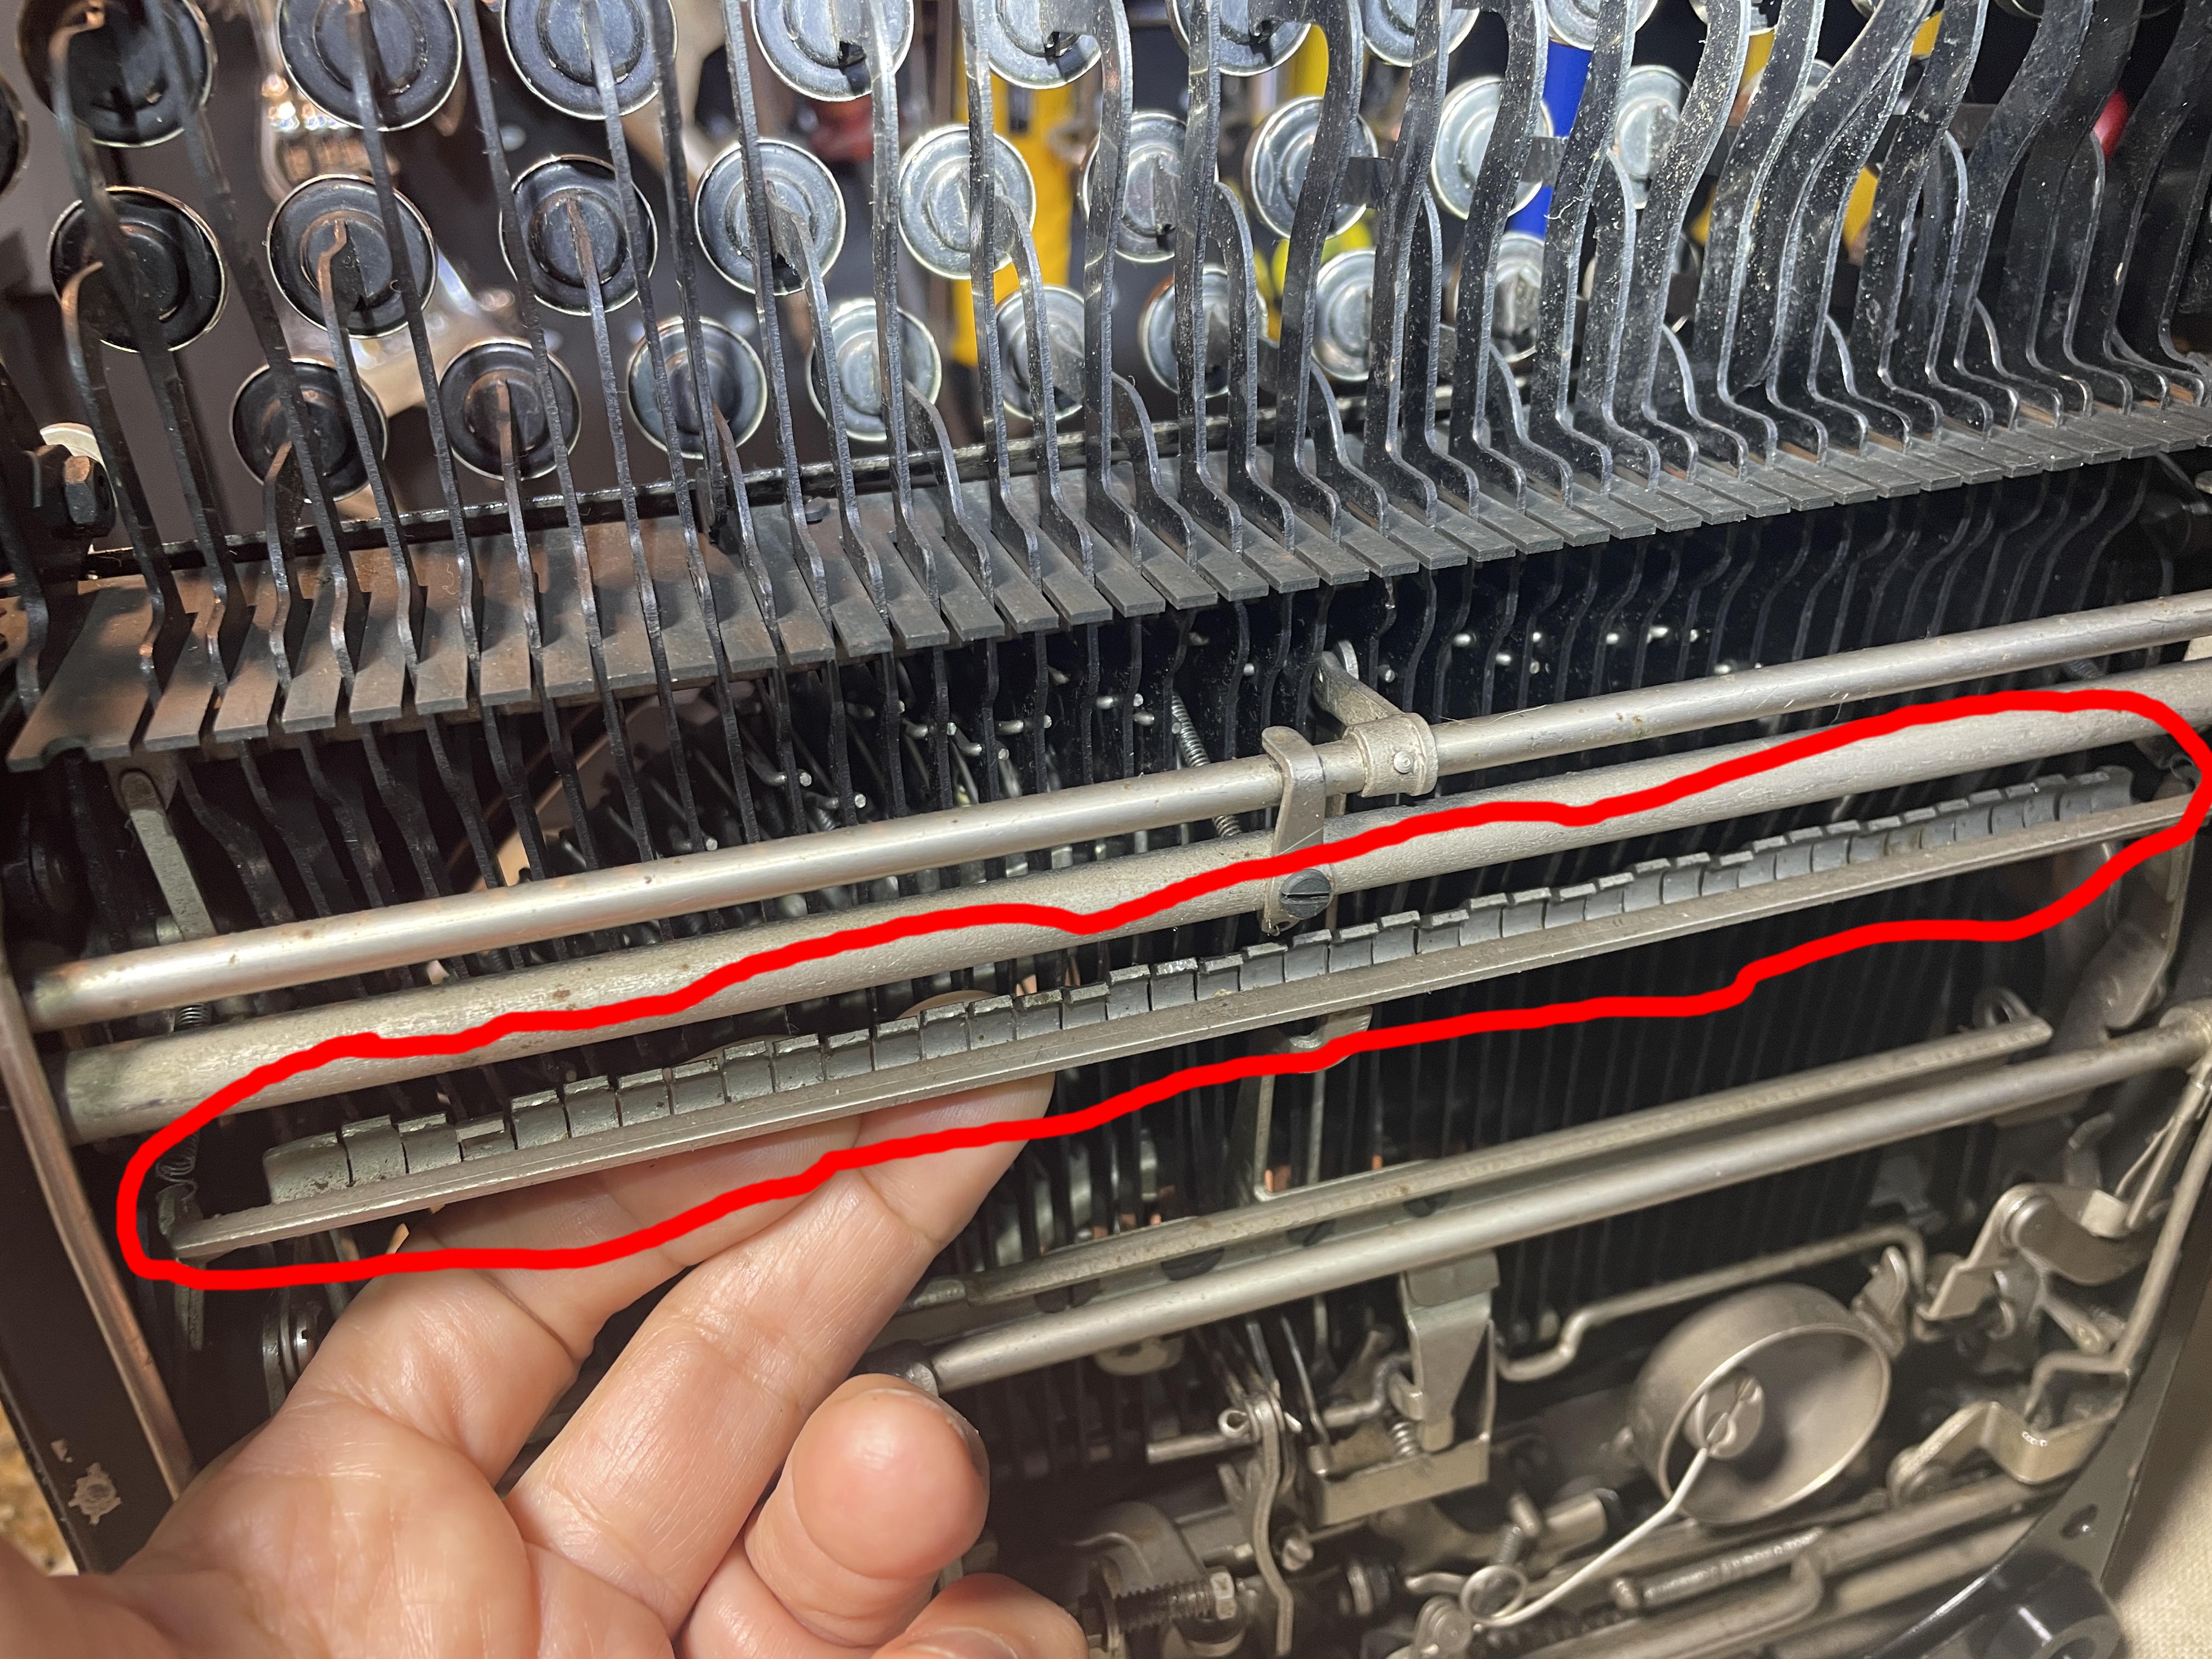
I didn’t have the right tool. I don’t know what the right tool would have been, so I took one of my many Allen /hex wrenches and using a metal cutoff wheel on my Dremel, fabricated an angled tool for getting into the tight space where I could adjust the tiny teeth of the individual key trips.
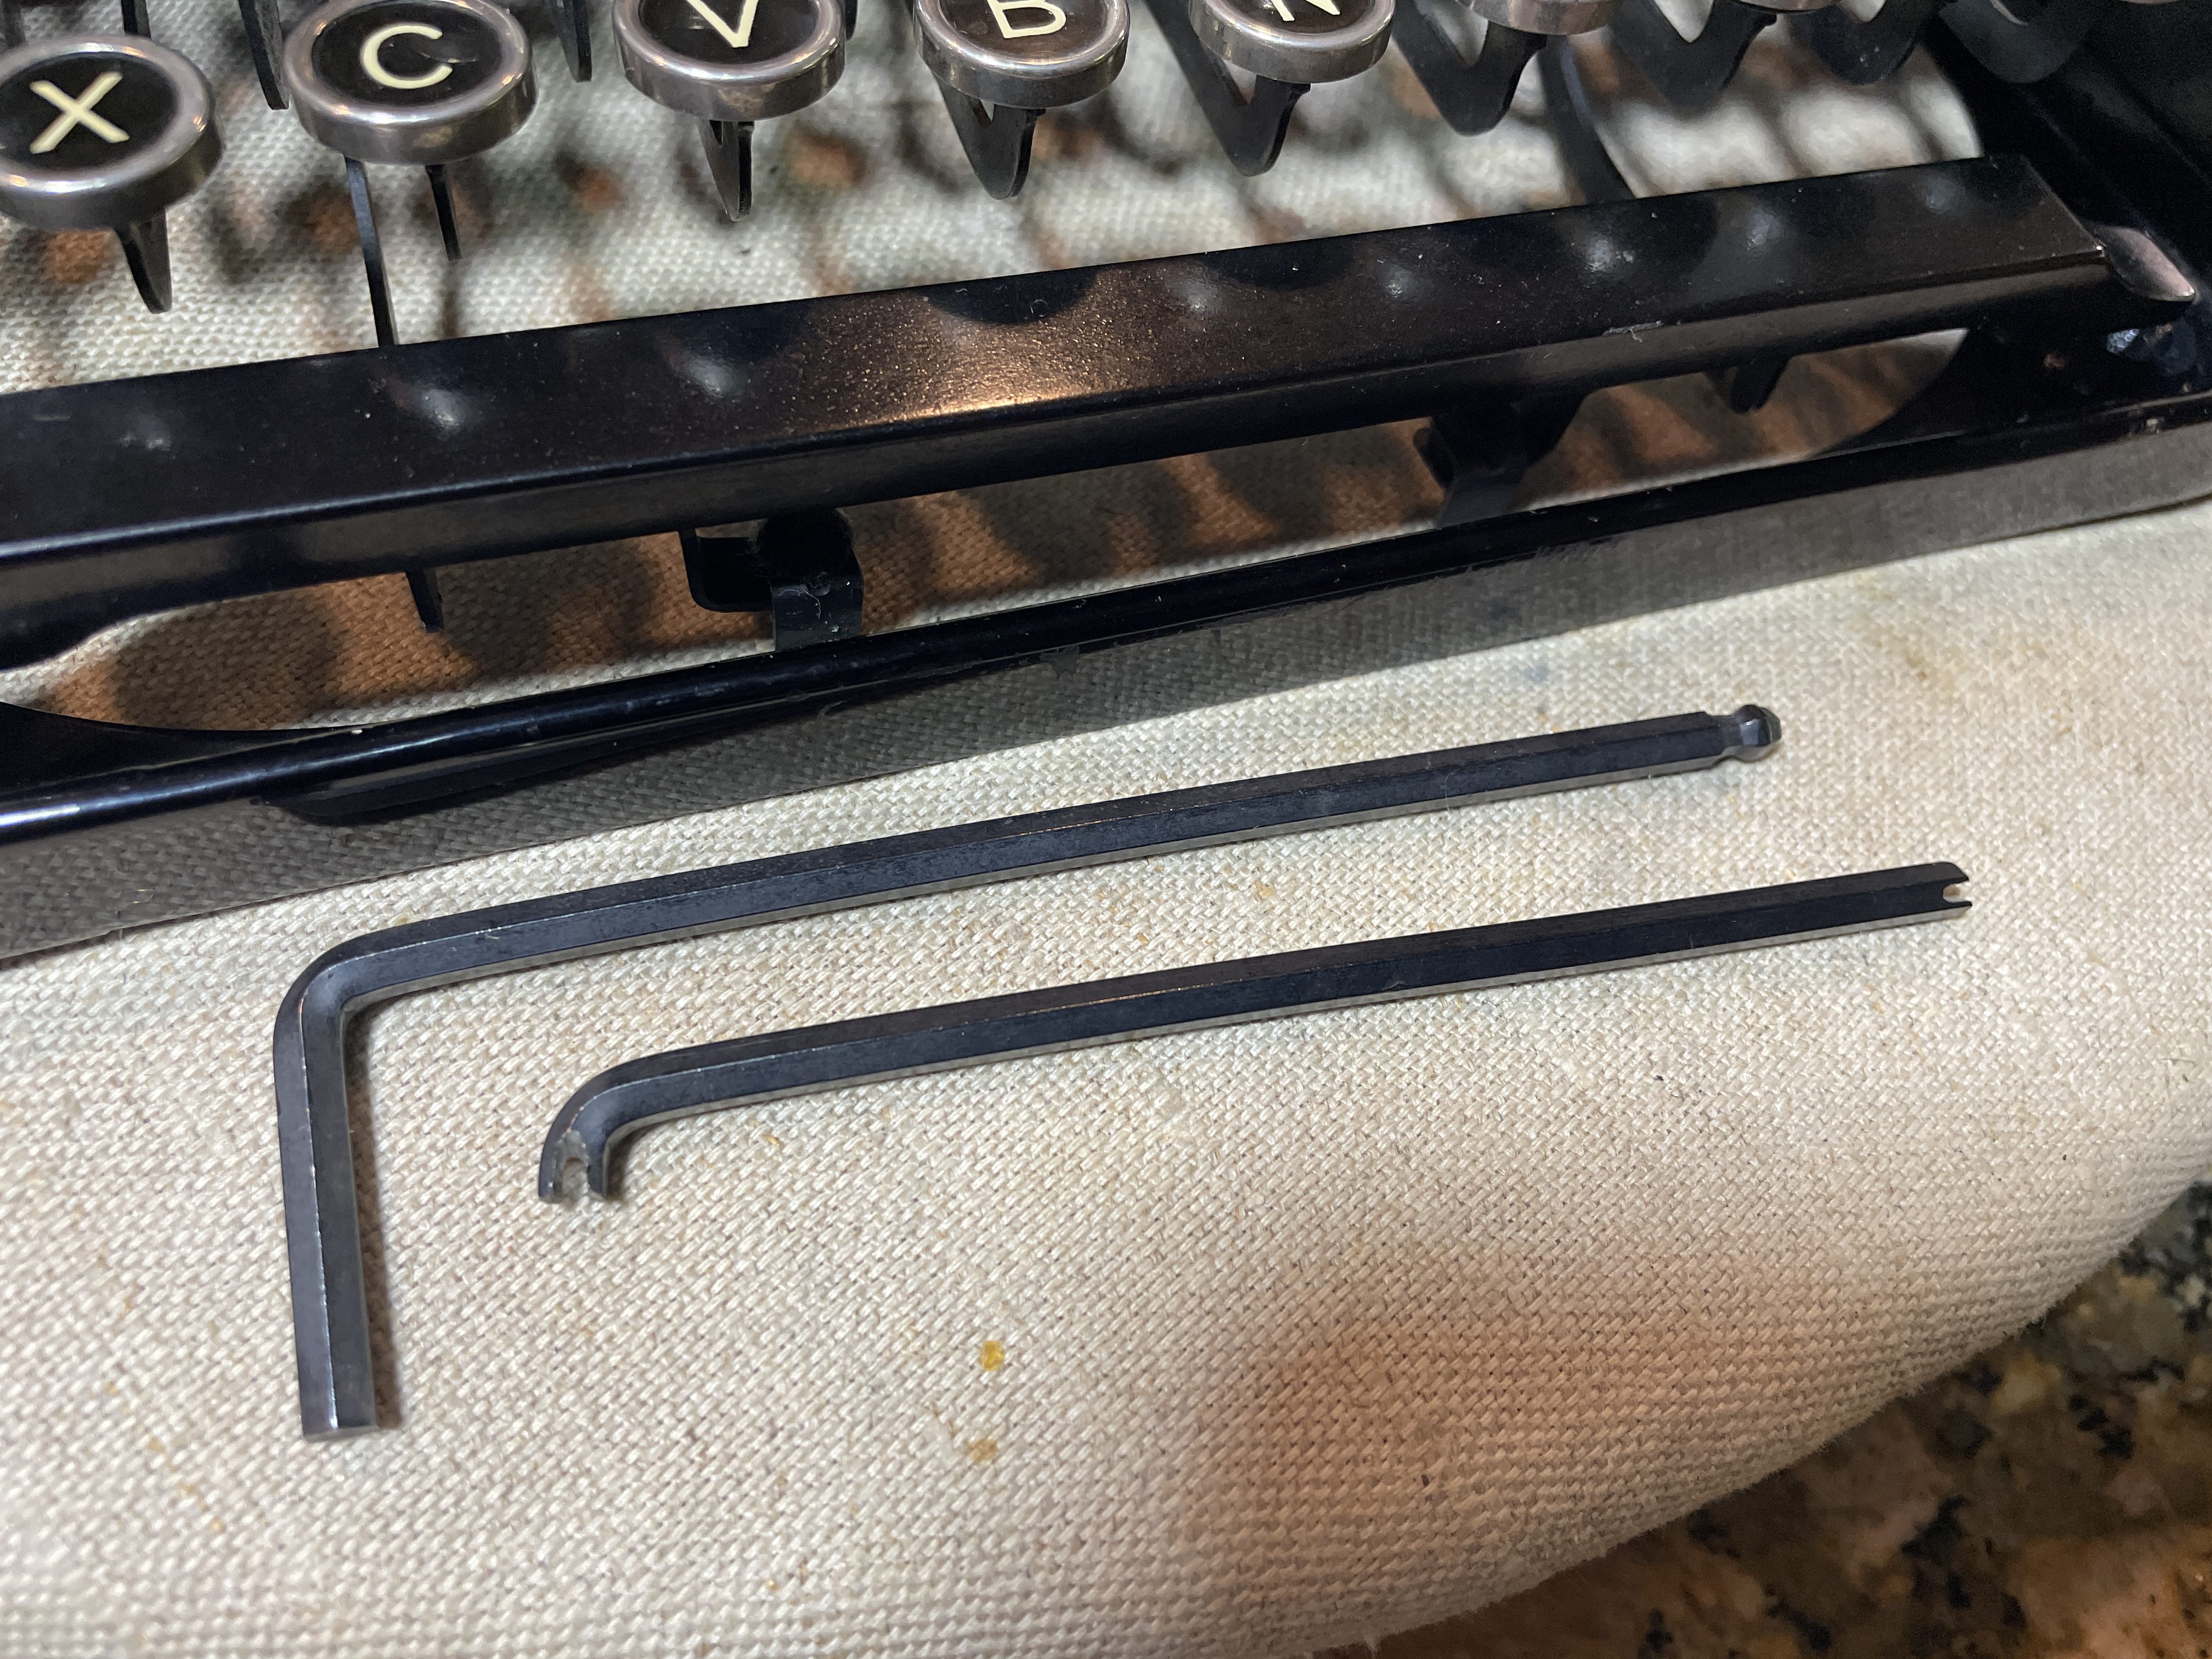
I made a second with a slightly longer reach.
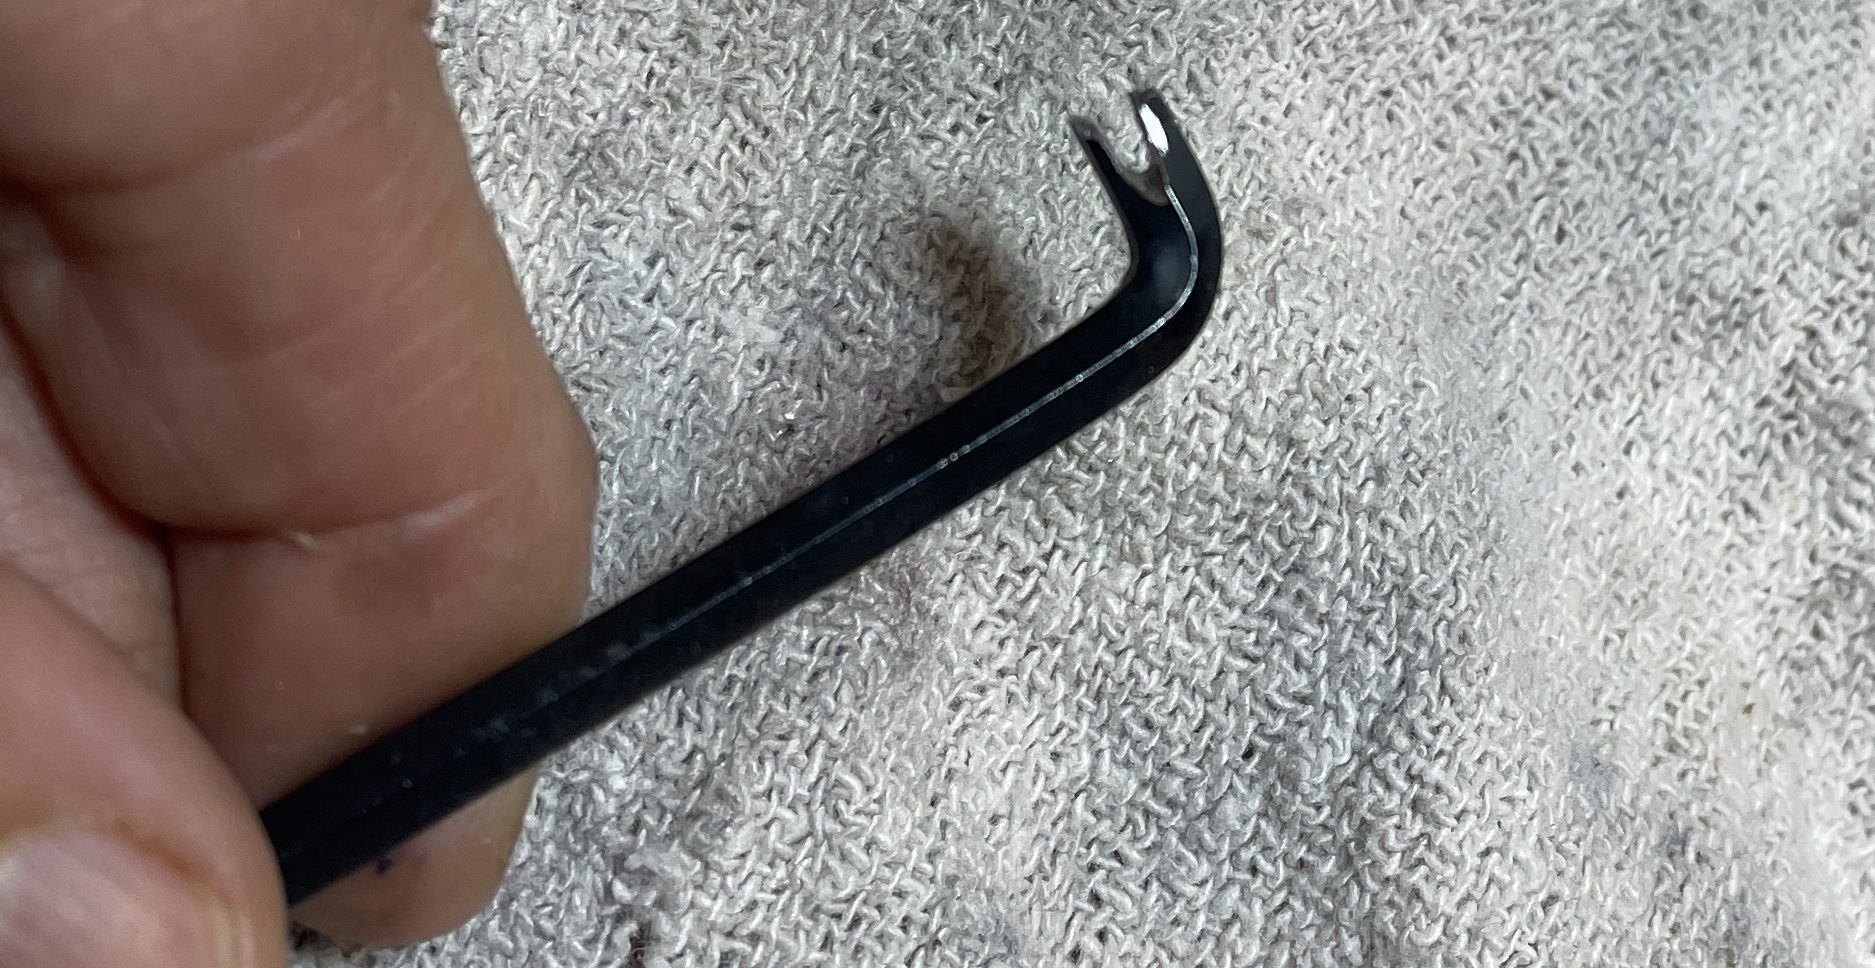
The tools worked great, and I got the leverage I needed to bend the tiny teeth of the problem keys up a hair. With the trip occurring further from the platen on those keys, there was no more piling.
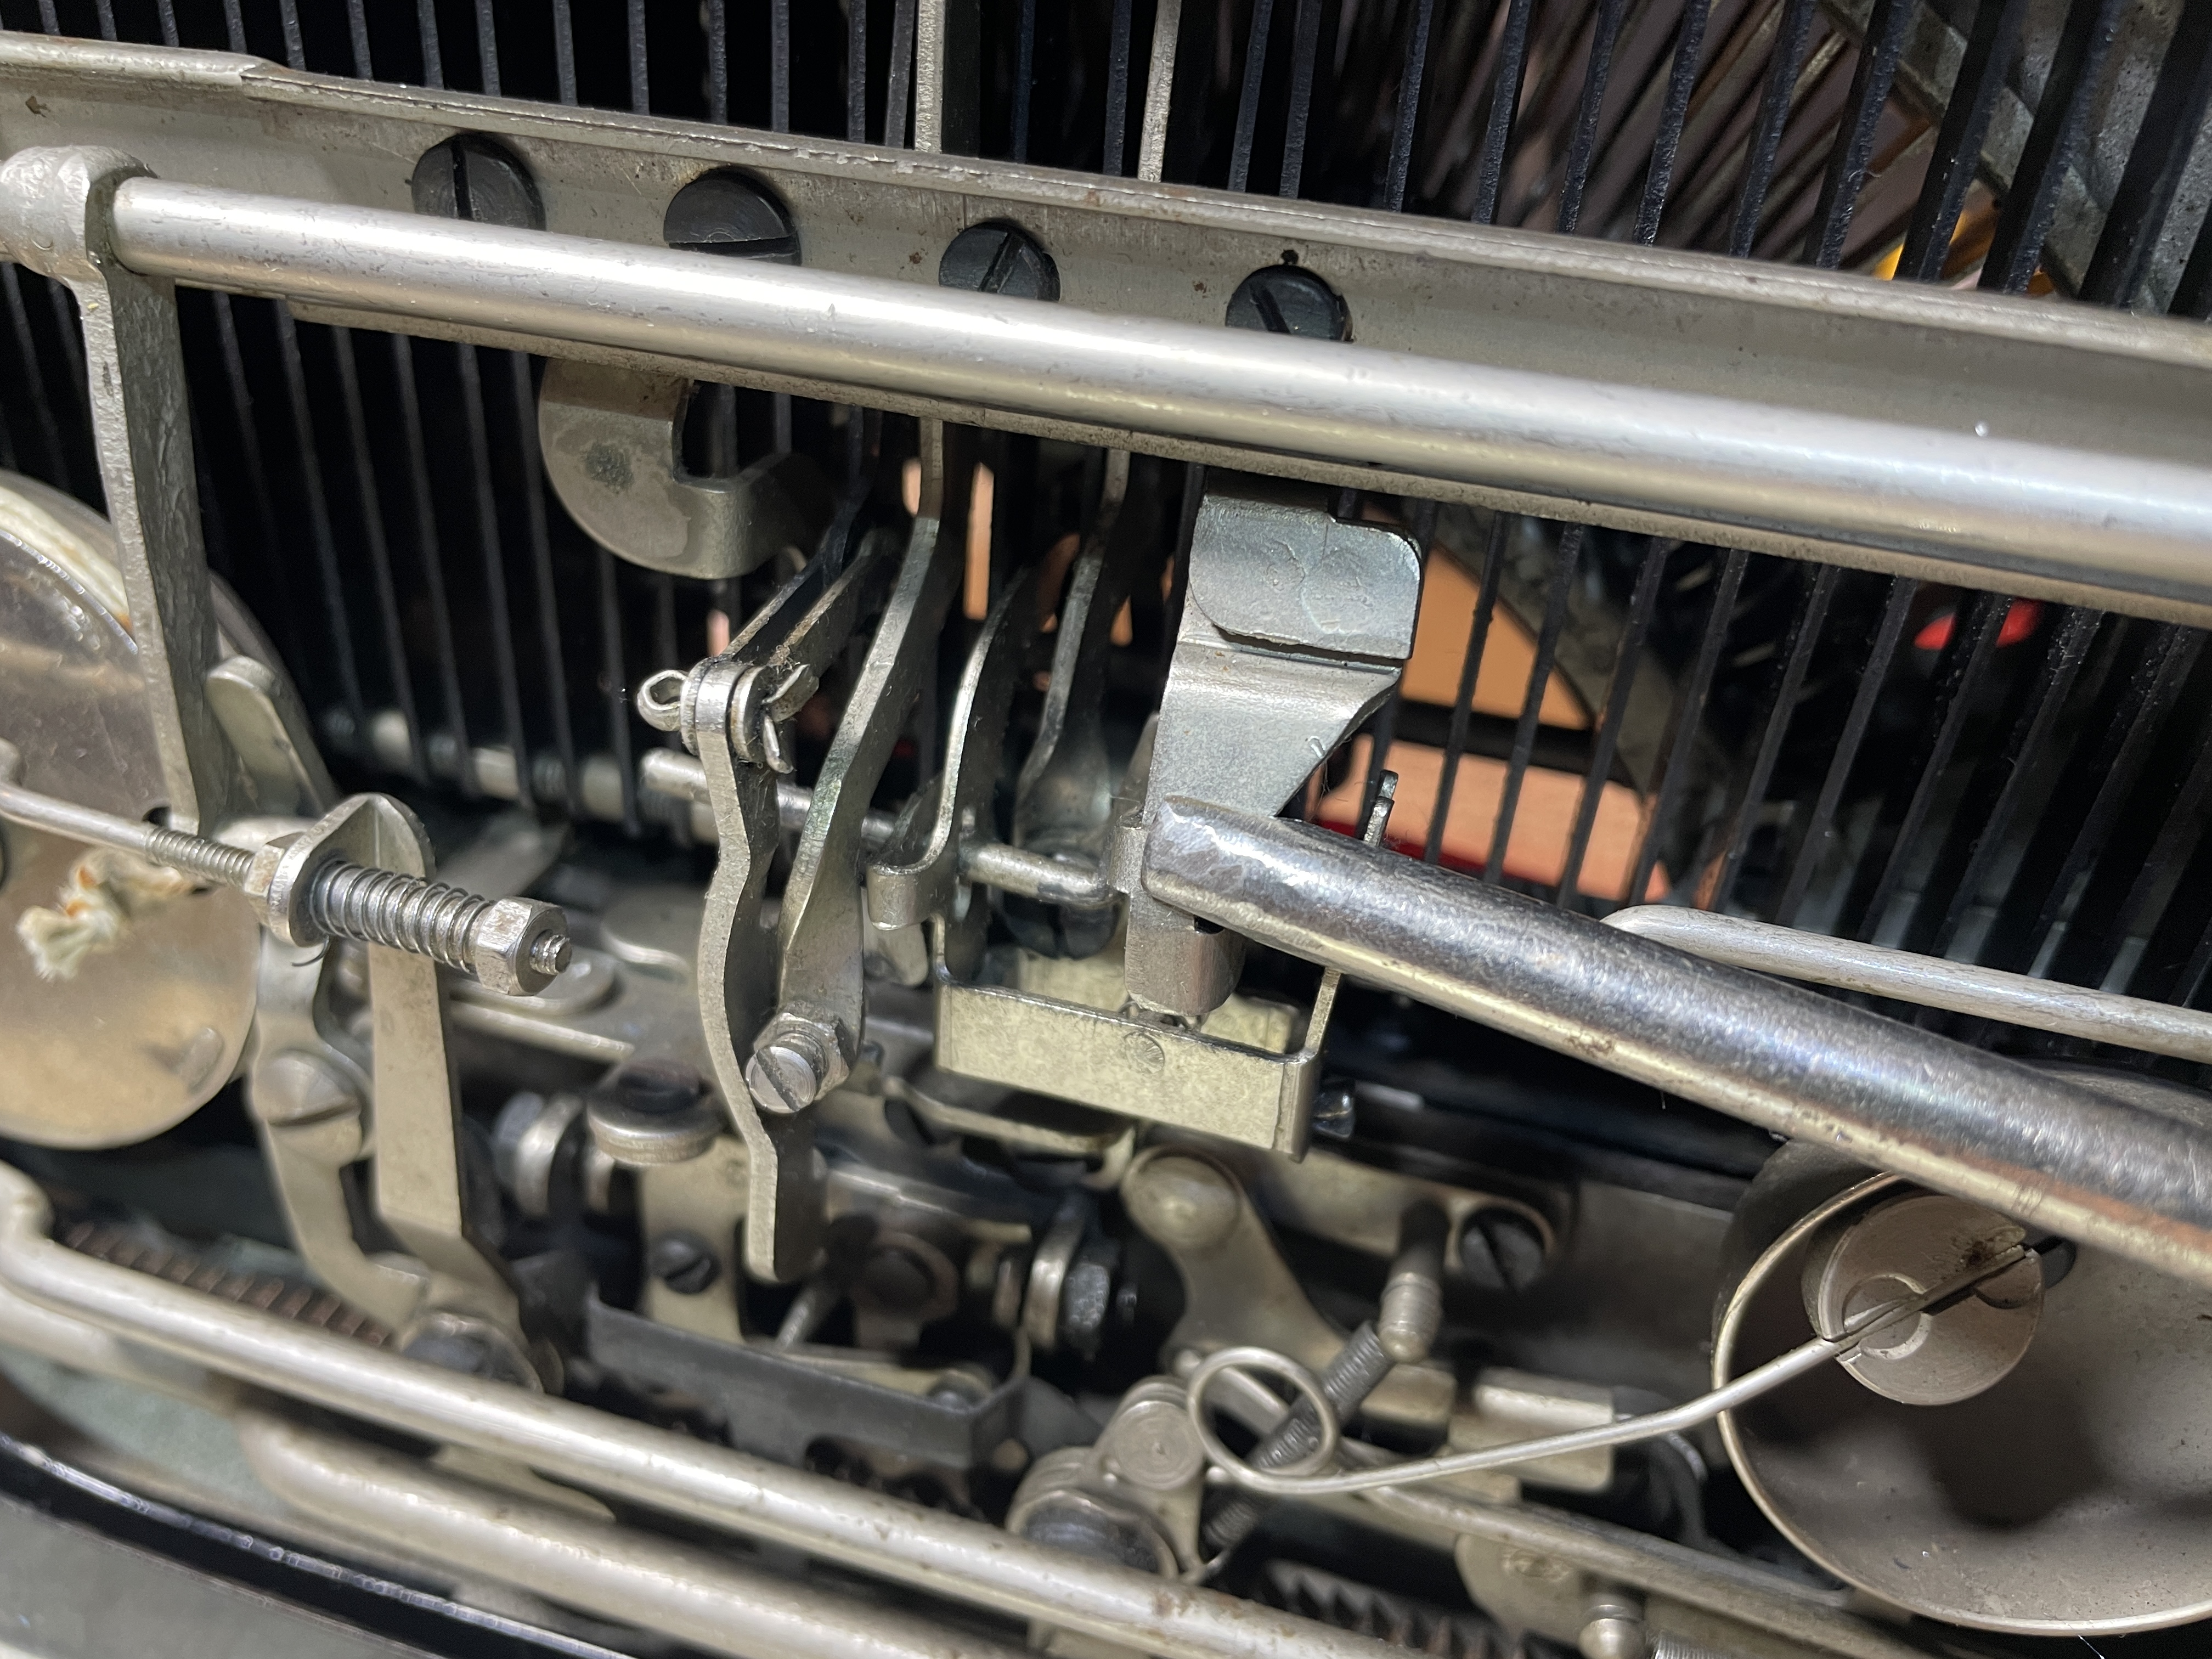
Ribbon hanging up on line finder
When in red setting, the ribbon caught on the line finder and bunched up.
I pulled out the the line finder. It was subtly bent on the corner and had a rough edge. I straightened it and sanded the corner, and the hanging stopped.
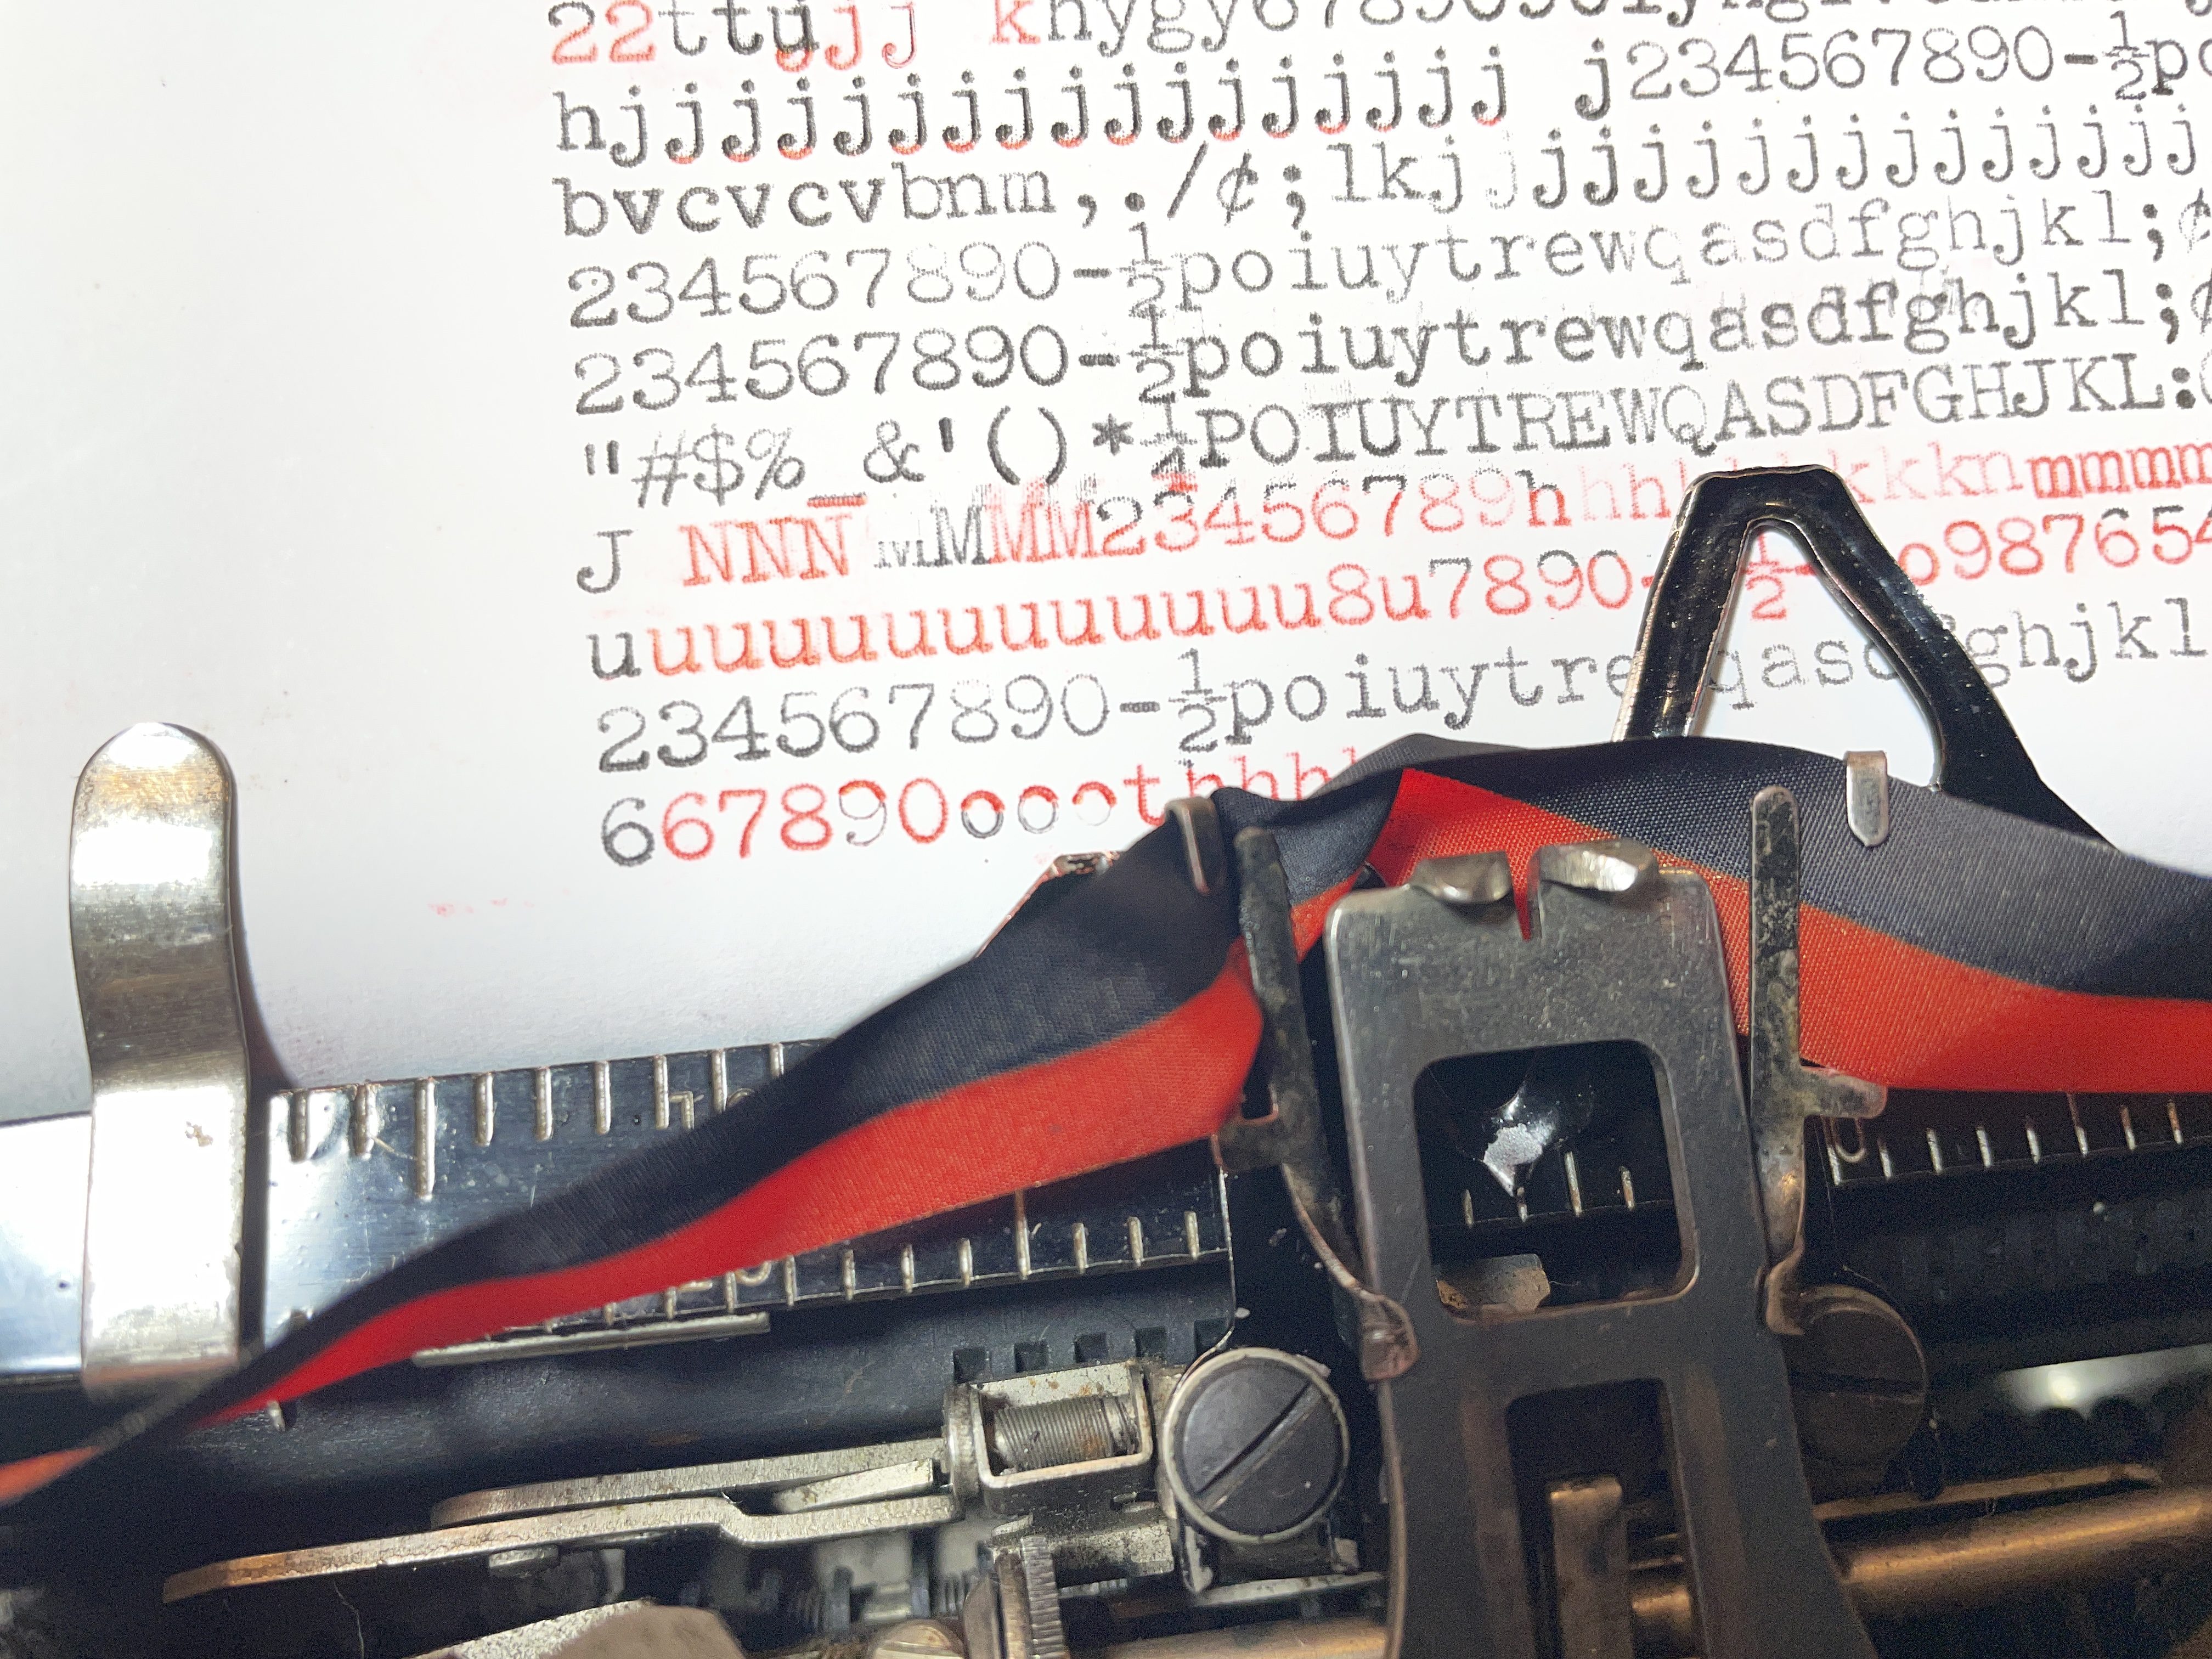
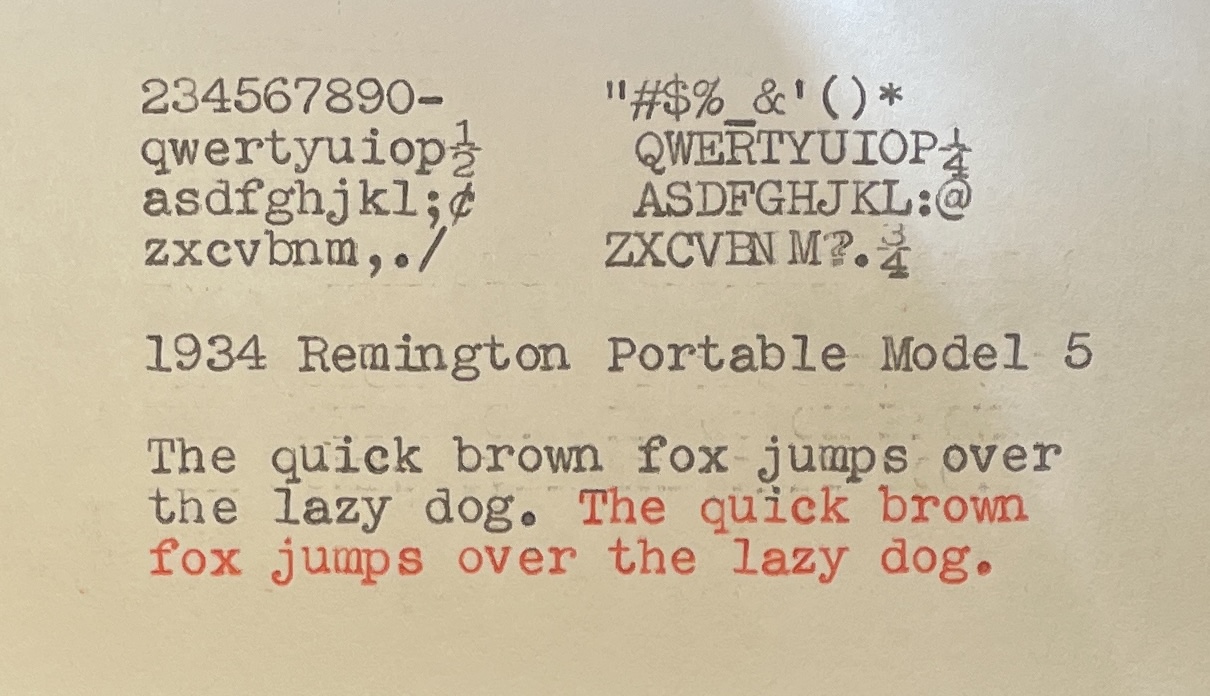
Color bleeding and ribbon throw adjustment
It looked like the ribbon was throwing too high when set to black because I was getting red bleeding on the bottom descenders. Weirdly, when set to red, the ribbon wasn’t rising high enough because the occasional letter showed a black top. Ribbon throw too high or ribbon throw too low? Both? Neither?
Now, I could put a black ribbon on it and call it a day. There’s no color bleeding with all black, but I like to type in red sometimes. Also, I love the aesthetics of a red/black ribbon, and it ties in with that red PAR key. Yum.
First off, I had to make sure that the ribbon was on right. Remington portable ribbon installation is a little specific and fiddly:
The ribbon was on correctly, so I moved onto the ribbon vibrator. It was moving smoothly, but it was a little mangled. I straightened it out, but it didn’t affect the bleeding.
I went to the Manual Typewriter Repair Bible‘s section on Remington portables’ bichrome adjustments and read:
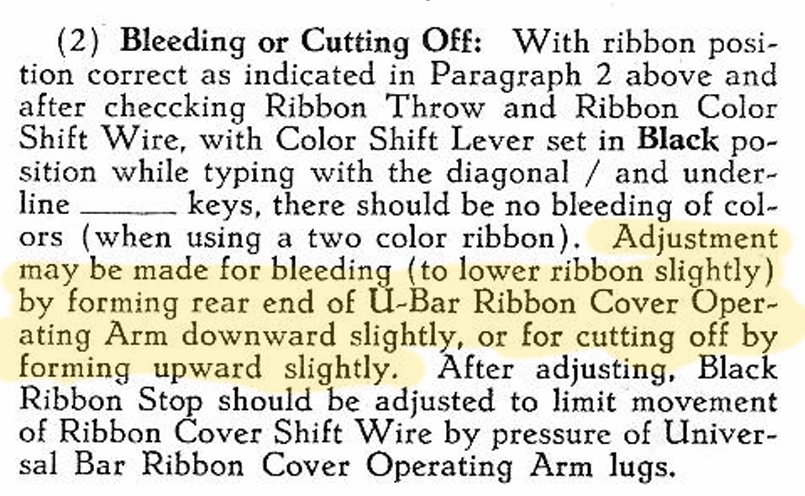
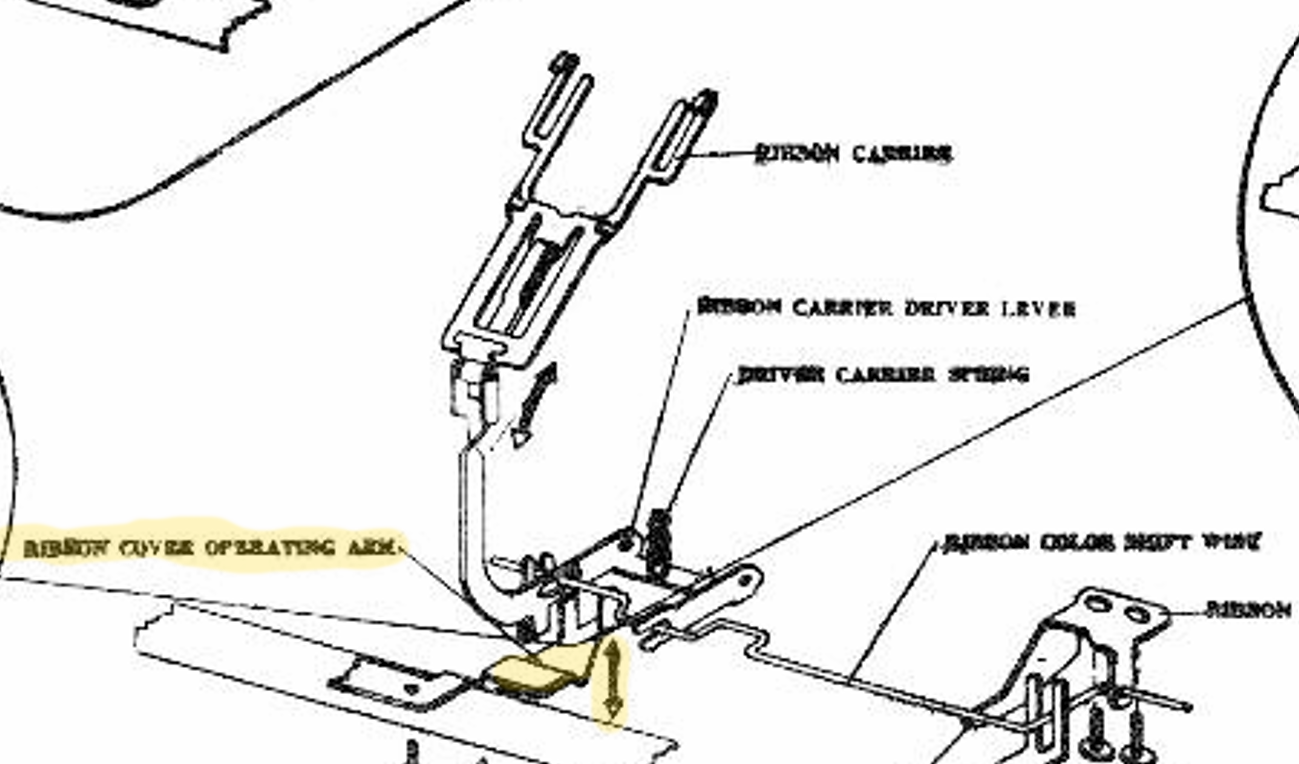
I adjusted the Ribbon Cover Operating Arm downward slightly. It’s very sensitive, and if you go too far, letters will get cut off.
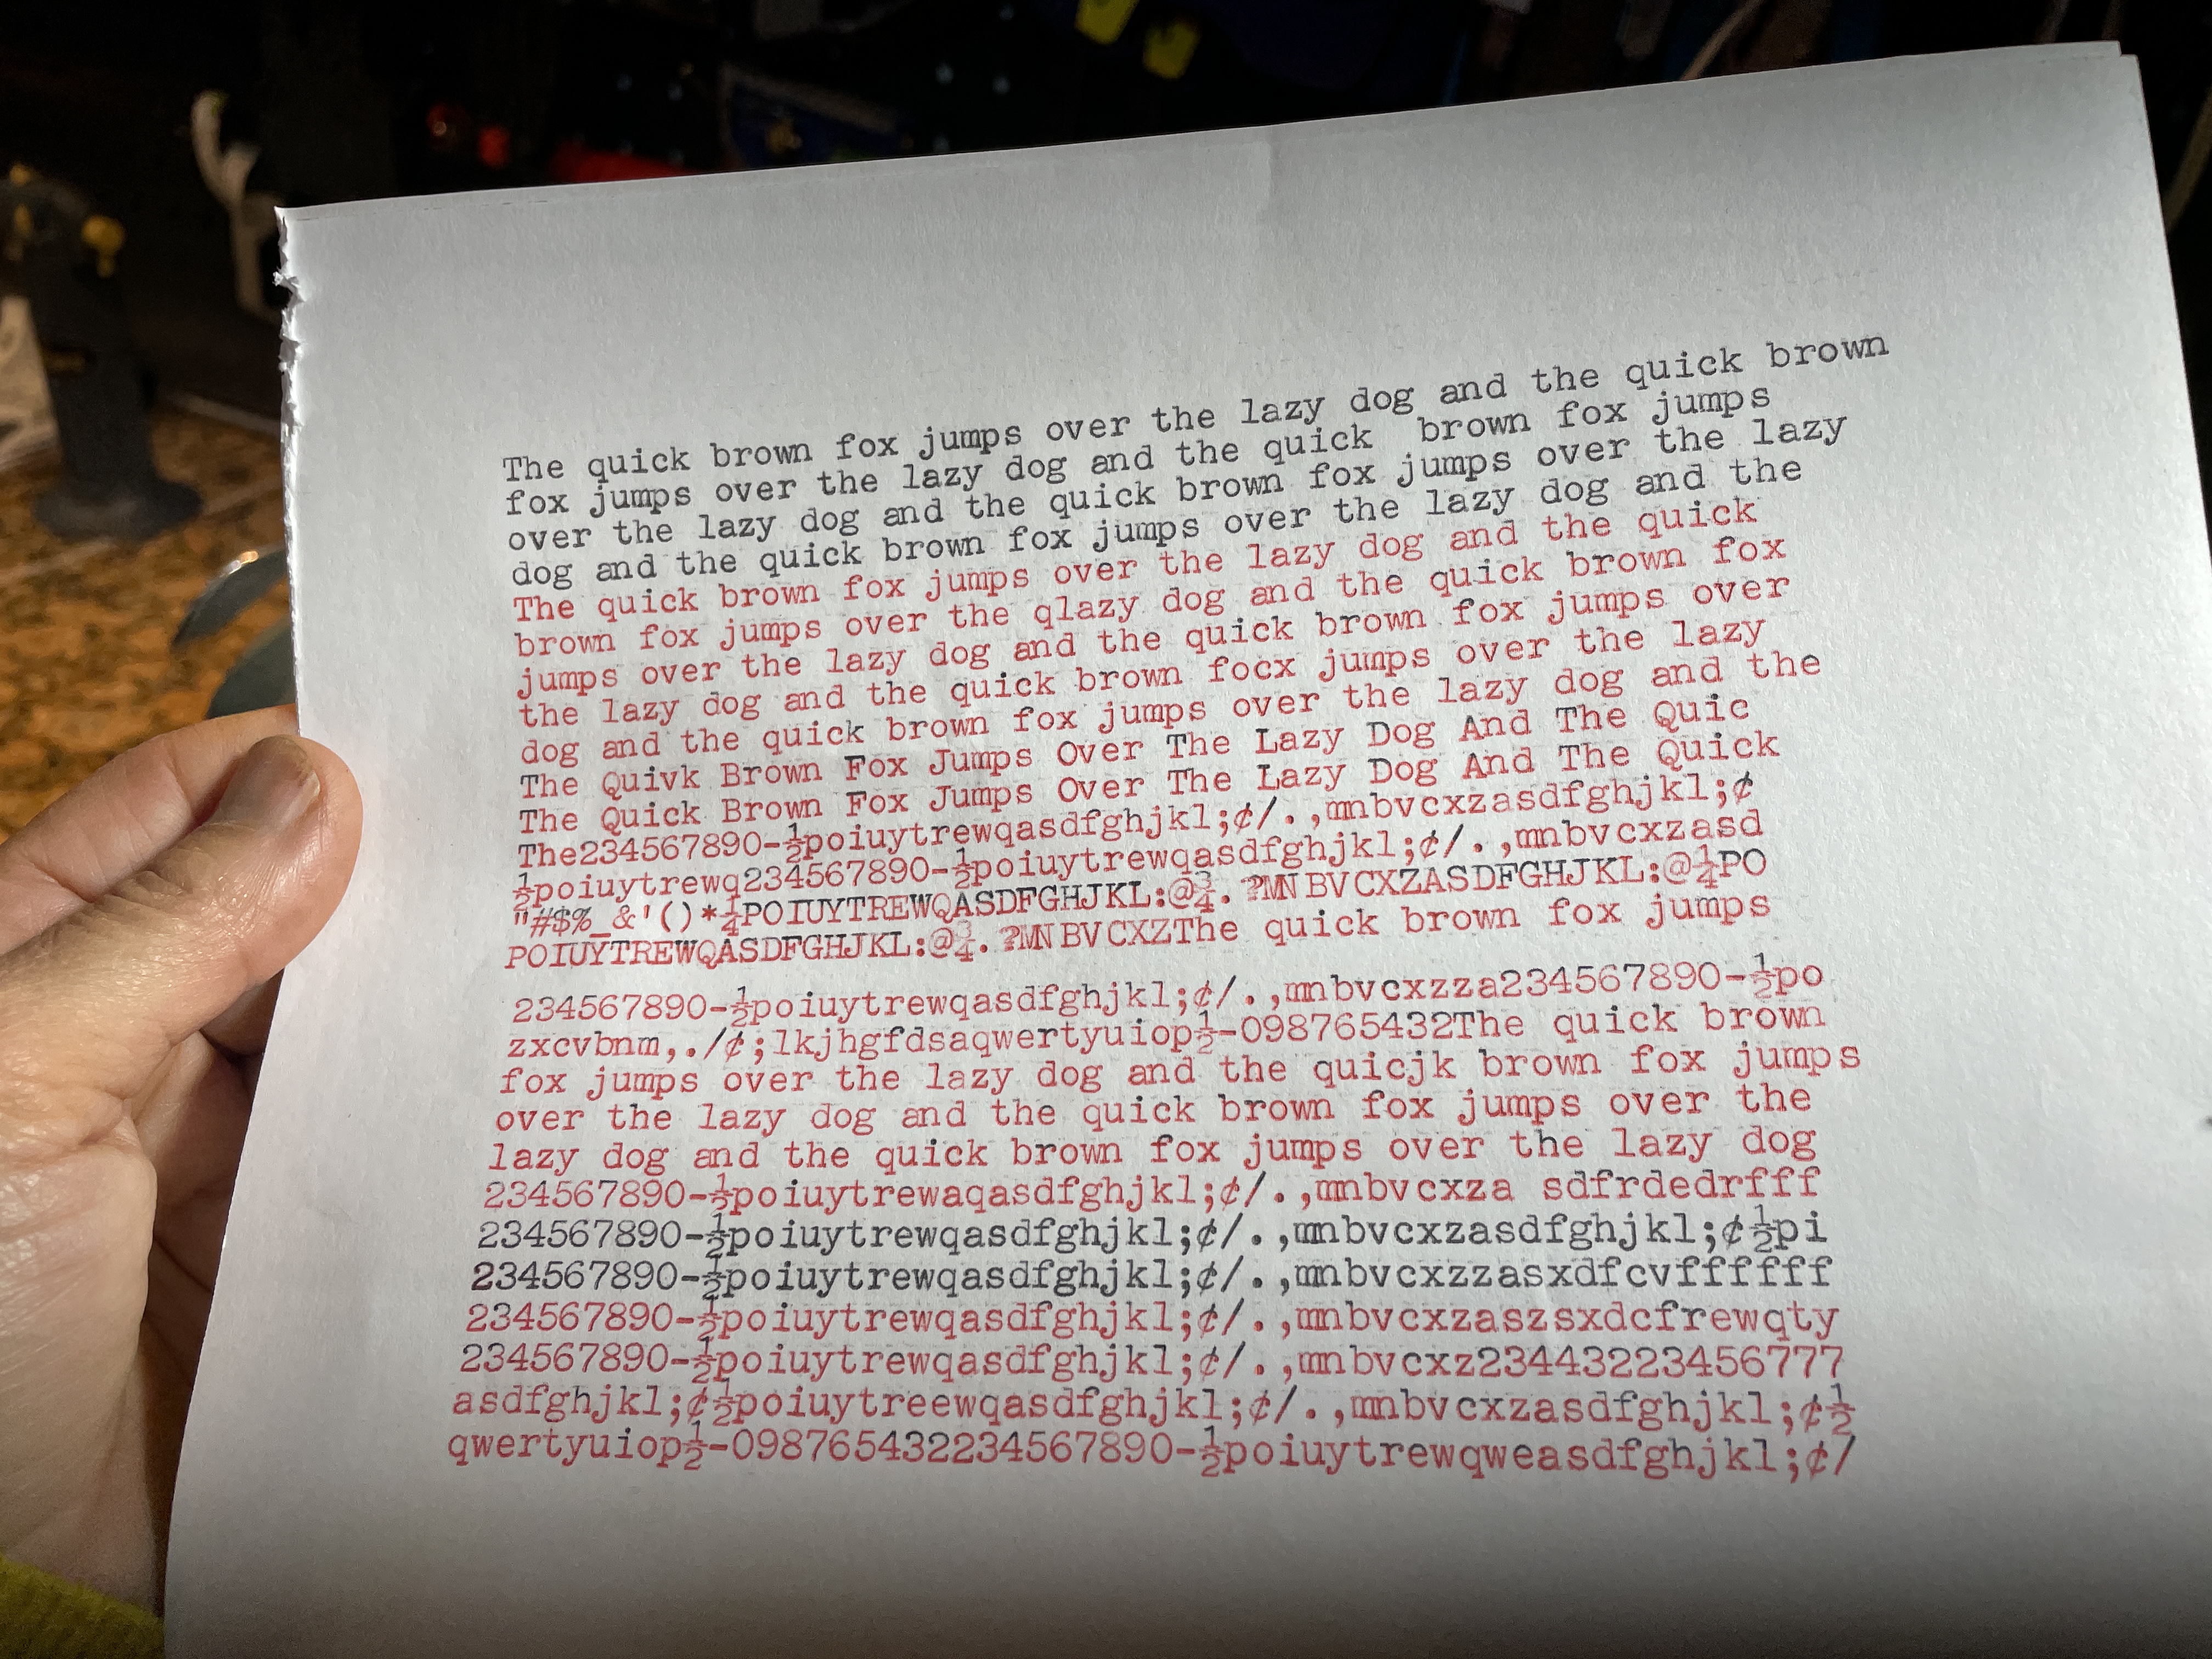
The black printing is now perfect. No bleeding on black. On the red setting, there is some inconsistent bleeding, especially in red upper case.
I read further down the Remington portable bichrome section of the Manual Typewriter Repair Bible:
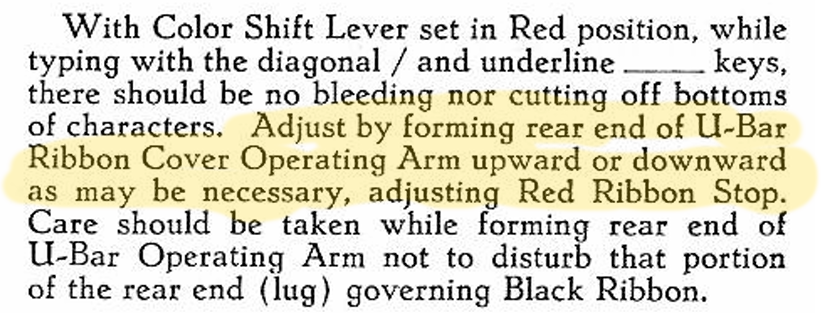
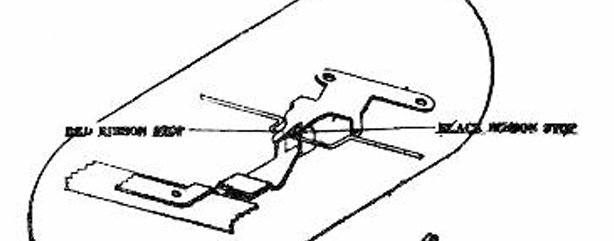
I’m going stop here. I am worried that if I try to adjust that Red Ribbon Stop, the black setting will be disturbed, and that’s perfect now, and that’s what’s really important.
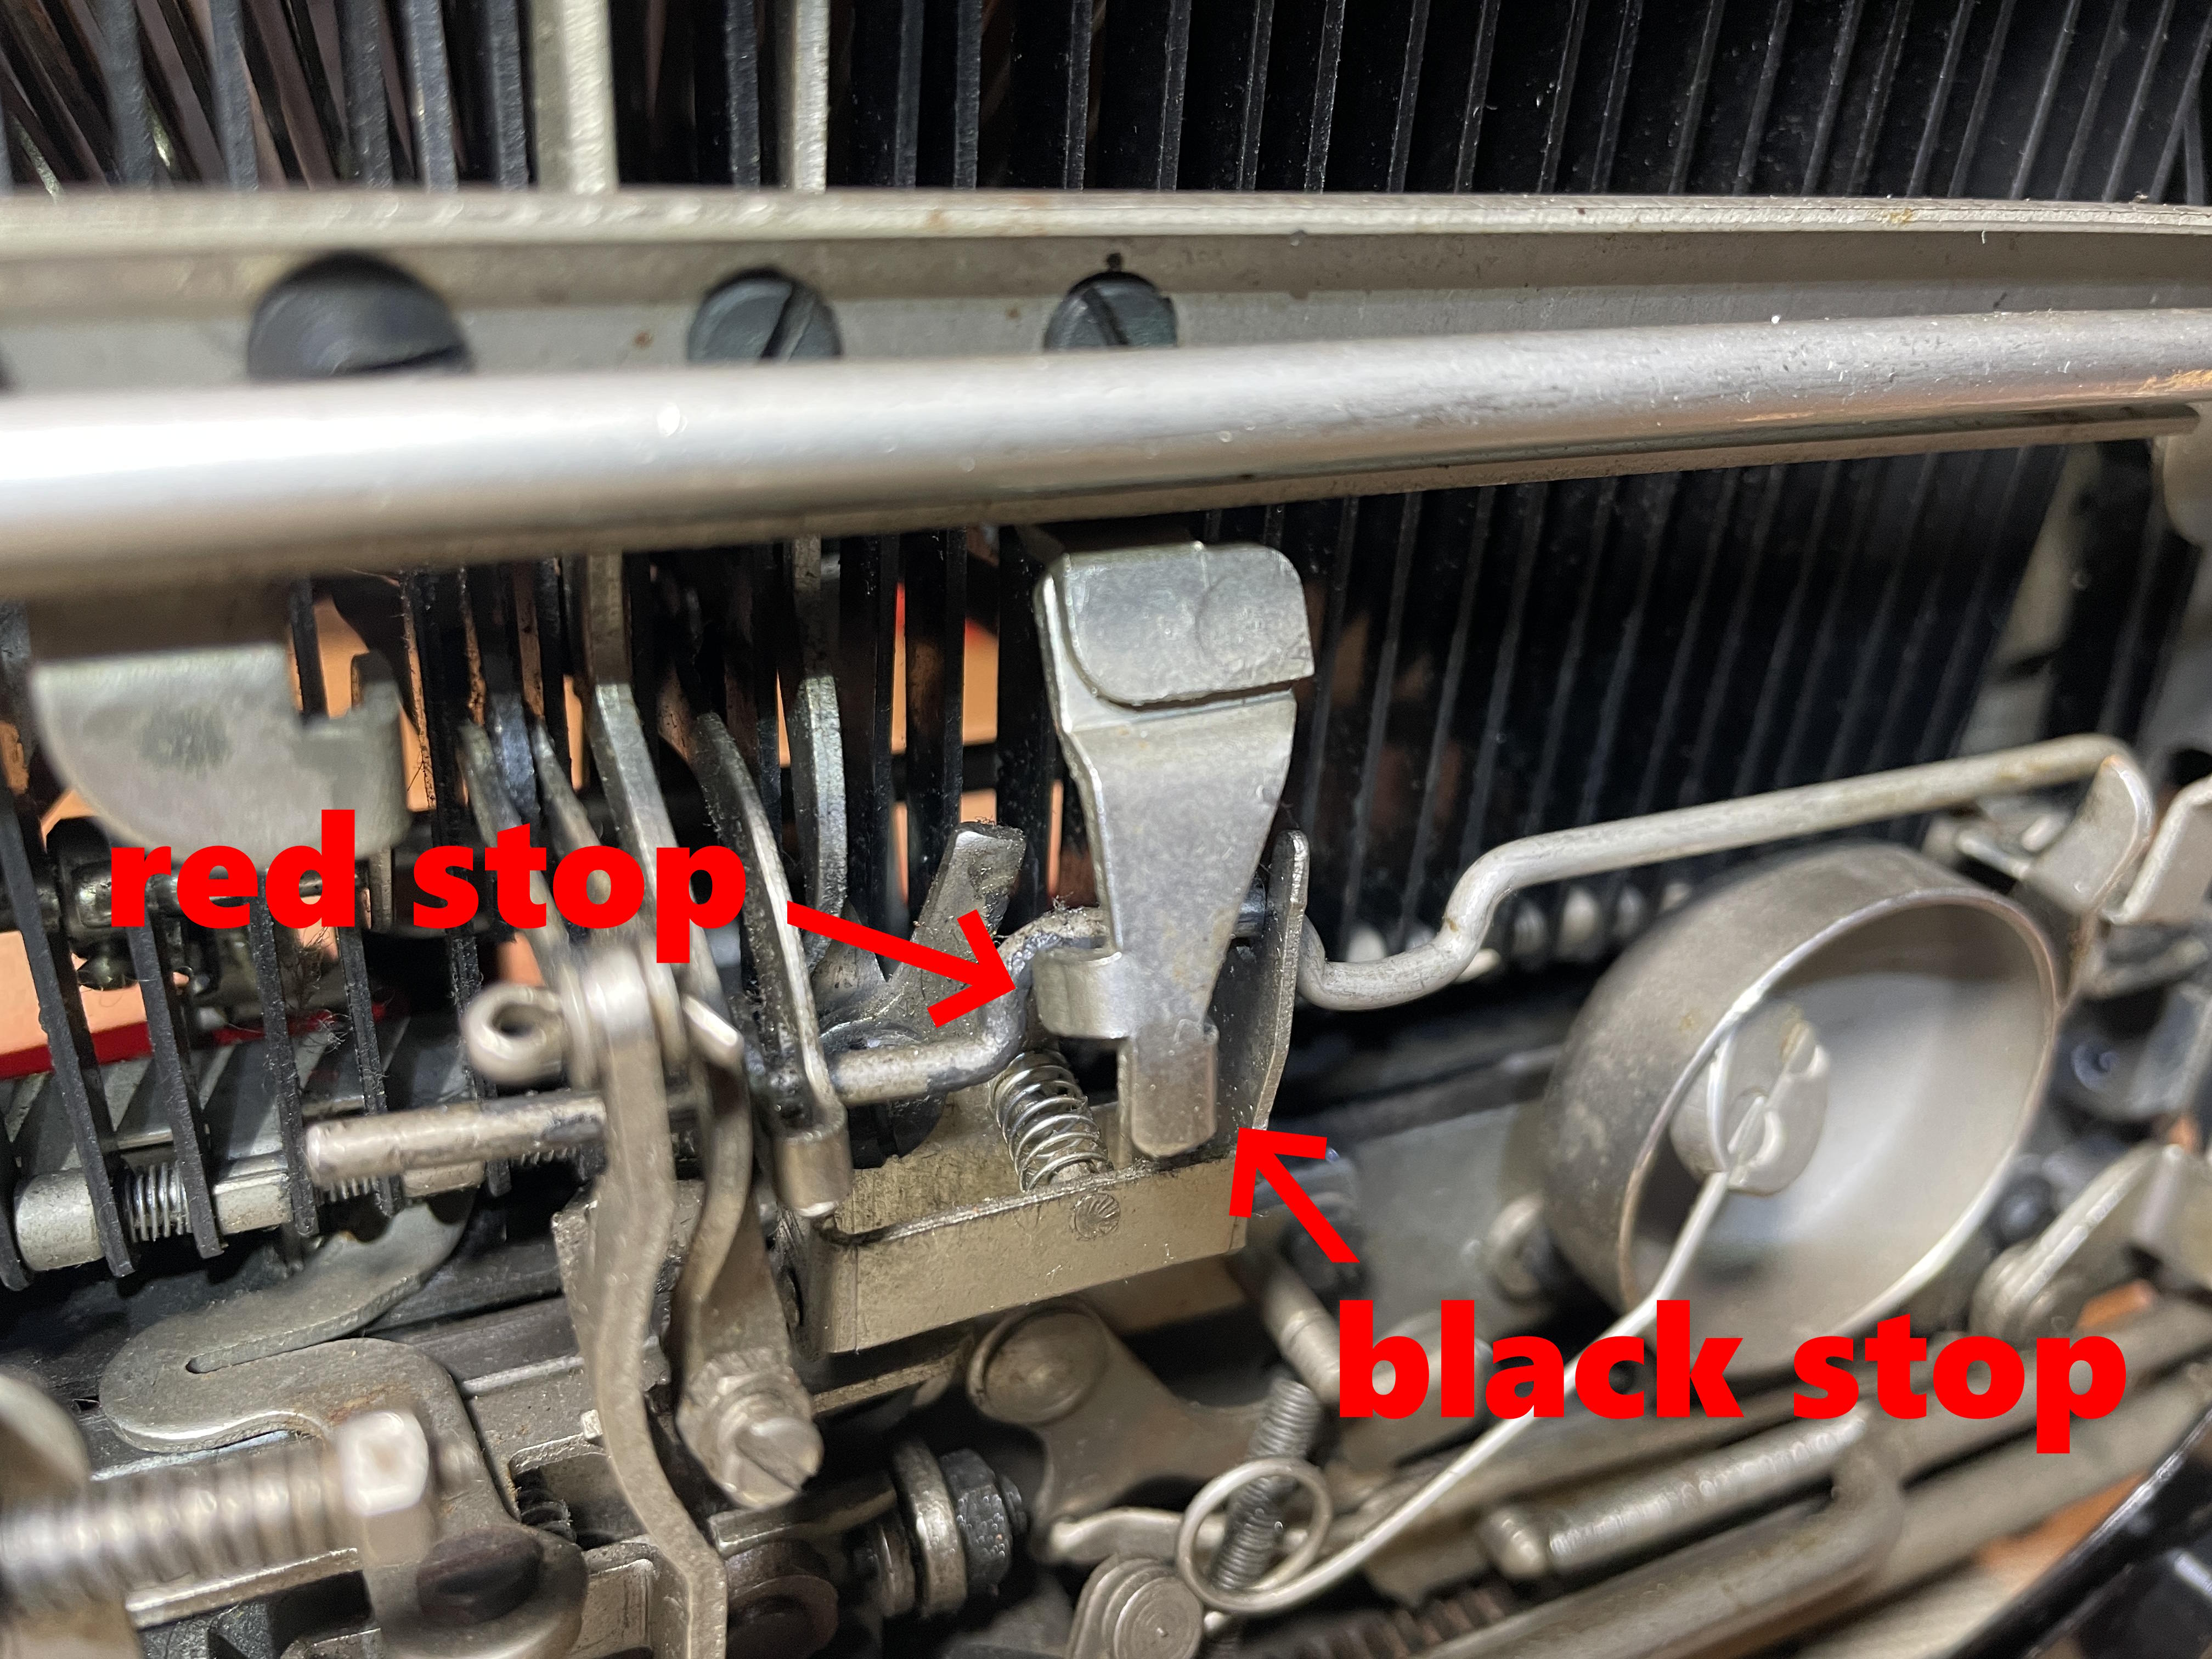
I think the imprint looks pretty good now. Red is not perfect, but it’s pretty good. I’m just going to leave it alone.
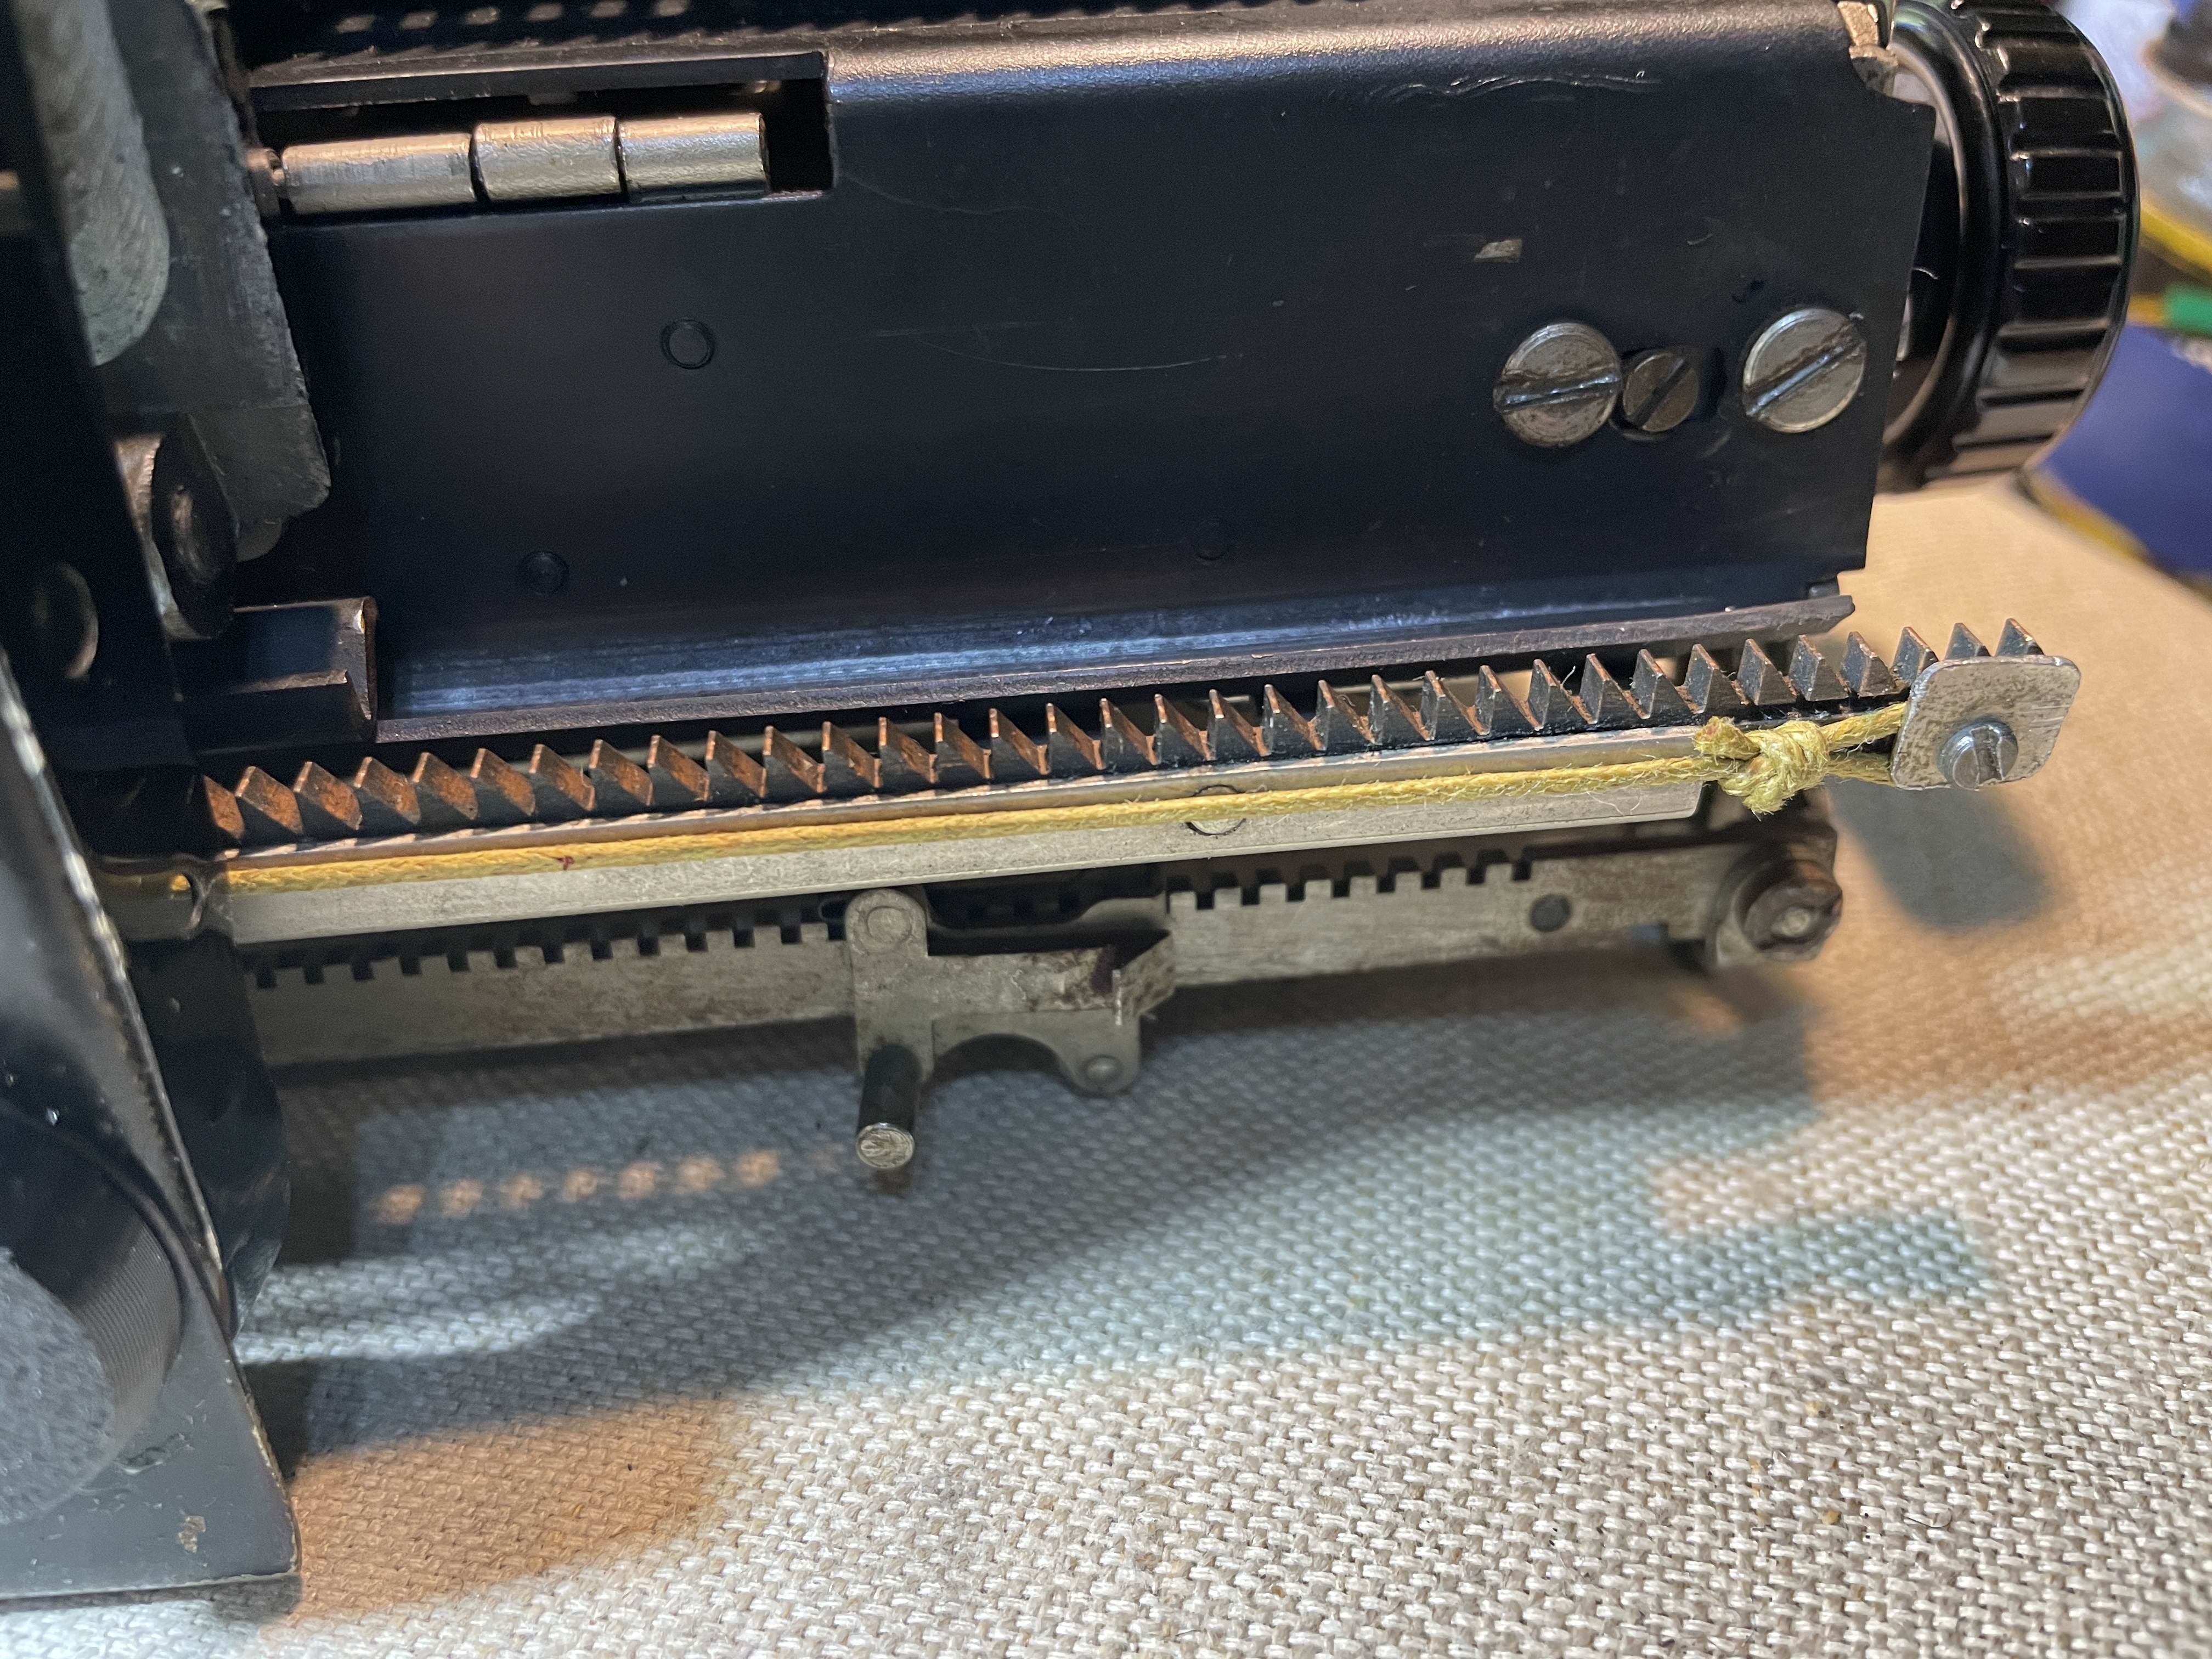
I was almost done with the Model 5. As a finishing touch, I replaced the kitchen twine drawstring. It was starting to fray because of its weird positioning along the back.
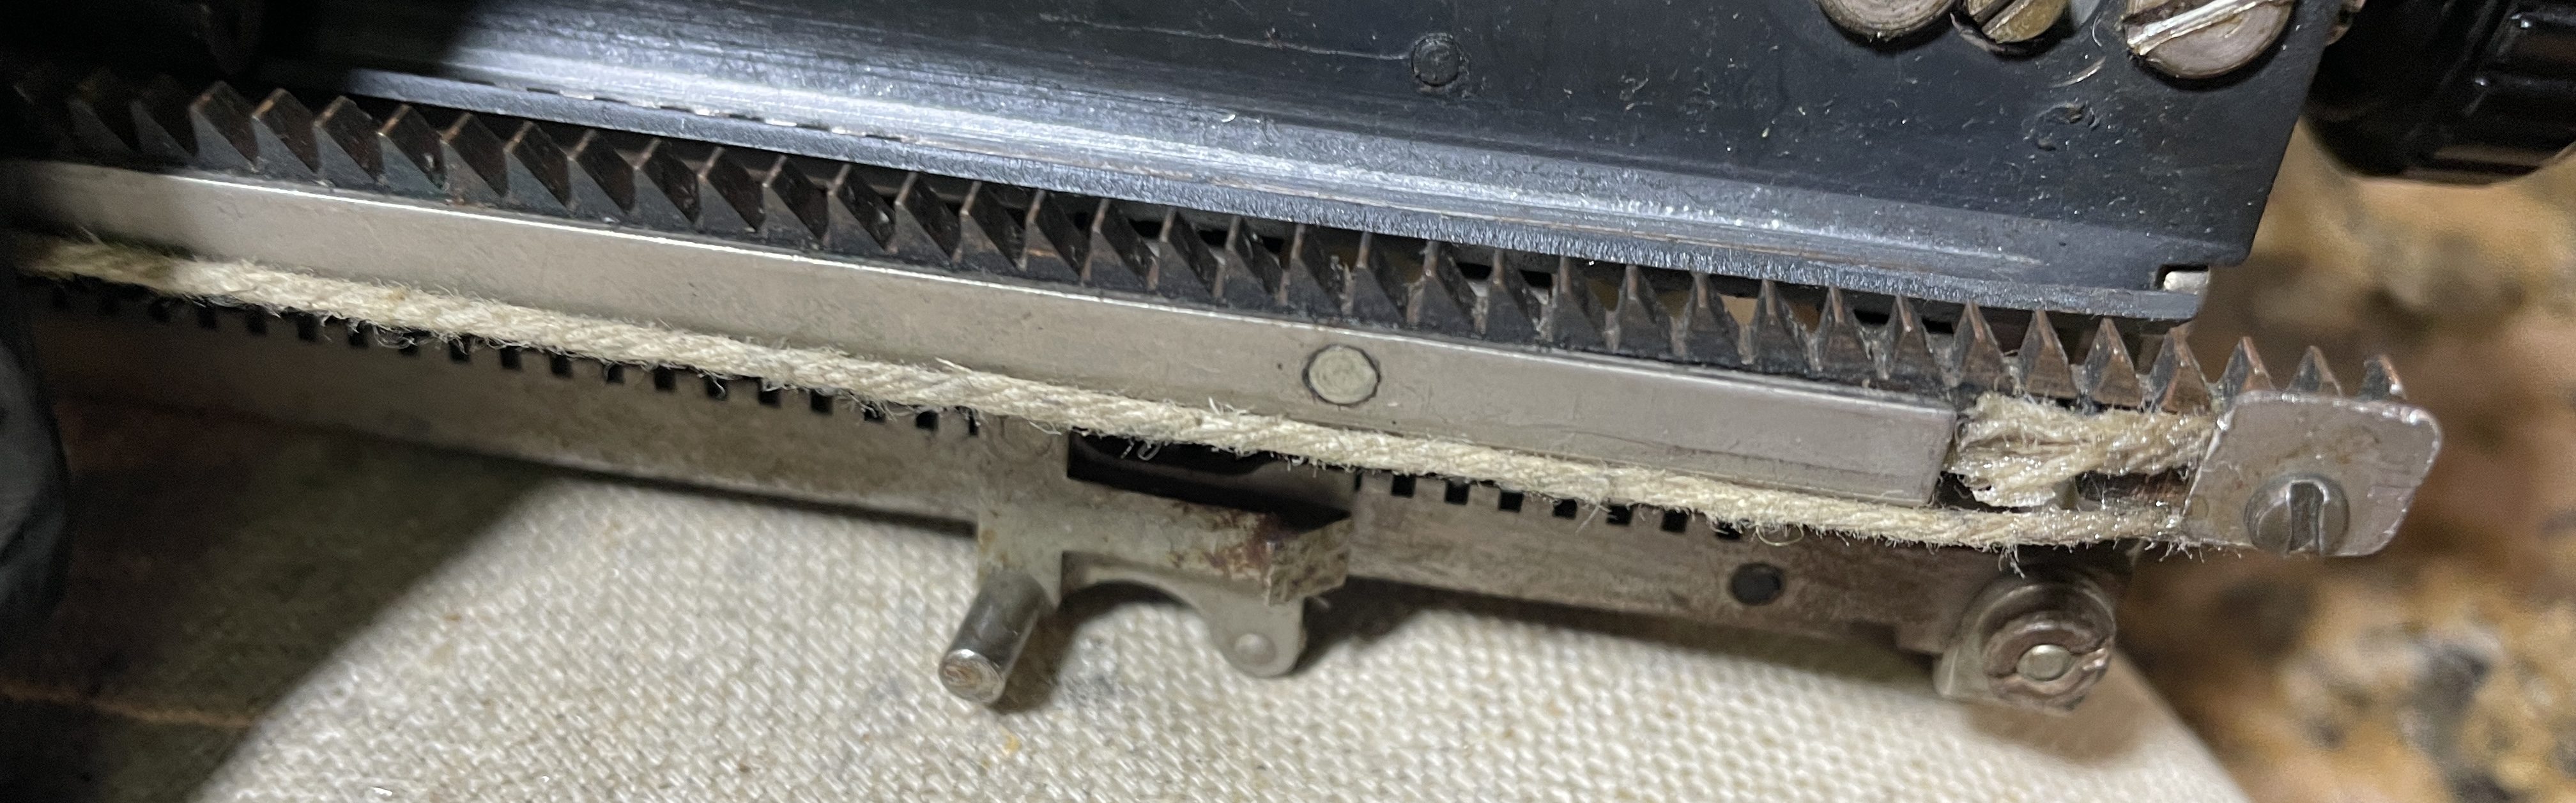
There is an excellent video on Remington Portable drawstring replacement on Duane’s Phoenix Typewriter channel. I replaced the old drawstring with heavy duty waxed cotton cord I found at a craft store in the beading section.
This beautiful little creature is ready to go back to Monica and Stephen.
My youngest graduated from college this past weekend. Many years ago, she was the one who urged me to drag home a broken Remington KMC she found on the curb. She’s the one responsible for this ongoing nonsense with typewriters.

I get a little choked up thinking about how fast all of that time went, but I need to maintain perspective. There’s a new kid and always a new typewriter to work and fret over.

Yay for Remington Portables!
Great the models can still be useful, simple as they are 🙂
The feed roolers look very good, bright and fresh. So far, my experience with TPU durability has been fine – just the z-seam can be a problem.
As always, I enjoy reading your repeairs 😀
LikeLike
I go back to your posts about Remington Portables again and again and again. Your Remington Portable documentation is my go-to resource. And thank you for posting the Remington Portable feet file at Thingiverse in 2015 (!) You were way ahead of the curve.
LikeLike
Ha! Just got your letter typed on this machine! 😀
LikeLike
😀
LikeLike
Another excellent job. You’re making me think I should get a 3D printer someday!
LikeLike
I have an entry-level printer that fortunately has extensive online documentation and associated videos. Despite the learning curve, I have been printing a lot, especially since I got some rubber-like filament. There are many, many 3D files available online.
LikeLike
Great work Mary.
I love those old Remingtons, but they can be finicky to work on.
The 3D feed roller making could lead to a career of making feed rollers.
LikeLike
I love the way these little old Remington portables type and they are surprisingly durable despite their fragile appearance.
The 3D printed feed rollers worked surprisingly well, and I liked that I was able to customize sizing.
LikeLike