Over the holidays, I sent DePiglio the Underwood 5 away to a nice farm in the country—er, I mean, to my brother-in-law’s office in Rhode Island.

In 2019, I had cleaned up the Underwood 5 and recovered the platen with heat shrink. I got it typing pretty well, but last year I decided to add a sixth layer of polyolefin heat shrink to the platen to tighten up the paper feed. Per the OAMI specs for Underwood Nos. 5 & 6, the platen should be 1.75″ inches in diameter. DePiglio’s recovered platen was a bit shy of that.

Most typewriter enthusiasts agree that having J.J. Short recover your platen and feed rollers is the best option. However, since my typewriter shtick is junkers, there’s a good chance they’ll come to me with cracked platens and disintegrating feed rollers. I enjoy hands-on crafting, so I go with the fun, cheapo solution of layered heat shrink. I’ve been told that using heat shrink for platens is a terrible idea, but come at me, bro. I’ve been able to produce heat shrink platens with very good imprints. They are kinda hard (by durometer reading) but perfectly functional—and much better than a cracked platen.
To get back to my story: I decided to add another layer of heat shrink, so I had to remove the platen. Removing the platen from an Underwood 5 shouldn’t be too hard, right? I had done it before—but how had I done it? I really had to think about that. I sifted through my brain, but the detailed memory was shrouded in the fog of war and the mists of time. I just couldn’t recall.
Carriage removal on an Underwood 5 is not too hard (see below for carriage removal photos from another Underwood 5 project), but removing the platen…hmmm.
I dug around the internet, and while there is lots of carriage removal info, there isn’t a lot of photo or video information on Underwood 5 platen removal.
I hadn’t done my usual photographic documentation when I had taken the platen out the first time. I paged through my nice spiral-bound copy of the Manual Typewriter Repair Bible and remembered. Oh yeah, it’s a little tricky.
I have now decided to thoroughly document this for posterity and my own sieve-like brain. Not only does my typewriter blog function as an exercise in creative journaling, it’s a mechanics notebook for me when memory fails.
How to Remove a Platen from an Underwood 5
So here are the full 1946 OAMI Service and Adjustment Manual instructions:


1. Remove Left Carriage End Cover Plate
OK, that’s pretty easy – just two little screws to remove and the plate pops off:

2. Loosen Right Hand Cylinder Shaft Knob Screws [2] and remove knob
Also, easy. No need to remove the screws completely, just loosen them and wiggle the right knob off, like this [note that I removed the right cover plate as well to access the knob screws more easily]:

3. Disconnect Detent Spring from Spring Post, permitting removal of Line Space Disengaging Cam
This is where it gets a little hairy. In the past, I have taken out the detent arm screw and all the little pieces involved fell out into my lap. Richard Polt has a post on Underwood 5 disassembly and the Line Space Disengaging Cam.
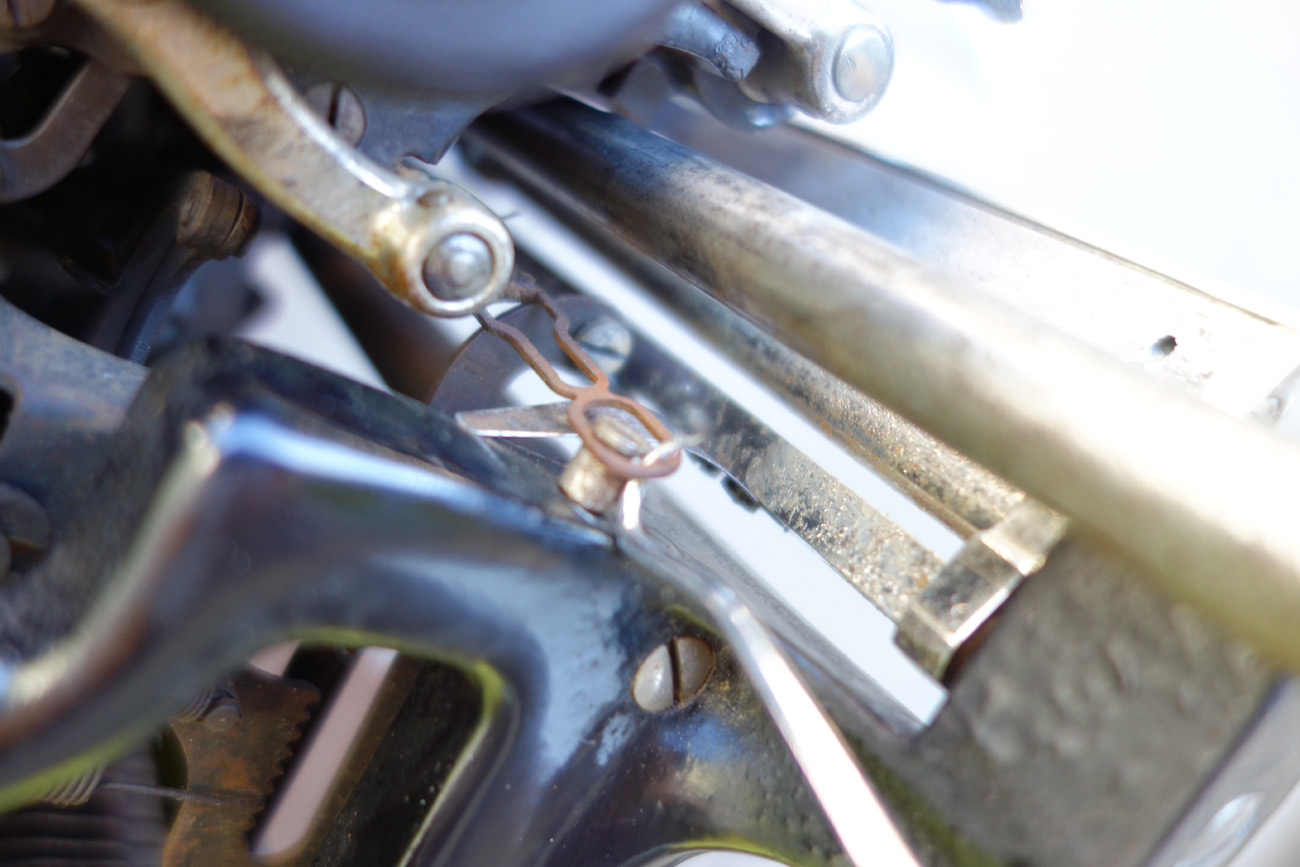
I believe that this is what is considered the “Spring Post” and the “Detent Spring”:

I used a pair of pliers to pop the spring out from under the post. Use caution. Messing with a brittle 102 year old spring may be dangerous to the spring’s well-being.

Wiggling out the “Line Space Disengaging Cam” is difficult because you have to push the detent arm toward the back of the machine to pry the disengaging cam out:

It’s very fiddly, and you may decide at this point to go off-script and remove the screw that holds the detent spring in place. Use caution if you choose to remove the detent spring screw: take lots of pictures beforehand if you do this because you will end up with a bunch of weird little pieces in your lap that you will have to put back together:

This is what happens if you take out the detent spring screw
4. Loosen Cylinder Shaft Screws [2] on each end of Platen
Easy – just loosen, no need to completely remove the set screws

5. Holding Platen with right hand, draw out the Cylinder Shaft with the Left Hand Platen Knob, from the left.
You may need to rotate and wiggle the rod to slide it out. I found it easier to pull the cylinder shaft out with the shift + lock engaged (if the carriage is on the machine) and the carriage release depressed.

6. Platen may be lifted up and out of Carriage Skeleton.
Yup.

So that’s it.
Lastly, here are some pretty pictures illustrating carriage removal on an Underwood 5. I took these while I was working on Modesto, an Underwood 5 rehab project.
My recommendation: use caution and leave carriages on typewriters if at all possible. Once the carriage comes off, the typewriter is at high risk of Parts in a Box Syndrome. Some carriages come off very easily (Oliver 9, Olivetti Lexikon 80, Fox 24, Rheinmetall KsT) but that doesn’t mean you have to take them off. I don’t want to encourage over-confident cowboying.
On a scale of 1-10 (1=easy-peasy and 10=impossible), I would rate Underwood 5 carriage removal a “3”. Taking it off is pretty easy, but you may have problems re-seating it.
How to Remove the Carriage from an Underwood 5

Ames Typewriter Mechanical Training Manual, 1945, vol. 1; courtesy of The Classic Typewriter Page typewriter manuals archive
The first step is to disengage the draw band from the carriage stud and secure it to the draw band stud on the main frame. I used a hook to do this.
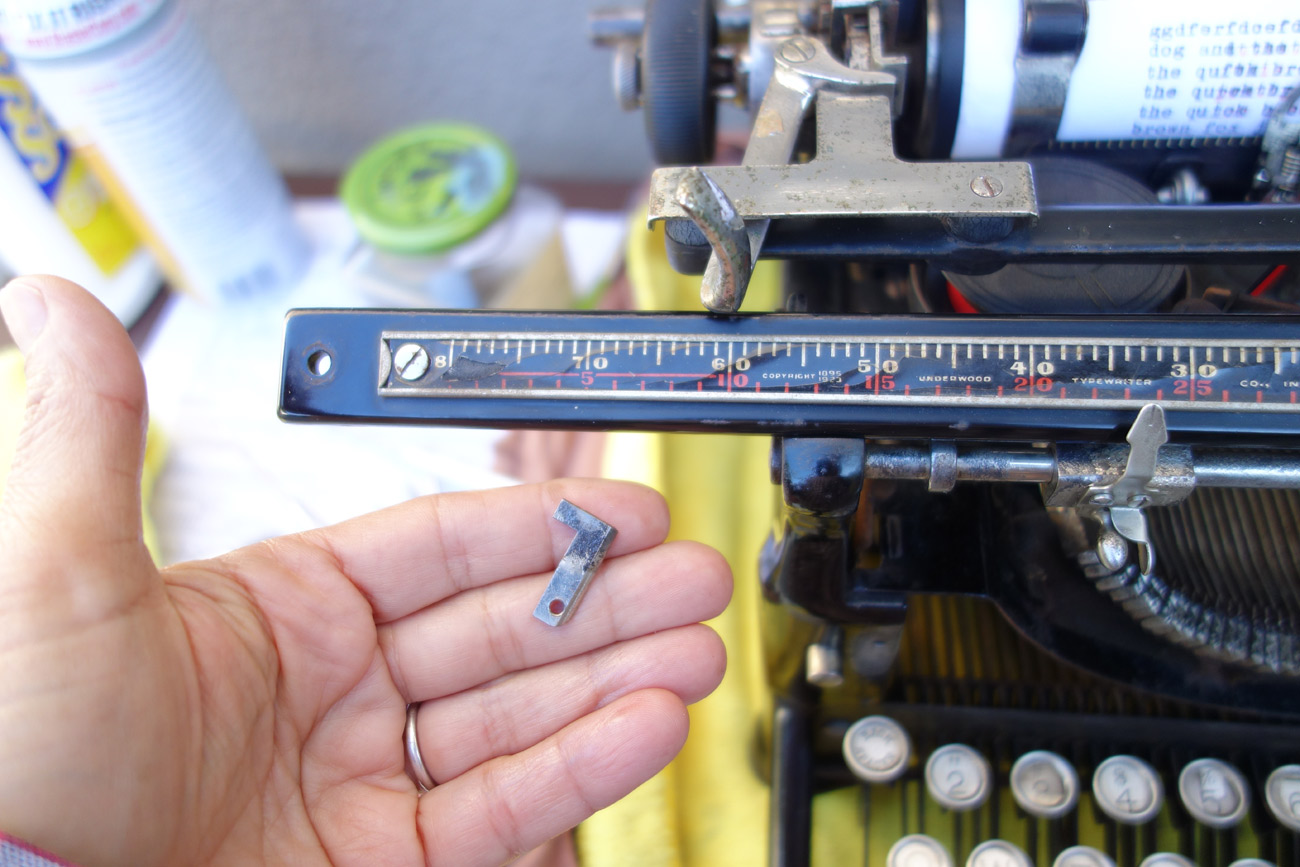
The next step is to remove the front scale plate and slide it off to the left. That’s the right carriage frame stop in my hand.
Then you lift the front of the carriage slightly…
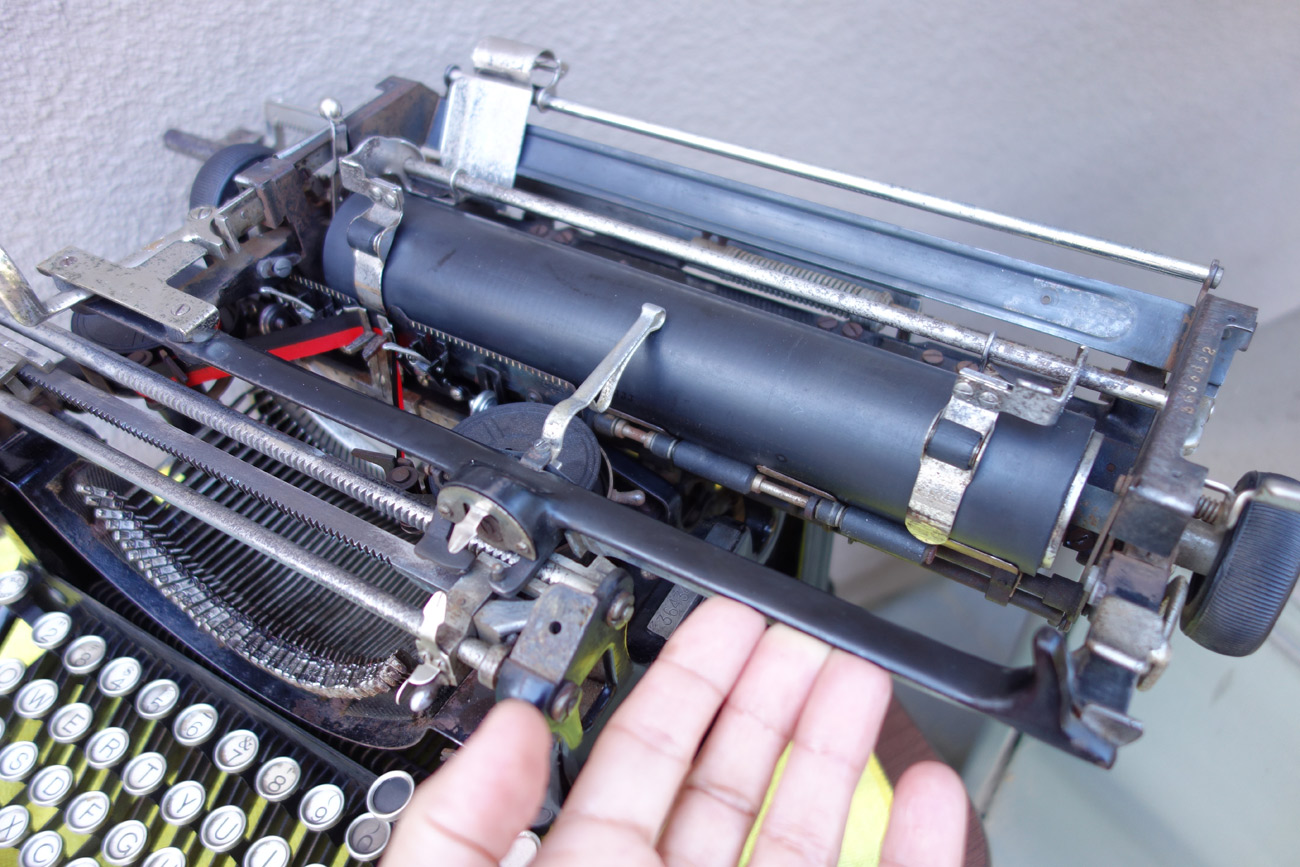
…and slide the carriage off to the right. I don’t *think* there’s a break band on an Underwood 5, so carriage slides off to right.

Ta-da! The carriage is off:
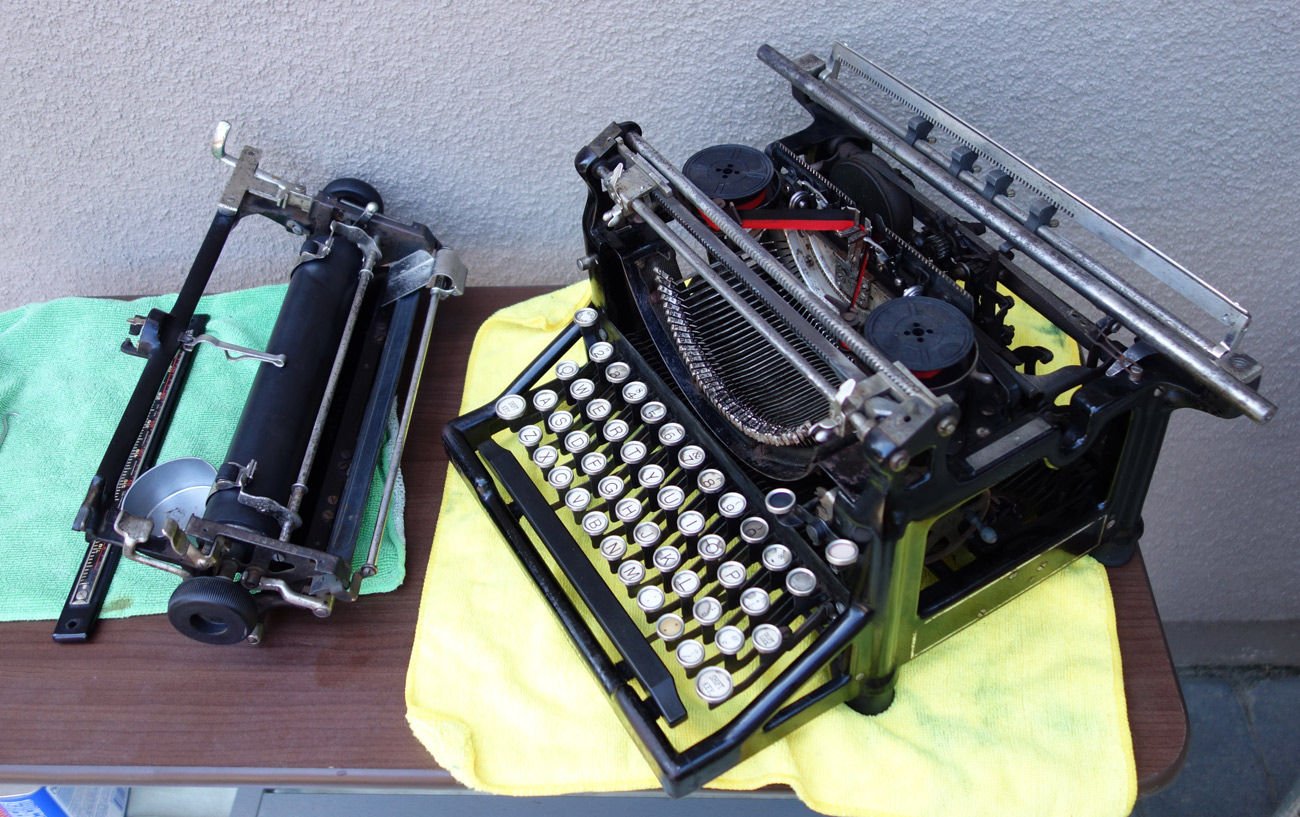
And that’s it. Maybe don’t try this if you have a history of typewriter dismemberment and mysterious bodies in boxes buried in the garage.
Lastly, here’s some bonus content for the hungry eyes out there. I dug up a nine year-old clip of me as a newbie enthusiast removing a carriage from an Oliver 9:


Loving your blog. I’ve collected and used typewriters since the late 80s, but I’m a writer not a tinkerer. I too afraid to try — maybe someday.
Anyway, do you have a post on heat shrinking? I have to admit I haven’t heard the term before.
Again thanks.
LikeLike
Nice to hear. I posted about my experience with a cracked platen on a Remington Portable #2 here:
https://myoldtypewriter.com/2019/10/06/platen-regeneration-remington-portable-2/
LikeLike
Ooh, good step-by-step; these howto’s in are often very helpful, thank you 🙂
Have both re-covered and heatshrink platens and I’d agree; for low-use machines heatshrink is fine.
Also yes on carriage removal; big differences per machine. E.g. on a Remington Portable troublesome, but on a SIM or a Royal Portable it’s a pain to get back on. (A contemporary manual could say the process was ‘vexatious’. 😉
LikeLiked by 1 person
I really appreciate the manufacturers that made it a cinch to remove the carriage and the platen. (Oliver carriages are brilliantly easy—I love the self-disengaging drawband! But removing the platen is another question.)
LikeLiked by 1 person
Yuh, the blog is an excellent notebook for putting the step-by-steps. Benefits you *and* the rest of us! 😀
LikeLiked by 1 person
If only every typewriter carriage was easy to remove like the Oliver. Like Richard stated, the platen is another story.
About the 1950s manufacturers started making their office machine platens easily removeable, but not carriages.
Adler carriages are quite easy to remove.
LikeLiked by 1 person
Years ago, my first typewriter was an Underwood 6. Without doing any research, I figured out how to remove the carriage (it is essentially the same as on the 5) and put it back. I really got beginner’s luck as it is much harder with other machines (like the Royals)!
LikeLike
Agreed. Royal carriage removal and replacement is a thorny procedure. I assume carriage removal of LC Smiths of the era is similar in difficulty – haven’t had the pleasure -yet.
LikeLike
Hi,
I just tripped over your blog about old typewriters. I know this isn’t a comment against this subject above.
I have an Underwood 5, it came to me in boxes/bags. It was grimed, stuck and someone along the way had damaged the slots in a lot of screws. But it’s rebuilt and almost working. However in another post of yours (Quinn’s) you mention the adjustment of the ‘key lever comb’. I have an issue where the capital letter is halfway up the small caps letter. I also have an issue where every type is ‘Red’ but one question at a time. What is the key lever comb and how do I move it! If I knew what the key lever comb was I could maybe even work it …but I’m having senior moment 🙂
Apologies for not contacting in the other post but it’s closed.
Thank you,
Johnny.
LikeLike
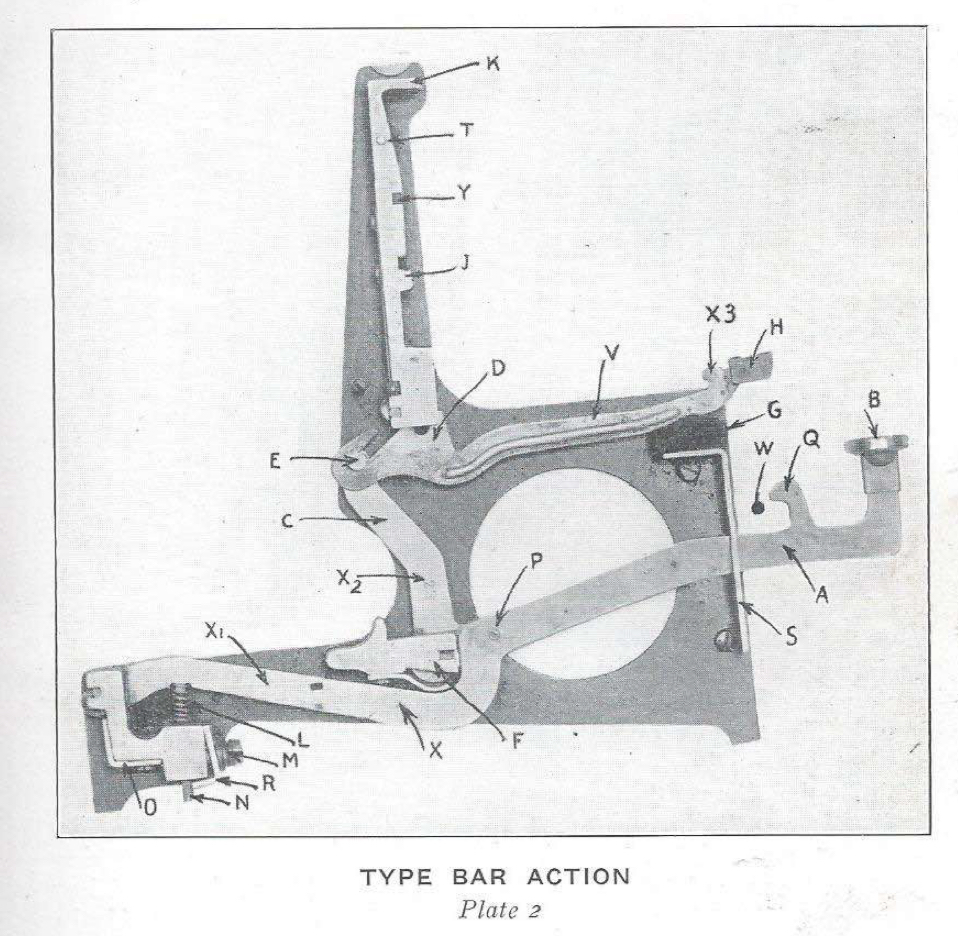
Hi Johnny! If you have have a problem with uppercase and lower case alignment, make sure you try adjusting the “motion blocks” on each side of the carriage first. See page 39 of 1920 service manual for the Underwood 3, 4 and 5. If that fails to align upper and lowercase, try adjusting the key lever comb which is “S” in the diagram below.

The comb sits right behind the key levers on the keyboard and can be adjusted once its screws are loosened.
Here is a picture of the comb on an Underwood 6 (no 5s in the house right now)
I hope this helps!
LikeLike
Maryech, thank you so much for this advice. Yes the motion blocks can’t go any further back. So will try this and balance the movements of the block and comb.
Do you think I could find this ‘comb’!!!! Of course the front cover had been fitted back on.
I managed to fix the black ink red ink issue. Repaired the ribbon pin in the escapement.
thank you so much. Will give it a go later and let you know!
Johnny.
LikeLike
Maryech,
I tried this but the comb was already at highest point. Am I chasing the wrong thing here and are to small caps too low???
Just a thought as the small caps I notice aren’t quite on the platen??
I’ve included photos (if I can get them uploaded) so you can see.
I’m pretty chuffed at getting this typewriter to almost working….more used to vintage motorcycle gearboxes…and violins ha ha ha!!
Thank you!!!
Johnny.
LikeLike
can’t see how to load photos- sorry.
LikeLike
Sorry to hear that the motion blocks and the key lever comb were a bust. Email me a photo of the printed out typing showing the misalignment of the upper and lowercase and any other photos you think might be helpful. Here’s my email address:

LikeLike